Packages
Learn about the packages and how to use these packages in your integrations.
Learn about the packages and how to use these packages in your integrations.
A package contains a set of services and related files, such as specifications and document types. When a project is created, a package is created with the same name as the project. For example, if you create a project named FlowAny, an associated package is automatically generated in the system as FlowAnyProject. When you add a service, specification, or document type to the project, they are stored in the corresponding package. So, a package contains the assets used in the project. Thus, you can easily manage all the services and files in the package as a unit.
Apart from your project assets, you can add the integration packages stored in any external repositories to a project and use it along with other assets in the project. Currently, you can add packages that are stored in GitHub.
Packages offer many benefits such as,
Modularity and Reusability: Organize and modularize your integration components and services, making it easier to reuse and share them across different projects. Version Control: Maintain and manage package versions, which is crucial for tracking changes, ensuring compatibility, and rolling back to previous versions if needed.
Isolation and Security: Provide a level of isolation, helping you control access to specific integration assets. This improves security and safeguards against unauthorized modifications.
Ease of Deployment: Simplify the deployment process by bundling related integration components into a single unit. This reduces deployment errors and ensures consistency.
Enhanced Maintenance: Easier to maintain and manage integration assets, as changes can be localized within a package without affecting other parts of the system.
Customization: Create custom packages tailored to your organization’s specific needs, promoting flexibility and adaptability to unique requirements. Thus, packages offer a structured and efficient way to manage, deploy, and maintain integration components, promoting modularity, reusability, and security for efficient integration management.
Click Projects from the top navigation menu. All projects appear.
Click a project card for which you want to view the project package details.
Click Packages. The list of packages associated to the project appears in a tabular format.
Click the package for which you want to view the details. The package details appear, see Packages Tab.
The Packages tab lists the packages used in your project. The main package created when the project was set up is highlighted in blue and appears on the first row. Custom packages imported from external repositories are listed beneath the main package.

The Packages tab displays the following details about the packages used in a project:
Package Name: Displays the name of the package. You can click the package name to view complete details of a package in the Package Details view which consists of the following tabs: Package Information, Assets, Security, and Libraries.
Version: Indicates the version number of the package.
Load Status: Indicates the package load status as follows:
Yes if the package is loaded successfully.
Partial if only some components were loaded.
No if the loading process failed entirely.

For more information about how to reload a package, see How to Reload a Package.
Actions: Lists all actions you can perform on a package. Only when the package load status is No, you get the various options as follows:

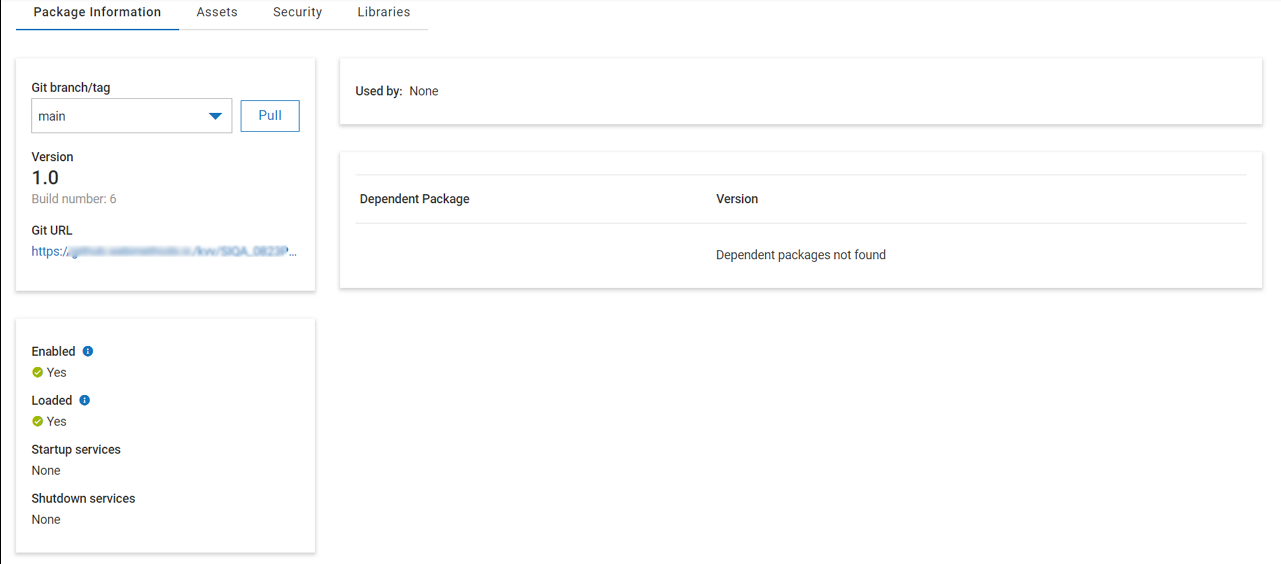
The Package Information tab lists the following details:
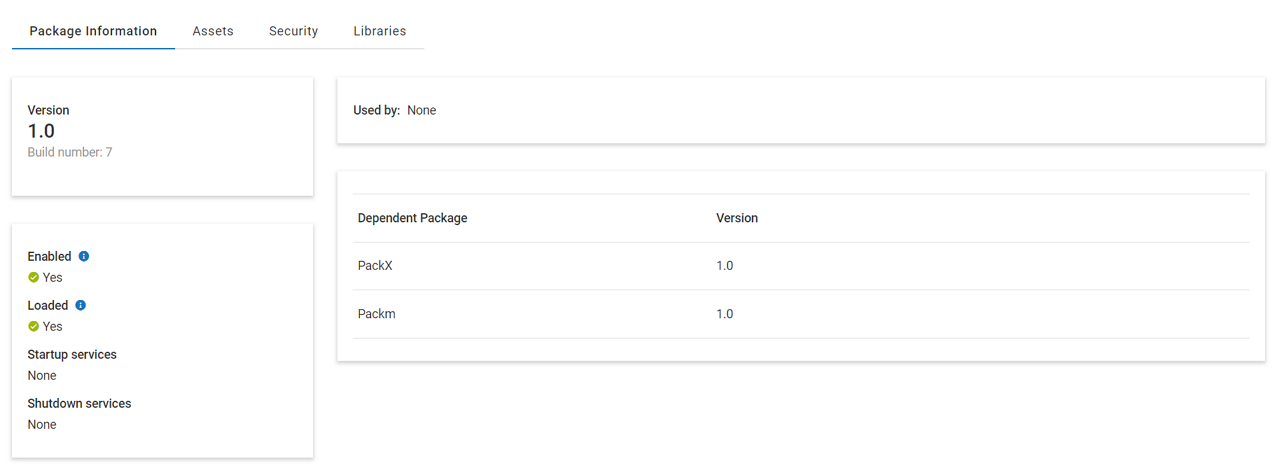
Git branch/tag: Indicates a specific branch or tag in the repository where the package resides.
Pull: Retrieve the latest changes from the remote repository.
Version: Indicates the version number in the package’s manifest file.
Build number: Unique number that a developer assigns to a package each time it is generated.
Git URL: Repository path where the package exists.
Used by: List of the packages that are using this package.
Dependent package: List of packages that are imported from other repositories to this project.
Enabled: Indicates whether a package is Enabled in cloud runtime.
Loaded: Indicates whether a package is loaded or not loaded in cloud runtime.
Startup Services: List of services that are identified as essential for proper functioning of package.
Shutdown Services: List of services that are identified as essential for the proper closing of services.
Assets are files or resources used by various services in your project. The Assets tab lists all the integration resources related to the flow services within the package.
The following asset details are displayed:
Name: Name of the asset.
Type: Type of the asset, for example, java service, flow service or any other service.
Namespace: Complete name of the asset for easy identification purpose.
Visibility: Specifies if a service is Private or Public. Services marked as Private are hidden from the general view and are unavailable in integrations by default. However, Public services are available in workflows by default.
true in the Properties view of webMethods Service Designer.Dependent Assets: Displays the integrations in which the asset is being used. See, Dependent Assets.
The Security tab in the Packages page shows a list of services that are denied by default within a package.
Key points to consider
You can modify the service information only if you have the write access for that project.
Modifications to a restricted service or Java service for a package in a runtime affects all packages in that environment, that is, the change applies to all packages, not just the one you are working on.
The Security tab displays the following information:
Restricted Services: Displays all denied services within the package.
Name: Displays services marked as denied by default.
Used In: Lists flow services where the denied service has been used.
Restrictions: Allows you to specify the access status of a service within the integration. You can set one of the following values by toggling the button:
Allowed: Select this value to allow a service to be used in integrations.
Denied: Select this value to restrict a service.
Java Services: Displays all Java services within the package. By default, Java services are not supported to run in the runtime environment. However, if you need to run these services, you have the following options:
Allow Java Services: Set with one of the following values:
Restricted: Specific Java services are allowed to run.
All: All Java services to run without individual selection.
None: Restrict all Java services from running.
Name: Name of the Java service.
Restrictions: Allows you to specify the access status of a Java service within the integration. You can set one of the following values by toggling the button:
Allowed: Select this value to allow a service to be used in integrations.
Denied: Select this value to restrict a service.
The Libraries tab provides a list of all third-party libraries such as JAR or Shared Object (SO) files uploaded in the project.

The basic library details such as name, and classpath type appear. You can perform the following operations on these libraries:
Delete the library by clicking the  (Delete) icon. The library is deleted after you confirm.
Download the library by clicking the  (Download) icon. The library is downloaded to your local system according to your browser’s settings.
Upload the library by clicking the  (Upload) icon. In the Add library page, select the library to upload by clicking the
  (Browse) icon and then choose the Classpath type as one of the following:
Server - Library is available for use to all the packages in the runtime. You must restart the runtime for the changes in the libraries to take effect.
Package - Library is available for use in the current package only and the package is reloaded automatically after the library is uploaded to the package.
You can upload, download, and delete libraries in a project package only.
You can upload libraries with the same name if the Classpath type is different.
Key points to consider for Load status usage
Ensure that the dependencies are resolved before adding the package.
If a package is not loaded and the Load Status column displays No, then the option to reload and enable appears.
If a package is not enabled, then the user cannot view the assets, and the project do not work as expected.
Go to Projects > Packages. The Load Status column reads No if a package with unresolved dependencies is added.

Click (![]() ) and select Reload.
) and select Reload.

A confirmation message appears.
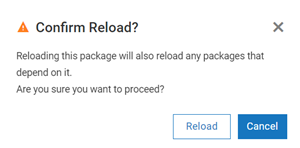
Click Reload.
You can add your own integration packages stored in an external repository to a project and use it along with other assets in the project. Currently, you can add packages that are stored in GitHub.
It is not possible to import a Integration project package into another Integration project. Projects are considered top-level integrations and must be deployed independently. Create a custom package if you want to share code between projects and use messaging for intra project collaboration.
Only the latest version of the CloudStreams Connector provider packages are supported.
Database, IBM® Power®, SAP® ERP, Kafka and MQ accounts imported from Git will be disabled. You must update the password before enabling the accounts.
Ensure that you have the GitHub account details to access the GitHub repository where the packages are available.
Ensure that you have linked your Empower credentials with the tenant to access webMethods packages. For more information, see Linking a Package Registry to a Tenant
Before exporting the packages created in webMethods Service Designer, ensure the following:
Enable auditing for each service that you want to monitor in the Monitor page. For more information about enabling auditing, see Enabling Monitoring for Package Services.
Remember to only enable this where low-level monitoring is required as it will have a performance impact on your processing, and any errors will be propagated to a parent service, which will then show up in Monitoring.
Update the package dependencies to reflect any packages that it is dependent on. This is important for dependencies on webMethods packages as it will ensure that these packages are automatically added to your target runtimes if not already present.
The Visible property is set to public to allow webMethods Integration workflows to use CloudStreams connectors or flow services created in webMethods Service Designer.
Click the Projects tab from the navigation menu.
Select a project and click Packages. The details of packages, if any, assigned to that project appear.
Click Add package. The Add Package page appears.
Select Git. The options to enter Git details appear.
Provide the following details:
In GIT URL, enter the URL of the package repository where the package is hosted.
In Source Control, select the display name of the account associated with the repository. The drop-down list displays all GitHub accounts available to you.
Click Next.
Select a particular branch or tag of the repository to use as the source for the package in the Git branch/Tag field.
Click Pull. A confirmation message appears after a successful addition of a package to a project. The assets such as flow anywhere services, connectors, and any other artifacts associated with in the package can now be used in your project.
You can retrieve the updates done to a package from the repository.
Key points to consider for successful packages uploads are as follows:
You cannot have different versions of the same package between projects that are hosted in the same runtime. You can choose to upgrade the version of a package when importing, but this also updates all other projects to that version. Downgrading is not possible.
Updates to any dependent packages are not yet supported.
It is not recommended to make changes to project package assets outside of the web tooling when using an external git repository. The only exception being assets that are not directly editable from our cloud tooling such as the README.md or GitHub actions. Any external changes can be pulled into the package through the Pull button provided in the package details view, but note that any local changes that have not yet been committed may get overwritten.
Navigate to the Package Information page.
Select the desired branch or tag from the options provided in the Git branch/tag drop-down field.
Click Pull.
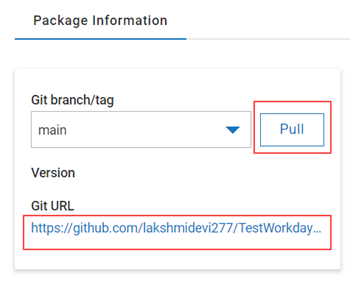
The pull action updates the packages to their latest versions available in the repositories.
If a service in the project references or depends on an asset, then that asset is considered a dependent asset for that service. The Dependent Assets view displays assets that are being used by each service in the same project or in a different project. Additionally, you can navigate to the integration where an asset is used from the Dependents Assets view.
Currently, the Dependent Assets view displays the Flow and Adapter services asset types only.
In the Assets tab, click the asset name displayed under Name. The Dependent Assets wizard appears.
Review all the dependencies.
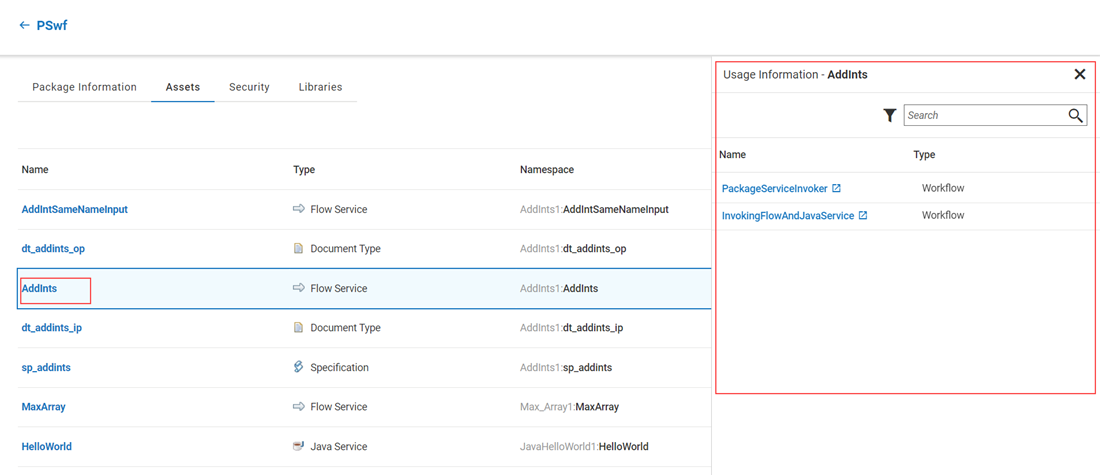
[Optional] Click the asset name in Usage Information. The integration in which the service is used appears in a new window.
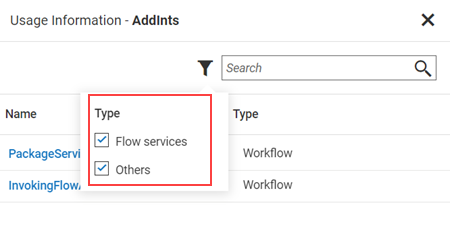
You can use the following filter options to view the usage of desired assets:
Type: Displays assets categorized on the service type, for example, Flow services. Other asset types include various assets such as document types, adapter connections, Java services, and other assets in IBM webMethods Integration.
Any services that are part of the package imported to your project are known as Package Services. You can access the services in these packages in your integrations as follows:
Workflows
Packages are listed under the Connectors > Services pane on the workflow canvas. Also, the workflow wizard has the following options:
For more information about the procedure, see Using Package Services in Workflows.
Flow Services
Packages are listed under the Package Services category in the flow step. Upon selection of a service, the following options appear:
For more information about the procedure, see Using Package Services in Flow Services.
REST APIs
Packages are listed in the Select services drop-down list in the Resources and Methods page. Upon selection of a service, the following options appear:
For more information about the procedure, see Using Package Services in REST APIs.
You can configure package service connections used in your integrations in either of the following approaches:
Approach 1: Configure the account in the Projects > Connectors > Deploy Anywhere page and use the connection details in an integration. For more information, see Add New Package Service Connections in a Project and Manage Package Service Connections Configured in a Project.
Approach 2: Configure the account in the Connections page on the Integration Runtimes dashboard. For more information, see Connections.
Assume that you have added your own integration packages stored in any external repositories to a project. For more information on how to add packages, see Adding Packages to a Project. Let us see how to use these services in a workflow and configure runtimes for these services.
Go to the project where the services are added.
Click Integrations > Workflows.

Click the ![]() (plus icon). The workflow page appears.
You can search and filter package services by either their service name or by the package name.
(plus icon). The workflow page appears.
You can search and filter package services by either their service name or by the package name.
Click Create New Workflow. The workflow canvas appears.
Click Flow Services to view the package services.
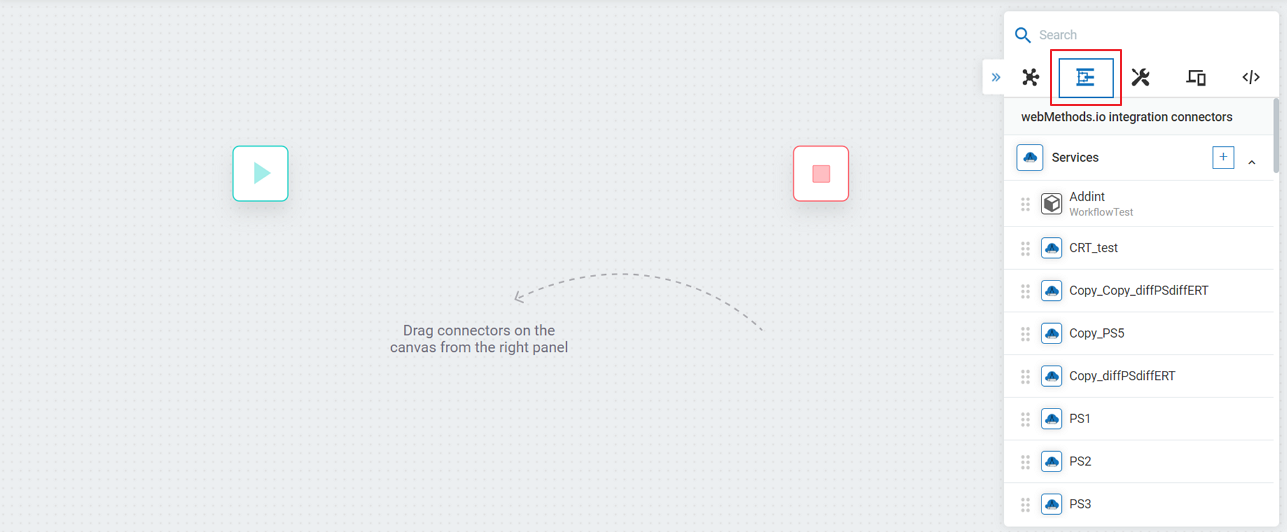
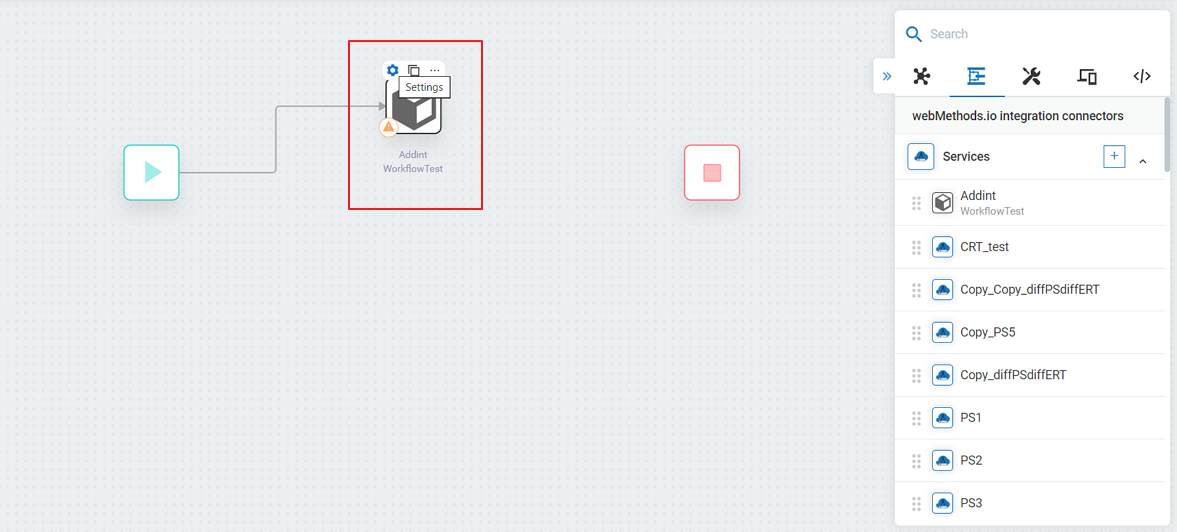
Select the package and drag and drop the package into the canvas. For example, Addint.
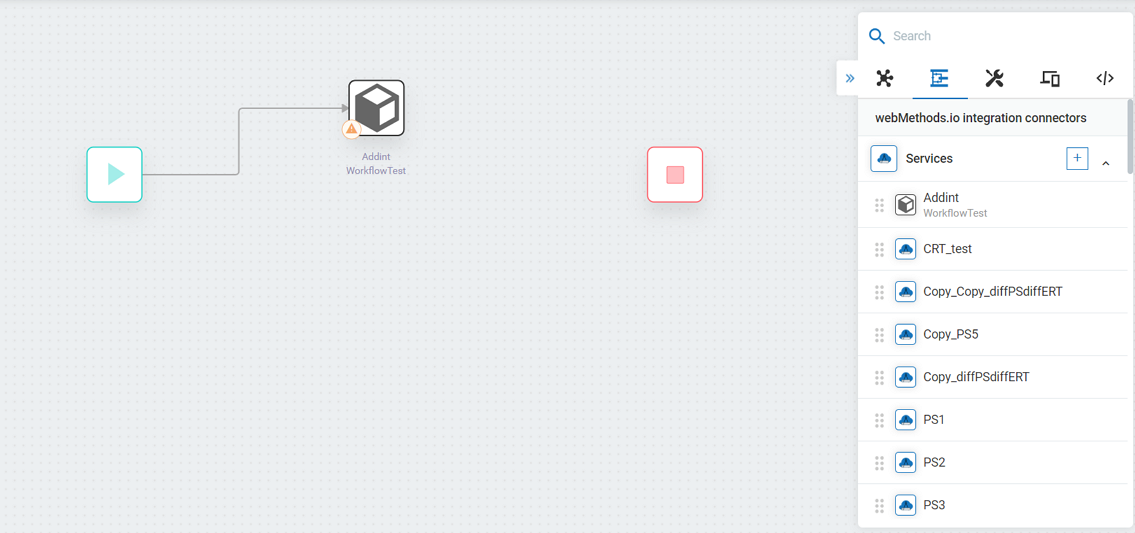
Click the Addint package and select Settings.
The AddInt settings dialog box along with the service name appears.
Select a runtime from the Select Integration Runtime drop-down list.
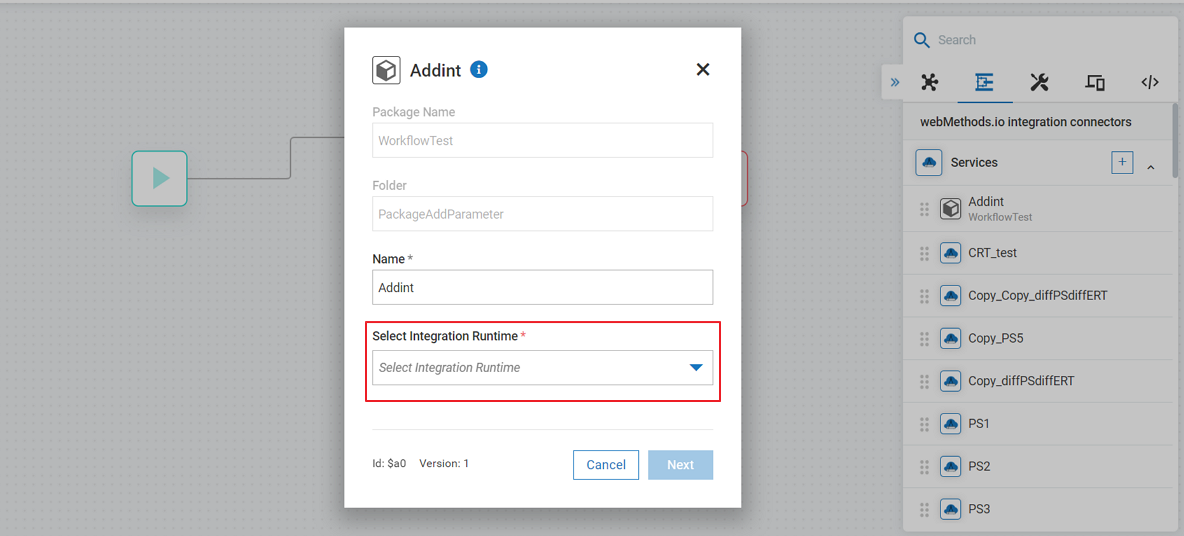
Click Next. The Incoming data page appears.
Add the input values.
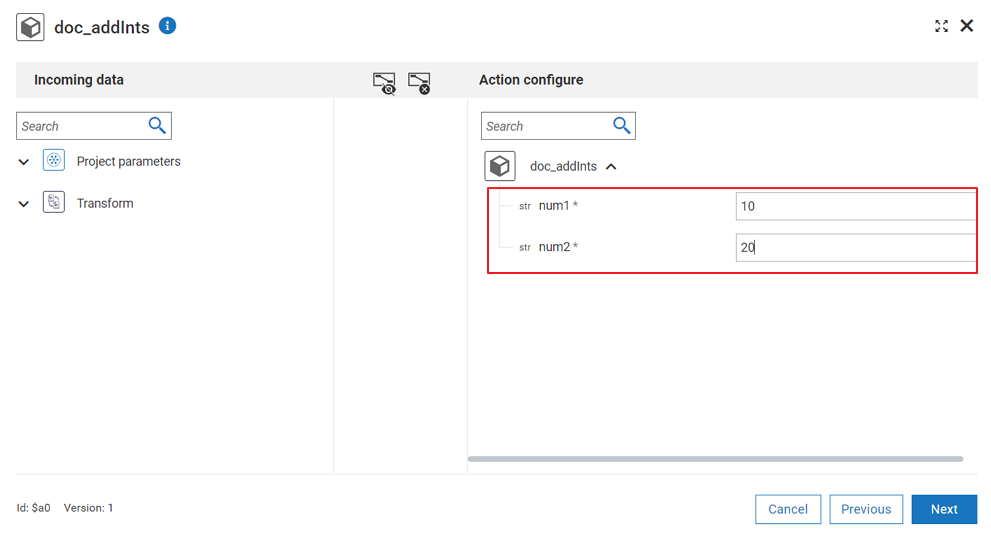
Click Next. The Test this action page appears.
Click the Sync button to sync the packages to the runtime.
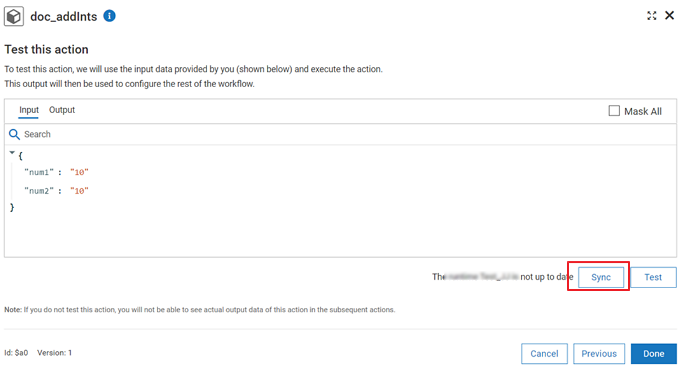
Click Test.
Click Done.
Assume that you have added your own integration packages stored in any external repositories to a project. For more information on how to add packages, see Adding Packages to a Project. Let us see how to use these services in a flow service and configure runtimes for these services.
Go to the project where the services are added.
Click Integrations > Flow services.
Click the ![]() (plus icon). The Flow Editor page appears.
(plus icon). The Flow Editor page appears.
In the flow step, click All > Package Services.
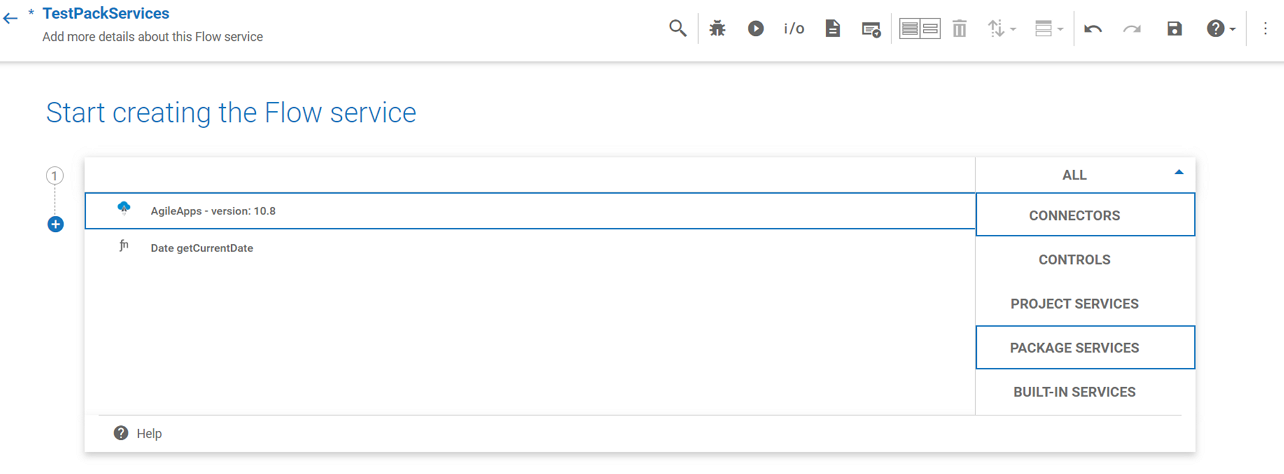
Select a service.
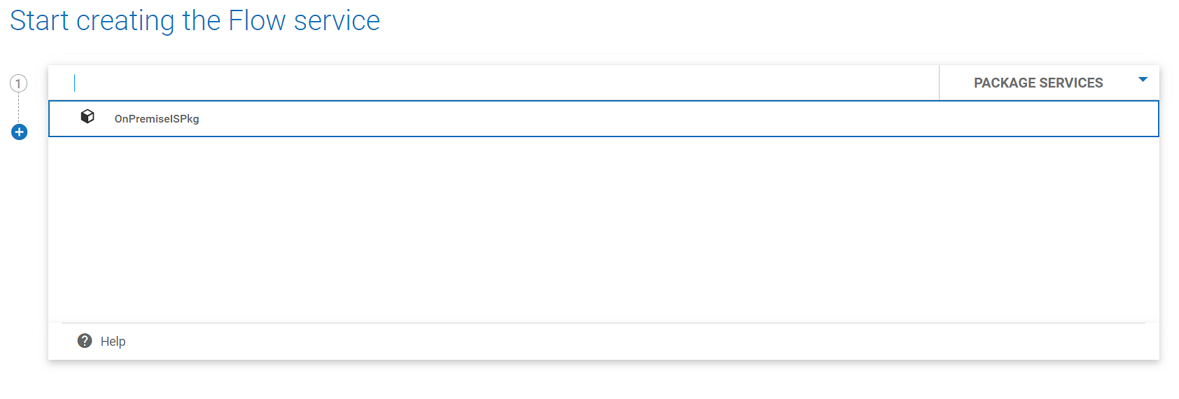
Select an operation.

Select a runtime.
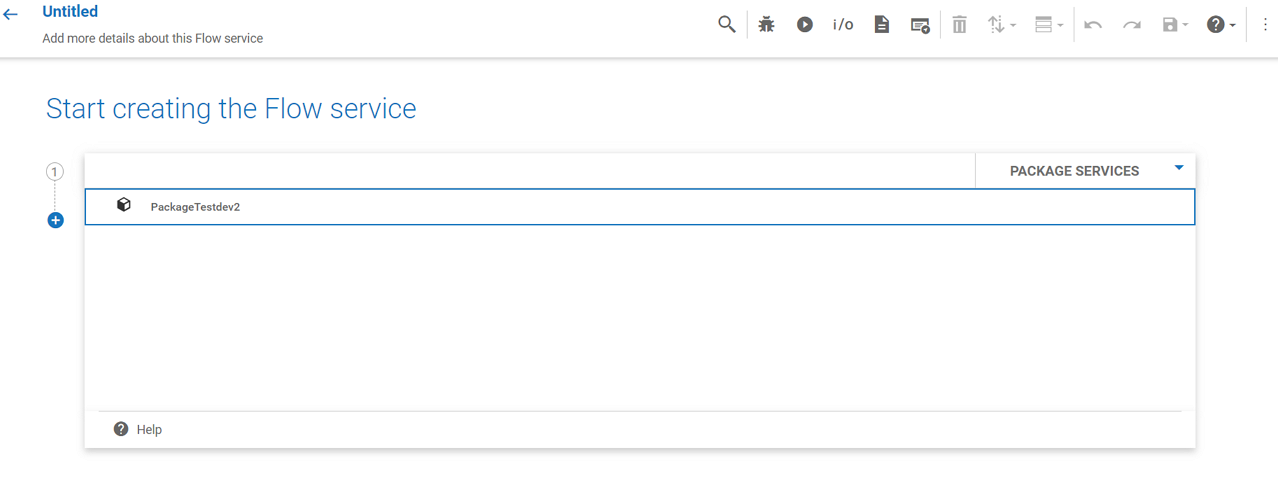
Click  to sync the packages.
An orange or red dot appears on the Sync button when user actions are required. Hover over the Sync button to view the information.
For more information on scenarios and actions, see Indications for the Sync and Run buttons in Flow Editor.
Click Save. The services are now configured to your runtime.
The steps to create a REST API using package services is same like how you create a REST API for any workflow or flow service, except for an additional step as follows:
While adding resources in the Resources and Methods page, you can select the package service you want to run through this API in the Select services drop-down list.
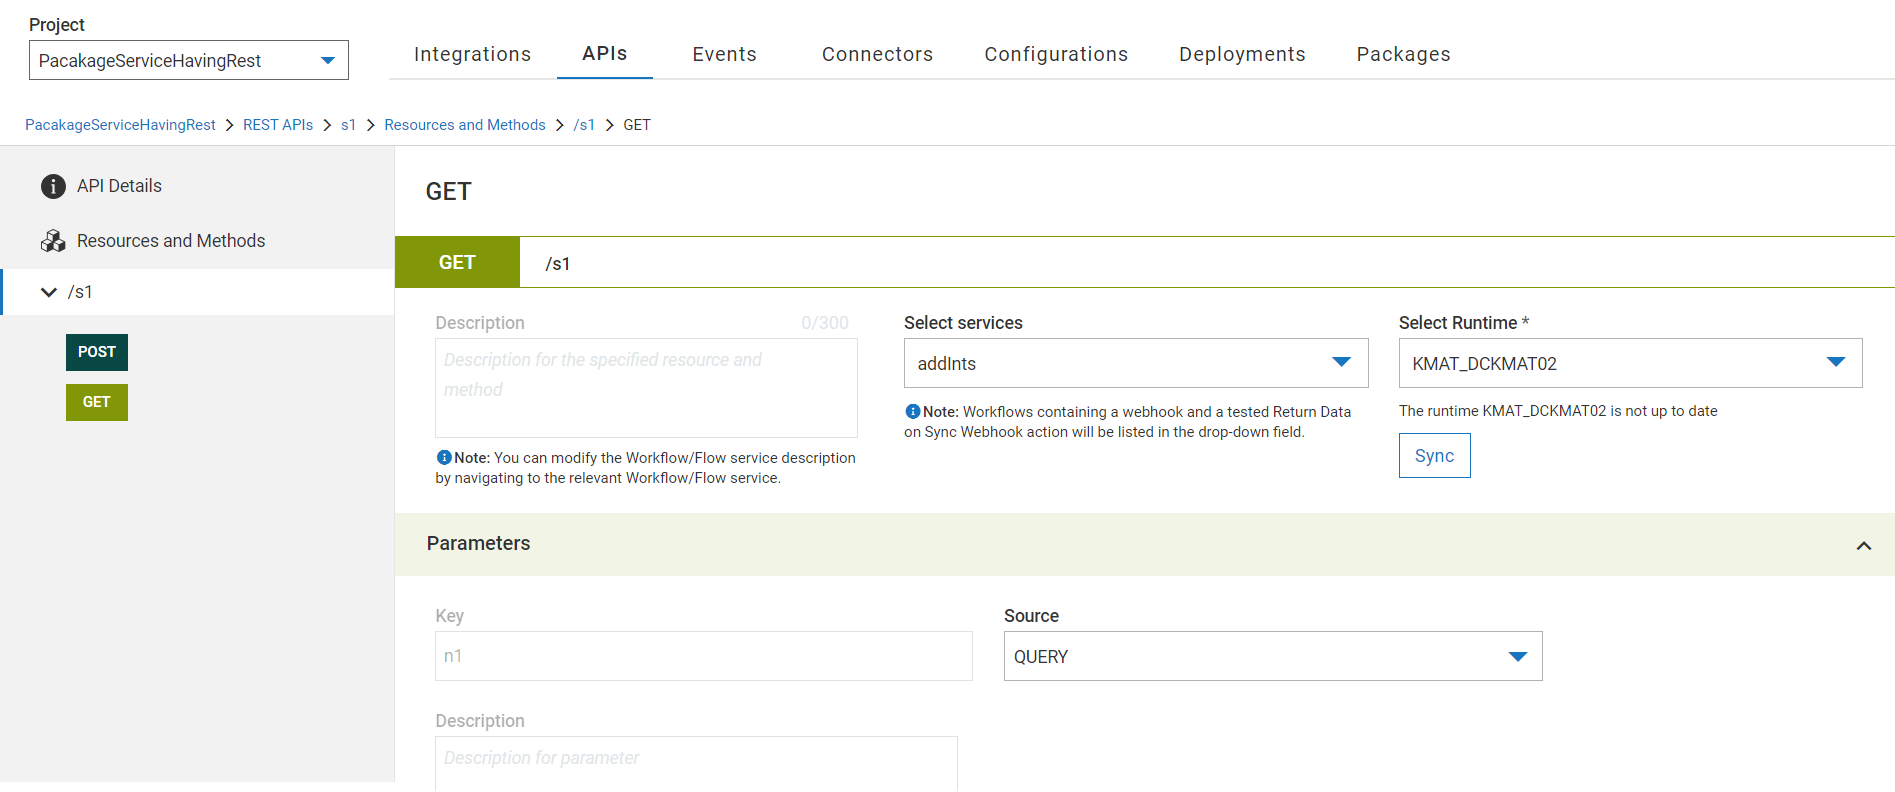
After you select a package service, the following fields appear to configure the runtime:
Select runtime: The runtime on which you want to run the package service.
Sync: Click Sync to sync the services. The service is linked to the appropriate runtime instances when you perform a synchronization operation. If the synchronization fails, the outcome may not meet your expectations. This is due to the possibility of running the previously saved service, which might not incorporate the most recent updates. For more information on the sync operation, see Sync.
Ensure that auditing is enabled for packages before exporting them from webMethods Service Designer. See, Enabling Monitoring for Package Services. In the Monitor page, to view the package service executions, you must select the appropriate runtime.
Publish-deploy for REST API using flow services and workflows containing package services is supported. However, if the package services are directly used in REST APIs, you must reselect the runtimes in target environment after each deployment. Otherwise, connections would point to the source environment only after deployment.
You can clone a REST API using package service, but you need to add the package to the target project.
The Deploy Anywhere page under Projects > Connectors displays services used in packages that you imported into your project.
The Deploy Anywhere page consists of the following sections:
Filters
Connector Table
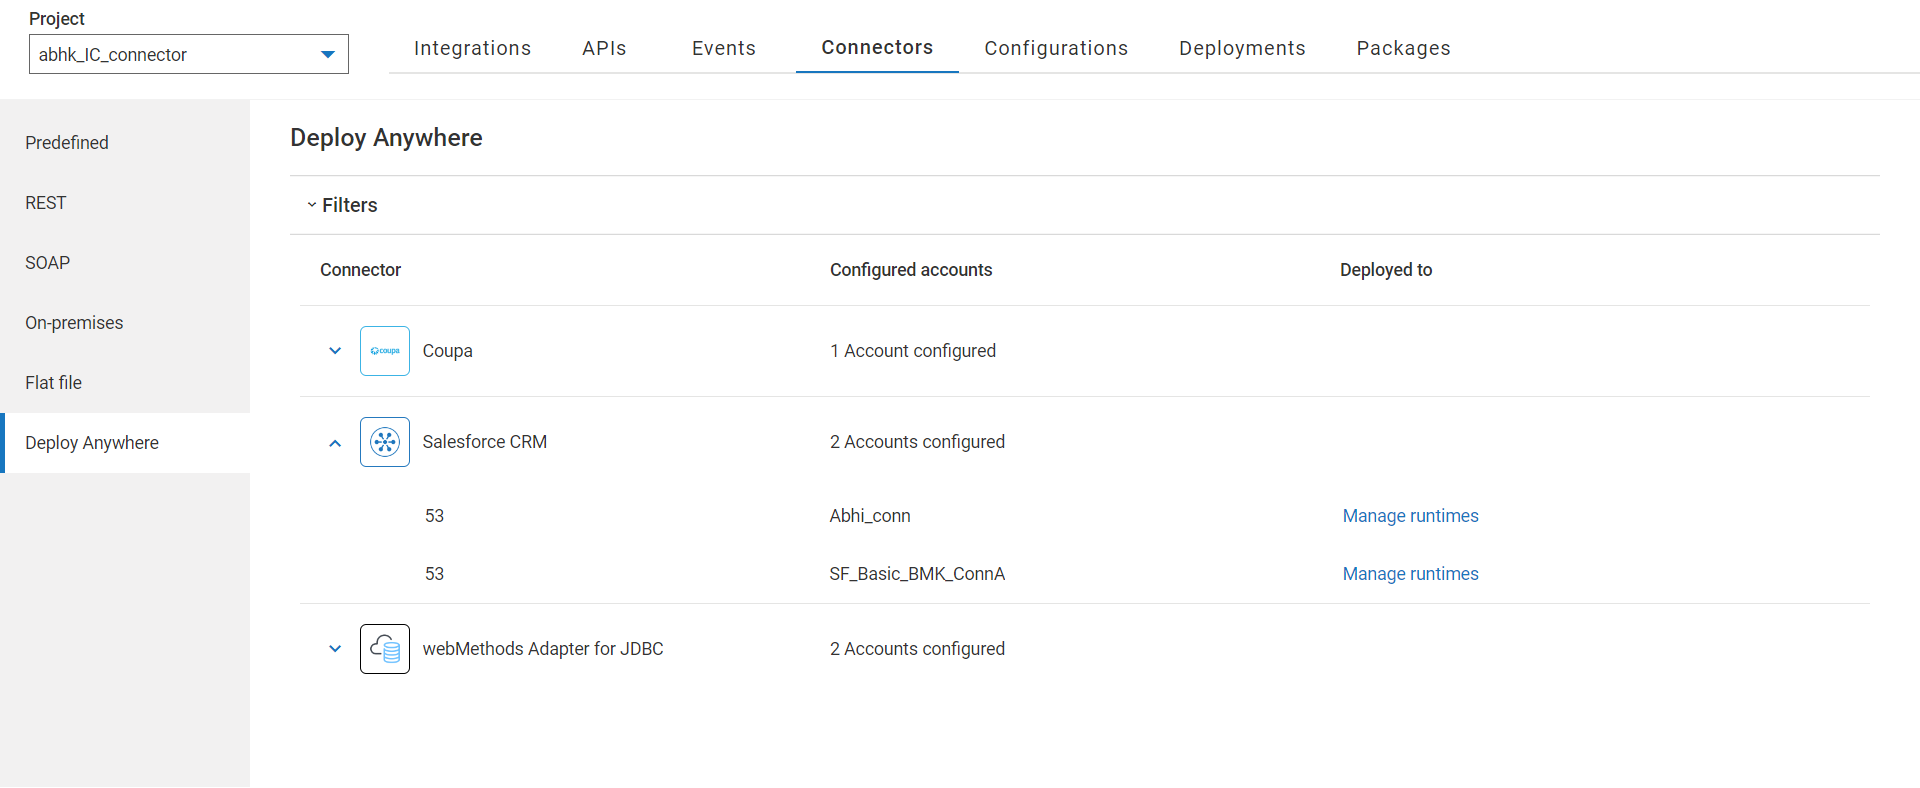
You can use filters to view the desired package services based on the following options:
Connector: Name of the connector.
Account: Name of the account used in the package service.
You can use either one or combination of these filter options to search for package services.
You can view the list of all connectors that are used in a package. The table lists the following details:
Connector: Name of the connector.
Configured accounts: List of accounts configured for this connector.
Deployed to: Add, edit, sync, or delete connections in runtimes through Manage runtimes.
Go to Projects > Select a Project > Connectors > Deploy Anywhere.
Click the drop-down arrow next to the connector you want to modify the connection. All connections created for the selected connector appears.

Click Manage runtimes for the connection you want to modify. The Runtimes with connector name pane appear with the following details:
Name: Name of the runtime.
Status: Current status of the runtime.
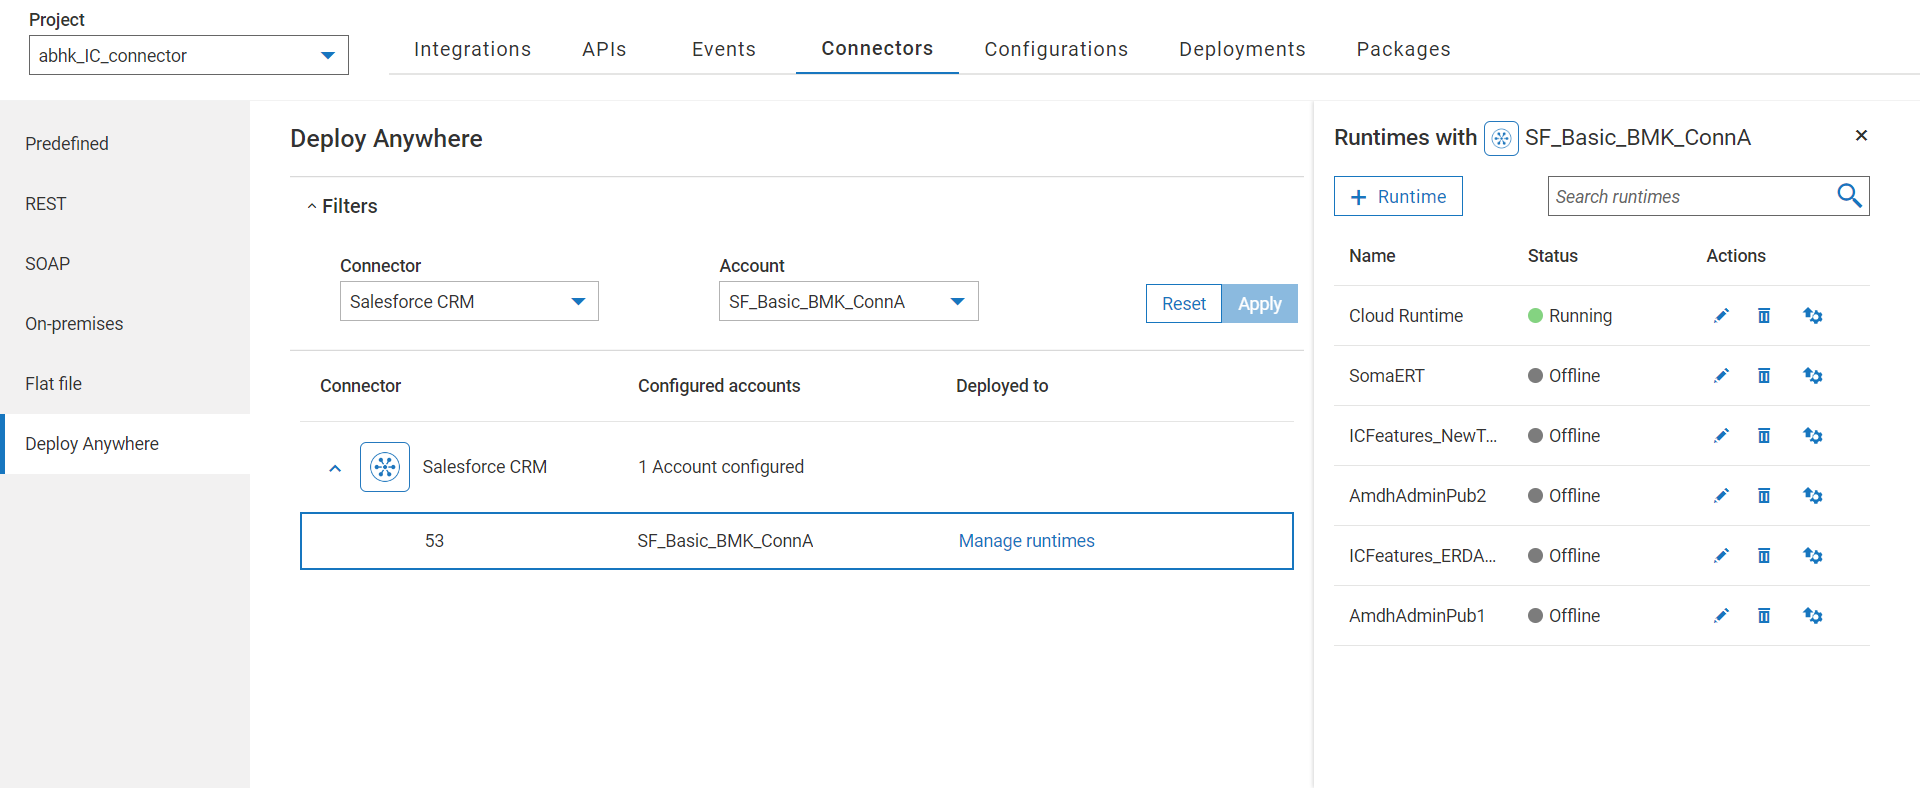
Do one of the following actions by selecting the respective button in the Actions column:
Edit: Allows you to edit the connection details. The Edit Connection properties page appears for you to modify and save the details. For more information about the fields in the connector, see the respective connector on the Connectors page.
Delete: Allows you to disable the connection to the runtime.
Sync: Allows you to synchronize all assets with the selected runtime and all instances connected with a runtime. If you are adding new assets in the runtime, the sync operation might take few minutes.
Go to Projects > Select a Project > Connectors > Deploy Anywhere.
Click the drop-down arrow adjacent to the connector for which you want to modify the connection. All connections created for the selected connector appears.
Click Manage runtimes for the connector you want to add. The Runtimes with connector name pane appear.
Click  . The Add Runtime page appears.
Select one or more runtimes from the available list of runtimes.
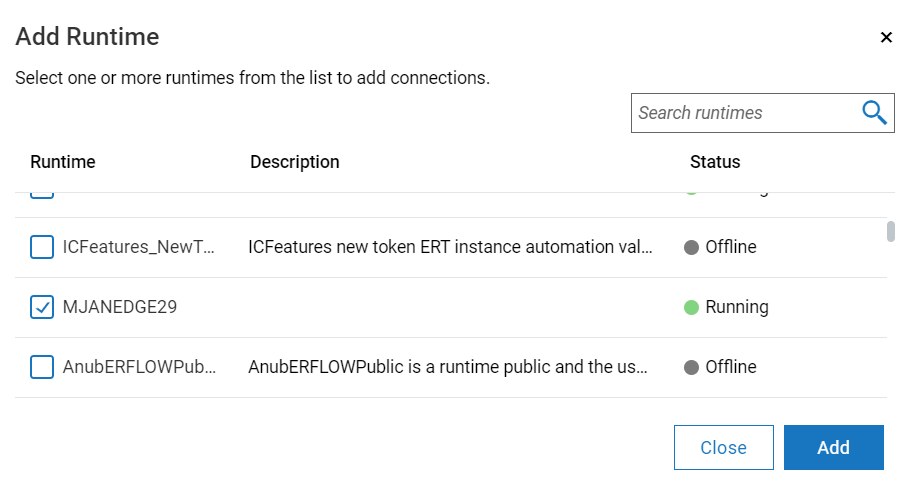
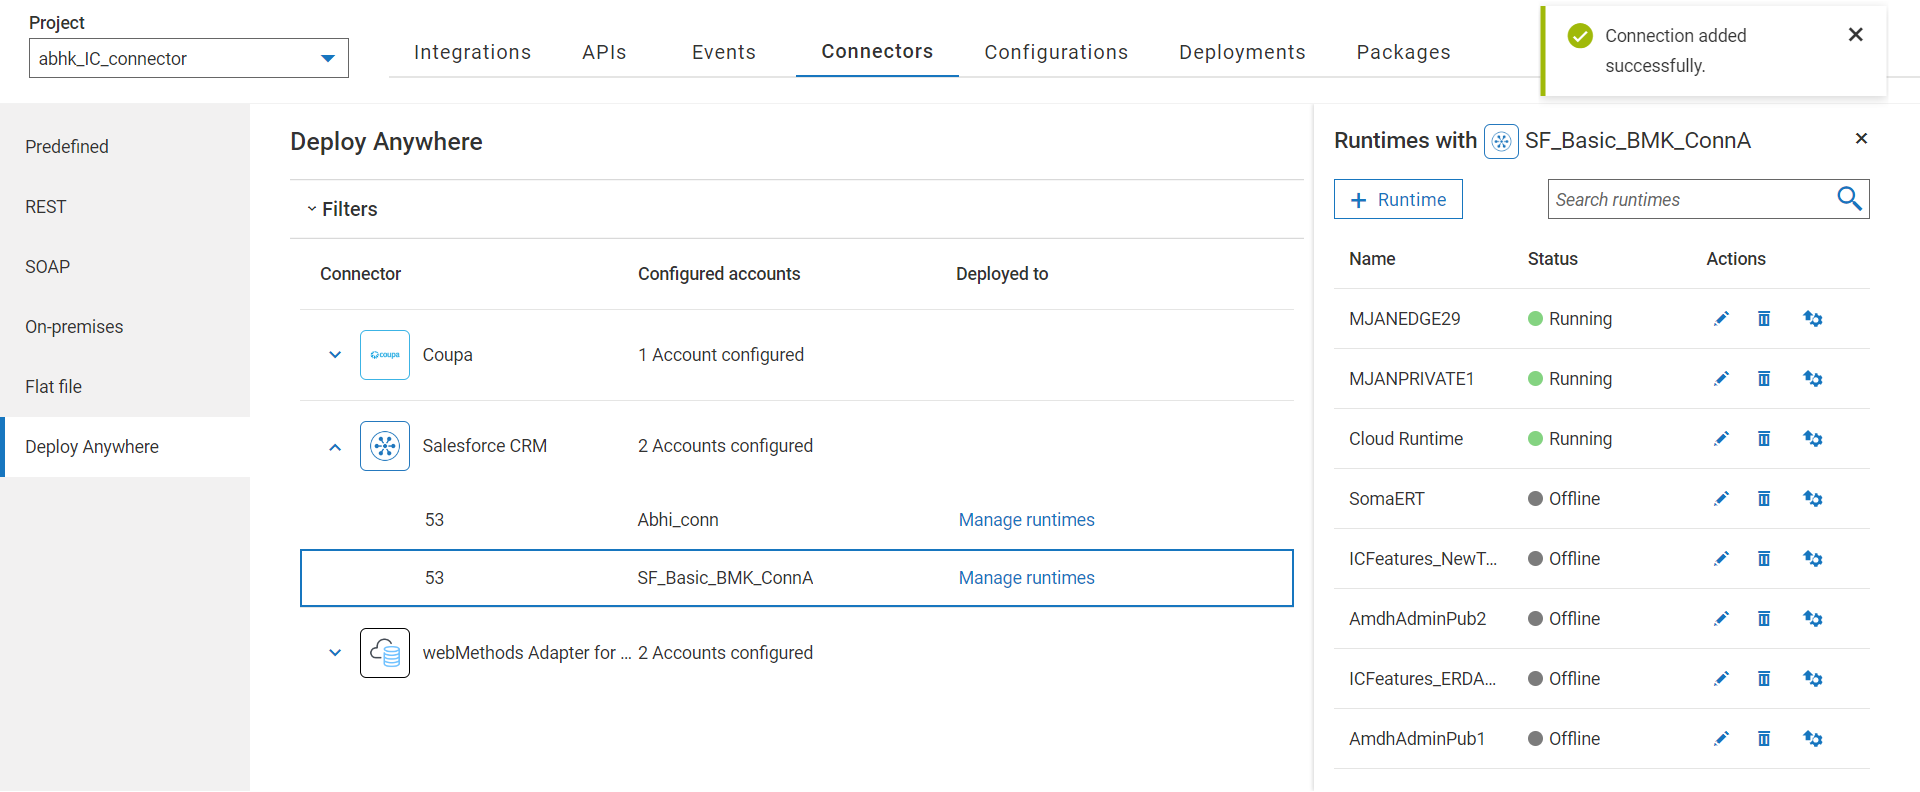
Click Add. The connection is configured in the selected runtime.
The Publish wizard does not display the package services if any integrations are using them. If you publish a project, all packages added to the project are automatically published, regardless of whether you have used any package services in the integration.
The Deploy wizard includes the Integration Runtimes page allowing you to remap, sync, and restart the runtimes.
The Integration Runtimes page lists all runtimes configured for the services used in the integrations. By default, the runtimes configured in the source environment are considered in the target environment during the first deployment. Otherwise, the most recently configured runtime is considered.

Additionally, you have options to synchronize or restart runtimes after a successful deployment.
Some key points to note for successful deployments are as follows:
Packages added to a project are not deployed if the target tenant does not support deploy anywhere assets.
Packages added to a project are neither exported nor cloned when you export or clone an integration using package services.
While importing or deploying a project using Public APIs,
The new project name provided in the payload is not considered and the same project name that is present in the source environment is used.
You must configure the runtimes in the target environment after a successful deployment.
When importing or exporting a project that includes package services, configuring the runtimes in the target environment is necessary after a successful import.
Ensure that the GitHub accounts used for adding packages in your source environment are also configured in the target environment.
Ensure that the runtimes required for running package services used in the integrations are configured in the target environment.
Log in to your tenant (destination).
Go to Projects dashboard. If a new deployment is available for a project, then a message appears on the project card.
Click the project card that has the deployment message. A confirmation messages appears.
Click Yes. The Deployments page appears listing all deployments.
Click Deploy. The Integration Runtimes page in the Deployment wizard appears.
Select the runtime from the Target Integration Runtime drop-down list.
If the integration is already present in this project and has the same package services configured in it, then the runtime is selected based on the current configuration instead of what is present in the deployment.
If the runtime does not exist in the target environment, then an error message appears, and you need to either create a runtime or select a runtime from the existing list.
Do one of the following actions:
Select Sync all the target runtimes on deployment if you do not want to reconfigure the package service connections after deployment. The Restart Options appears.
Clear Sync all the target runtimes on deployment if you need to reconfigure the package services connections after deployment.

Click Restart Options to select specific runtimes that must be restarted after a successful deployment in the Selected target integration runtimes to restart page.
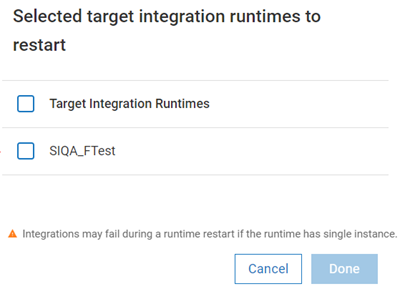
Offline runtimes are not listed in the Selected target integration runtimes to restart page.
Syncing and restarting happens only for the running runtimes.
Cloud runtime cannot be restarted.
The sync and restart operations are asynchronous processes and may take additional time even after the project has been deployed.
Click Next. The Accounts page appears. Follow the steps mentioned in the Deploying Projects section from step 5.
Deployed project cannot be edited in the target environment as they do not retain any link to the original version control. Instead make changes in your development environment and redeploy. Likewise, deployment from a higher to lower environment is not supported.
After deployment, projects previously linked to an external repository now utilize the default repository.
Verify your configurations. For example,
Reconfigure the package service connections, if any.
In REST or SOAP APIs, if you are using flow service containing package services, then you must reconfigure the runtime configurations post deployment. This is because the runtime details selected during the deployment are not retained.
Test and monitor your integrations in the target environment after successful deployment.
By default, integrations that use package services are not visible in the Monitor section. To monitor, you need to enable auditing in webMethods Service Designer before exporting the services.
For more information on how to enable audit for a service, see Enabling Audit in the webMethods Service Designer in webMethods End-to-End Monitoring documentation.
This table provides a list of capabilities that are supported when a package built using IBM webMethods Designer is imported into IBM webMethods Integration project.
| webMethods Integration Server Configuration or Asset Name | Minimum Runtime Version Supported | Description |
|---|---|---|
| Flow Service | 11.0.0 | Flow services built using supported assets can be imported into IBM webMethods Integration projects and deployed to runtimes. |
| Java Service | 11.0.6 | By default, Java services are denied from execution in the runtime. If required, you can enable execution selectively from the Security tab of the imported package. |
| Map Service | 11.0.0 | Map and transformations are supported in runtimes. |
| Document Type | 11.0.0 | Document types in the package are supported and can be used by services in the runtime. |
| Flat File Dictionary | 11.0.6 | Flat File dictionary in the package is supported and can be used by services in the runtime. |
| Flat File Schema | 11.0.6 | Schema in the package is supported and can be used by services in the runtime. |
| Schema | 11.0.6 | Schema in the package is supported and can be used by services in the runtime. |
| Global Variables | 11.0.6 | Package scoped global variables are supported and can be used within the packages in the runtime. |
| FTP | 11.0.7 | Only outbound FTP is supported, allowing users to send files to external servers. Inbound FTP is not supported, that is, runtime cannot act as an FTP proxy. Files can be stored externally in a mounted volume. Ideally, it is not recommended to store files within the container, as containers are volatile. |
| HTTP | 11.0.7 | Only outbound HTTP is supported. Inbound FTP is not supported for deploy anywhere integrations. However, inbound calls are supported for regular workflows or flow services in IBM webMethods Integration. |
| SMTP | 11.0.7 | Only outbound SMTP is supported, and users can send outbound emails using the pub.client.smtp services. SMTP aliases are not supported in version 11.0.6. |
The Packages feature does not support publishing or deploying packages from one project to another.
Currently, projects are hosted in a single shared runtime and any imported packages are implicitly shared with other projects. Hence, services may still run even after removing a dependent package from your own project if it is referenced elsewhere. However, you must not rely on this and must ensure that the dependent packages are referenced in your project as syncing with other runtimes may fail due to the missing package.
Simultaneous import of packages containing assets with the same namespace is not allowed. Attempting to import under such conditions may result in unexpected behavior, as all assets might not be successfully imported.
When package services use a document reference as input and reference it, all the fields included in that document reference are not displayed in the Flow Editor.
The missing package dialog box only appears during export-import scenarios. The dialog box is not shown in the clone scenarios, so ensure the package services are available in the target project.
After deleting the package service, attempting to access and rerun the service does not display any error messages.
Package services may still be executable from a deploy anywhere flow service even after removing the associated package from a project. This is because it may still be referenced by another project referenced in the same runtime, and hence the package will not have been deleted. A custom package will only be deleted once all project references have been removed.
You cannot have different versions of the same custom package between projects that are hosted in the same runtime. A user can choose to upgrade the version of a custom package when importing but this will also upgrade all other project to that version. Down grading is not possible.
All webMethods packages are stored and maintained as individual private Git repositories managed by IBM. The Integration Runtimes retrieve the required packages from the webMethods Package Registry while running your integrations. For successful package retrieval you need to configure your credentials. Otherwise, the integrations fail. For example, you have not linked your credentials and try to access a Database connector in your integration. While running the integration the runtime cannot access the webMethods Package Registry and displays the following error message:
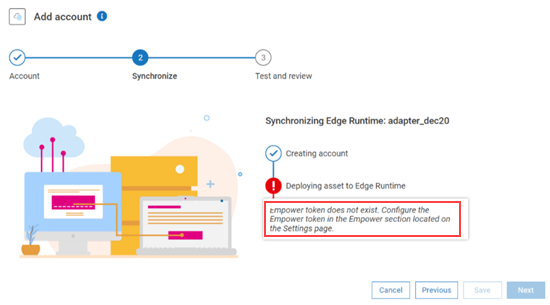
You can configure the credentials in the Package Registry Connection page. To link a package registry to a tenant you must have administrative access. Only one ID can be linked to a tenant at a given time.
Go to User Profile > Settings > Empower. The Package Registry Connection page appears.
Enter your credentials in the Empower ID and Password fields.
Select the number of days the connection must be valid from the Valid till drop-down list. For generating a lifetime access token select Never.
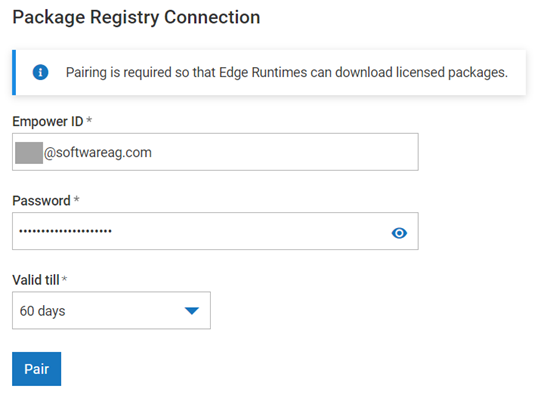
Click Pair. Upon successful pairing, the message about your pairing details appears.

[Optional] Click Test connection to verify the connection status.
Your credentials are linked to a tenant and runtime can download the packages.
Delinking a webMethods Package Registry from a tenant does not allow you to access or retrieve webMethods packages that are stored in the Git repositories managed by IBM. The integrations using any packages in the webMethods Package registry might fail with errors.
You must have administrative access to delink a package registry from a tenant.
Go to User Profile > Settings > Empower. The Package Registry Connection page appears displaying the registered ID details.

[Optional] Click Test connection to verify the connection status.
Click Unpair. The existing details are removed from the tenant.