EDI Documents
Adding an EDI DocumentUpdating an EDI DocumentCustomizing the EDI SchemaEDI Document PropertiesRecord PropertiesComposite PropertiesField PropertiesWhat are Validators?Conditional ValidatorsCode List ValidatorsEDI Document AttributesResetting an EDI DocumentBefore you beginUnderstanding EDI BatchingDelivering EDI Business Documents in a Batch using QueuesSummaryBefore You BeginBasic FlowHow to deliver the documentNext StepsInterpreting Validation Error CodesIBM webMethods B2B supports a comprehensive list of leading industry-standard EDI documents.
A list of group, envelope, and other native EDI documents appear as default documents on the IBM webMethods B2B Business documents page.
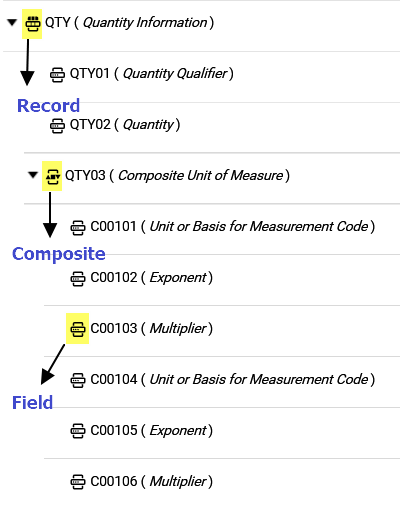
EDI documents display information organized in the form of records, composites, and fields:
Records. A record holds the complete set of information that belongs to a logical grouping. For example, in an employee record, an address is a composite.
Composites. A composite is a set within the schema (which may or may not be within a record) grouped based on a certain logic. For example, address entity having a house number, street name, area name, state, and country.
Fields. An indivisible node within a record. For example, house number.
Adding an EDI Document
Add new EDI documents to IBM webMethods B2B based on the business needs.
To add an EDI document
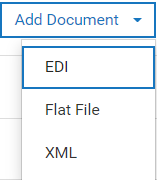
In IBM webMethods B2B, go to Documents > Add Document > EDI.
Select the following information as required.
Field Description Standard The document standard from the list as required.
For a complete list of standard documents, see Supported Business Documents.Version The version of the document standard selected. Transaction The transaction type for the selected document standard and version. To edit the EDI schema, enable the Enable customization option and select a document, and type a custom document name. To edit the scheme, see Customizing the EDI Schema.
Click Save.
The following information appears on the Summary page:Page Activities to perform Document structure The document tree view displays the schema of the EDI document. Expand the document tree view and select a node to view the node-specific properties.
In the Document definition section, view and search a node by its name, alternate name, or by XPath, and edit its properties.
In the Properties section, change the properties associated with composites, records, and fields. For a complete list of properties, see EDI Document Properties.Attributes A list of attributes of the default documents. Options Document options that apply only when the processing rule has any of the preprocessing options set to Defer to business document.
Next steps
After you add an EDI document of standard type UNEDIFACT, ODETTE, or EANCOM, add a new document with control transaction (CONTRL) for the corresponding standard and version. From the EDI document page, select CONTRL from the Transaction drop-down. This is important to successfully generate and send a functional acknowledgment (FA) to partners. An FA is a type of EDI transaction set that acknowledges the receipt, as well as the structural and syntactical validity of an EDI document.
For example, if you add a UNEDIFACT document of version 02B and transaction type BALANC - Balance message, to add a document with control transaction for this EDI document, perform the following steps:
- In IBM webMethods B2B, go to Documents
 > Add Document > EDI.
 Select the following values for these fields:
Field Value Standard UNEDIFACT Version 02B Transaction CONTRL Click Save.
Updating an EDI Document
Modify or update the following aspects of a business document:
Status
Description
Options
Properties of documents that have a structure associated with it
Edit EDI Scheme for X12 and UN/EDIFACT business documents
The document properties impact the behavior of each node in an inbound document. For any inbound document that deviates from the properties set for each node, IBM webMethods B2B generates appropriate validation errors in the Course of transaction. For information on how to set the validate option, see Predefined operations.
To update an EDI document
In IBM webMethods B2B, go to Documents.
Select an EDI document from the Business Documents page.
Update document properties.
To update the document properties, for a document that has a structure associated with it, as follows:
- Go to Document structure and select the node in the document under Document definition section.
- In the Properties section, select the property to update.
- Modify the values for the properties as required.
For a complete list of properties and their descriptions for records, composites, and fields, see EDI Document Properties.
Click Update.
Click Revert to revert the changes made to the document properties.To edit the EDI schema, enable the Enable customization option and select a document, and type a custom document name. To edit the scheme, see Customizing the EDI Schema.
Go to Attributes and select a node to which you want to add or modify an attribute to extract.
For details about EDI document attributes, see EDI Document Attributes.Click Update.
Click Revert to revert the changes you made to the document attributes.Update Options
Update options to control the behavior of the business document by clicking Options and modifying the following as required.Options Description Enable processing rule routing Searches for an appropriate processing rule and uses the rule to process the document. Validate document structure Validates the structure of the inbound document against the available schema. - XML Documents. For business documents created using a sample XML, and for those that do not have a corresponding schema available on IBM webMethods Integration, this option is disabled as the structure cannot be validated against the schema.
- EDI Documents. This option is available for all EDI documents including the default EDI documents that are available with IBM webMethods B2B.
Persist document Saves the document. - Only unique documents. Save only unique documents to IBM webMethods B2B.
- All documents. Save all documents.
The parts of the documents you can save are:
- Content. Save only the content part of the document.
- Attributes. Save only the document attributes.
- Activity log. Save only the activity logs of the document.
NoteIf you reprocess a document without saving document attributes, you might get unexpected results. Because if the attributes are not saved, the document would not match the intended processing rule. Instead, the document would match another processing rule, such as the Default rule, and IBM webMethods B2B would perform the processing actions defined in that rule.Click Update.
The EDI document is updated to include the modifications.
Customizing the EDI Schema
You can create custom EDI documents based on standard formats (X12 and UNEDIFACT), including the ability to specify versions and transactions. This allows for the modification of the document structure without changing the original format by leveraging existing EDI standards (X12 and UNEDIFACT), versions, and transactions while referring to previous modifications. This capability facilitates the reuse of customized document structures based on partner specification without changing the original document.
Pre-requisite: You must have administrator privilege to perform this activity.
You can edit an EDI document schema only if you added it previously in IBM webMethods B2B.
You must adhere to the following schema rules, to be able to customize the EDI schema:
- Field definitions remain within Record definitions.
- Composite definitions must contain Field definitions.
- Field definitions are atomic and cannot be nested inside other Field definitions.
- Record definitions cannot be nested inside Field definitions.
- Record definitions can be nested.
- Record definitions cannot be nested inside Composite definitions.
- Within composite definitions, only Fields can be included, which are referred to as sub-fields.
- Composite definitions cannot be nested inside other Composite definitions.
- Composite definitions can be placed within a Record definition.
- Composite definitions cannot be nested inside Field definitions.
To customize an EDI document for Existing Business Documents
In IBM webMethods B2B, go to Documents.
Select an EDI document from the Business Documents page.
To modify the document schema for a document that has a structure associated with it:
a. Select the element in the document under the Document definition section.
b. On the left-hand side, select a element to modify the segment and navigate to the element by using the action buttons such as up, down, right(Make the existing element a child element), left(Make the existing element a parent element), add an element(create a new element), delete an element(delete a element), copy, and paste.NoteYou can add a field element only to records and composites.The following table lists the segment type and the relevant action to perform:
Segment type Actions to perform Field 1. Select the segment.
2. Click Add.Composite 1. Select the segment.
2. Click Add.Record 1. Select the segment.
2. Select the child segment type.
3. Select the field name.
4. Click Add.Click Update.
- Format services are not supported for field properties.
- If the document is in active state, you cannot edit the schema.
- When you customize an EDI document schema structure, and use it to create another customization, then when you reset the document, the document is reset to the default structure of the document. For example, you create a custom document using X12 2040 830 and name it X12 2040 830_custom1, and create another custom document using X12 2040 830_custom1 and name it X12 2040 830_custom2. Then when you reset X12 2040 830_custom2, the document defaults to X12 2040 830.
- The schemas you update are visible on the EDI app of IBM webMethods Integration.
- IBM webMethods B2B supports the validation of custom EDI document structure.
To add an Element to a Record or Composite
- Select the element in the document under the Document definition section.
On the left-hand side, select a element to modify the segment and navigate to the element by using the action buttons and click
 to add a element.NoteYou can add a element only for records and composites.
Click Add.
EDI Document Properties
The following tables list the document properties based on whether the element you select is a composite, record, or field.
Any inbound document that deviates from the properties you set for each of the elements generates appropriate validation errors in the Course of transaction. For information on how to set the validate option, see the IBM webMethods Integration documentation for the Electronic Data Interchange application. The errors that appear in the Course of transaction depend on how the orchestration you define on IBM webMethods Integration handles and returns the errors.
Record Properties
| Property Name | Description |
|---|---|
| Name | Name of the selected node. |
| Alternate name | Another name for the record definition. |
| Description | Description of the record definition. |
| Mandatory | An instance of this record must exist in the inbound document.
|
| Ordered | Child records in the inbound document must appear in the same order as they appear in the record definition. This property applies only to records that are children of this record.
|
| Max repeat | Maximum number of times this record definition can repeat in the inbound document. Specify a positive integer. Maximum limit is 999,999,999. The following values are interpreted in a specific manner:
|
| Area | The area assigned to this record definition. The property determines the possible values that you can assign to a record.
|
| Position | The position of the record in an inbound document. Select the checkbox to specify the position of the record. Maximum limit is 9999. |
| Allow undefined data | The record definition is considered valid despite having undefined data. A record definition allows undefined data only if the inbound document is configured to do so.
|
| Check fields | Indicates if extra fields in the record instance must be treated as errors.
|
| Validator | The type of validator to use to validate instances of this record definition.
Conditional validators apply only to records and composites. For more information, see Conditional Validators. |
Composite Properties
| Property Name | Description |
|---|---|
| Name | Name of the selected node. |
| Alternate name | Another name for the composite definition. |
| Description | A description of the composite definition. |
| Mandatory | The field must exist as a composite in the document.
|
| ID code | The ID code of the composite definition. Its value is determined by the composite definition in the referenced record definition defined by the EDI standards. |
| Check fields | Indicates if extra fields in the composite instance are treated as errors.
|
| Validator | Type of validator to use to validate instances of this composite definition. Validation options are:
Conditional validators apply only to records and composites. For more information, see Conditional Validators |
| Extractor | Field number in the record that contains the composite you want to extract. It extracts the field or composite data from the record or extracts the sub-field data from the composite. If this property is empty, the composite is not extracted. Note
The extractor works for a composite only if the field delimiters and sub-field delimiters are defined for the inbound document.
|
Field Properties
| Property Name | Description |
|---|---|
| Name | Name of the selected node. |
| Alternate name | Another name for the field definition. The alternate name is used as the name of the String field that corresponds to this field definition in an inbound document. |
| Description | The field definition in a composite reference or a record reference at the specified location in the inbound document. |
| Mandatory | An instance of this field definition must exist in the inbound document.
|
| Data type | The Data type of the field that accept inputs in (data type, minimum length, maximum length) format. The maximum character length limit is 9999.Modifying Data type, updates the Format service. The following data types are supported
|
| ID code | The ID code for the field definition. It is defined by the EDI standards. |
| Format service | Format type applied to the field definition. The format service validates either the content in a field or converts the content in an associated field to an appropriate format. For example, a format service can validate if the content associated with a node is of numeric type. Another format service could convert a timestamp from HH:mm:ss.SS format to HHmmssSS.The following are the properties of the Format service:
|
| Validator | The type of validator to use to validate the field. The supported types are:
Note
|
| Extractor | Location of the data to extract for this field. The extractor works for a field only if the field delimiters are defined for the inbound document.
|
What are Validators?
A few scenarios may require you to perform cross-field validations in the business document schema. For example, a certain condition may be based on another field in the document, or a certain field may need to adhere to a length limit for the business transformation logic to process the document schema appropriately.
Different types of validators are available for records, composites, and fields. Validation is possible for:
- Records and composites using conditional validators.
- Fields using either length or code list validators.
Conditional Validators
The conditional validators are used in conjunction with all other validation attributes and are applied when the document is processed.
Follow the syntax rules created by the EDI Standards bodies ANSI X12 or UN/EDIFACT to specify conditional validators for a record or composite, regardless of the type of document you use.
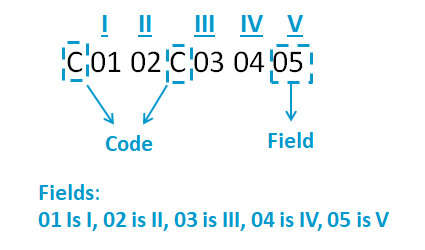
Anatomy of the Validator Property in an ANSI X12 Document
A conditional validator refers to the location of the field in a definition, not the location of the data in a business document. For example, if you switched the extractors for the first and second field such that the first field extracts the value in Field_II and the second field extracts the value in Field_I, the conditional validator would indicate that if Field_II is present, then Field_I is required.
For example:
Record1 has the conditional validator C0102Field_II - Nth field extractor, position 1Field_I - Nth field extractor, position 2This indicates that if Field_I is present, then Field_II also must be present. If you switch the position of these fields in the record, you get the following:
Record1 - conditional validator C0102Field_II - Nth field extractor, position 2Field_I - Nth field extractor, position 1This indicates that if Field_II is present, then Field_I also must be present.
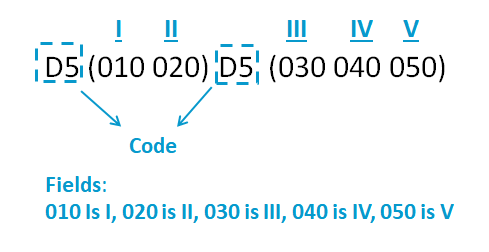
The following diagram illustrates the fields of a UN/EDIFACT conditional validator:
The record definition has five fields defined. Each with an Nth Field extractor, the first being field_I, the second field_II and so on. Both of these validators indicate that if Field_I is present, Field_II is required. If Field_III is present, Field_IV and Field_V are required; however, if Field_IV and Field_V are present, Field_III need not be present.
The following table indicates the codes for ANSI X12 and UN/EDIFACT documents based on the values in the above illustrations:
| ANSI X12 Rule Name (and Code) | UN/EDIFACT Rule Name (and Code) | Description |
|---|---|---|
Required (R) |
One or more (D3) |
At least one of the specified fields must be present.
ANSI X12 Example: UN/EDIFACT Example: |
Conditional (C) |
If first, then all (D5) |
If a specified field is present, all of the fields specified in a dependent set of fields also must be present. If a dependent field is present, the first specified field need not be present.
ANSI X12 Example: If you specify a field value of 00, the extra zeros are trimmed when the value is saved. For example, if you type C030400, the fields: 03, 04, and 00 are interpreted in pairs. 00 is trimmed as applying the conditional validator does not alter it. UN/EDIFACT Example: |
Exclusion (E) |
One or none (D4) |
At most, only one of the specified fields can be present.
ANSI X12 Example: UN/EDIFACT Example: |
List Conditional (L) |
If first, then at least one (D6) |
If a specified field is present, at least one of the fields specified in a dependent set of fields also must be present. If a dependent field is present, the first specified field need not be present.
ANSI X12 Example: UN/EDIFACT Example: |
Paired (P) |
All or none (D2) |
All of the specified fields must be present or absent.
ANSI X12 Example: UN/EDIFACT Example: |
| N/A | One and only one (D1) |
Exactly one field may be present.
UN/EDIFACT Example: |
| NA | If first, then none (D7) |
If the first field is present, all others cannot be included.
UN/EDIFACT Example: |
Code List Validators
Code list validators are used to validate field lengths or code lists when IBM webMethods B2B processes a document.
When you select the code list validator for a field or a record, IBM webMethods B2B appends /code in the xPath query for the attributes you want to extract. For example, /ST/ST01/code.
Modifying a validator for a field or a record from or to a code list validator impacts the existing attribute queries and these queries require updates accordingly.
EDI Document Attributes
In the EDI business document specify the system and custom document attribute values to extract from documents that match this document type. If you want to transform extracted attributes, use built-in or custom transformations. Add a new attribute or replace an existing one.
On the document details page, click Attributes on the left navigation panel.
To add an attribute, select a node in the left panel for which you want to define an XPath query. Click Add To Attributes and provide the following information in the Add extracted attribute dialog box:
| Field | Description |
|---|---|
| XPath expression | IBM webMethods B2B fills in the XQL query for the node. |
| Attribute | The required document attribute values to extract from documents that match this document type. Select the required attribute in one of the following ways:
|
| Type | The type of the attribute selected. |
| Description | The description included for the selected attribute. |
| Required | By default, when IBM webMethods B2B cannot extract an attribute, it continues processing, and if processing completes successfully, sets the processing status to DONE. It does not log an error to the activity log. If IBM webMethods B2B has to log an error to the activity log when it cannot extract an attribute, then designate that attribute as required for extraction. If processing completes successfully, IBM webMethods B2B sets the processing status to DONE W/ERRORS. |
| Transformation | IBM webMethods B2B can transform extracted attributes before storing them in the IBM webMethods B2B database.
|
To replace an existing attribute, select a node for which you want to replace an attribute. Select an existing attribute from the list and click Replace Attribute. If you choose to modify the attribute name and click Replace. The XPath expression of the selected attribute is replaced with that of the selected node. Click Update to save the modifications.
Resetting an EDI Document
Restoring a business document to its original state applies to the business document across IBM webMethods B2B and IBM webMethods Integration instances.
However, the default documents do not have a document structure associated with them, and therefore the modifications you make to them are not propagated to the IBM webMethods Integration product instance.
Before you begin
Disable the business document.
To reset an EDI document
In IBM webMethods B2B, go to Documents
 and click on a document to reset it.
Click Reset.
The reset operation resets the properties, description, and options for the documents you add.
Understanding EDI Batching
EDI systems typically work on batch documents. EDI Batching is helpful while delivering documents in a batch rather than delivering EDI documents to the systems in real-time as the documents are received. This feature works irrespective of the underlying inbound or outbound channel configuration for a business partner.
Batching offers the following benefits:
- Enables documents to be grouped and sent at scheduled times that are more appropriate to organizational requirements.
- Increases system performance, requiring fewer communication connections and less time spent on authenticating envelopes received individually.
- Makes working with legacy systems easier because legacy systems are batch oriented.
Delivering EDI Business Documents in a Batch using Queues
Summary
Documents can be queued and delivered at a later time. And based on the queue schedule information, a scheduler creates a final batch document based on the queue configurations defined during the queue creation. This use case starts when you create a queue with a processing rule. This processing rule helps in queuing the submitted documents on the queue. And the use case ends when a final batch document is routed to a partner using a processing rule.
There are different ways to process the document using queues:
Documents can be processed using queues, when the action in Processing rule is Queue for delivery. There are two ways to do it:
- By directly selecting the general queue.
- By selecting the receiver’s queue.
For a receiver’s queue, either associate a General queue or a Partner-specific queue with the partner.
Before You Begin
Ensure that you:
- Create a queue.
- Create a processing rule.
While creating a queue, if the Queue for delivery under the create processing rule section is selected, then the processing rule is created along with the queue.
Basic Flow
See Creating a General Queue to create a general queue and see Creating a Partner-specific Queue to create a Partner-specific queue.
To deliver documents in batches by configuring queues
- Create a Queue and a Processing rule.
- In the Processing rule, select the required criteria as Sender, Receiver, Document types.
Select the Queue for delivery and select the Queue from the list.
If you create the processing rule while creating the queue, then the configurations mentioned above is set automatically.
Go to Monitoring > Document submission and submit the EDI document.
When receiving a document, IBM webMethods B2B creates a task with the details such as status, sender, and receiver. Until the document is processed, the task remains in queued state. After sending the document to the partner, it appears in the transaction list. If it is an EDI batch envelop document, then view the EDI transaction count on the same transaction.
How to deliver the document
To deliver the document
- Create a Processing rule > set the action as Deliver document.
- Set the extended criteria as EDI batch Equals Interchange.
- Use the receiver’s Outbound channel to deliver the document.
Next Steps
Once the batch scheduler is triggered, it batches the queued documents as per the configuration defined in the queue. It then creates a final batch document with a special attribute to recognize it as EDI batch equals Interchange. You can then create a processing rule with that attribute condition to deliver the document to the intended partner as per the preferred channel.
For example, consider partner A and B. Partner A wants to send a batch document to partner B using a queue. It requires the processing rule (where the processing rule action, Delivery method section is set to Queue for delivery). Once the document is received or generated for partner B, the it gets queued based on the Processing rule criteria and when the final batch document is created and need to be send to partner immediately, then configure a processing rule for this (where, in the Delivery method section, set the Preferred protocol and in Extended criteria set the Attribute field with EDI batch, with the Operator set to Equals and the Value field with Interchange to recognize the EDI document).
Interpreting Validation Error Codes
Use the Validate Document Structure option to enforce document schema adherence. Recognition of the inbound documents can fail when they do not adhere to the underlying schema. If there are violations, the transaction summary captures them as validation errors. Each of the error corresponds to an error code.
convertEDIMessagetoDocument operation in IBM webMethods Integration.The following table describes the validation error codes:
| Error Code | Description |
|---|---|
| 1 | In the EDI document schema, the Mandatory drop-down menu is set to true for this element, but the element does not occur in the EDI document. |
| 2 | Reserved for future use. |
| 3 | Unexpected element. This field is not allowed in the record or composite in which it appears. |
| 4 | In the EDI document schema, a length validator is specified in the Validator property for this field. The value in the EDI document exceeds the maximum length specified. |
| 5 | In the EDI document schema, a length validator is specified in the Validator property for this field. The value in the EDI document did not meet the minimum length specified. |
| 6 | Reserved for future use. |
| 7 | In the EDI document schema, a code list validator is specified in the Validator property for this field. The value in the EDI document is not listed in the EDI schema as a valid value. |
| 8 | Reserved for future use. |
| 9 | Reserved for future use. |
| 10 | In the EDI document schema, a conditional validator is specified in the Validator property for this composite or record. The contents of this composite or record does not meet the conditional requirements. Note
The
errorMessage variable in the convertEDIMessagetoDocument operation contains the number of the condition that failed. If you have a validation string of C010203R0405 and both conditions fail, the error message would state that rules 0 and 1 are violated. If only the second is violated, it states that the rule 1 is violated. |
| 11 | The record is not defined anywhere in the EDI document schema. This error appears only when you do not specify a Default Record or selected Allow Undefined Data where this record appears in the document. If you specify either of these properties, you do not receive this error. |
| 12 | The record is defined in this EDI document schema, but it occurs in the document in a location prohibited by the EDI document schema. |
| 13 | Reserved for future use. |
| 14 | In the EDI document schema, the number of record instances in the EDI document exceeds the specified maximum number of repeats. This is validated against the Max Repeat property for a particular record. |
| 15 | Reserved for future use. |
| 16 | Within a record, this code indicates that the record contains a composite or field error. For a composite, this indicates that the composite contains a subfield error. |
| 17 | A string could not be formatted into the intended format. A format service reported that the data could not be formatted properly. |
| 18 | The conditional validation rule requires a field, but that field is not present in the data. |
| 19 | A field is excluded by a conditional validation rule, but that field is present in the data. |
Flat File Documents
Adding Flat File documentUser Roles and PrivilegesBefore You BeginAdding a Flat File DocumentAdding Identifiers to a Flat File DocumentAdding attributes to a Flat File DocumentConfiguring Flat File Document OptionsNext StepsUsing Custom Properties to Recognize Flat FilesUnderstanding Custom PropertiesUser Roles and PrivilegesBefore You BeginUsing the Custom Properties that are Defined in the Advanced Properties of an Inbound ChannelVisual ModelResubmitting Flat FilesAdd, identify, and process Flat File documents in IBM webMethods B2B.
Validate the Flat File documents with the corresponding Flat File connector from IBM webMethods Integration.
By default, IBM webMethods B2B considers inbound documents with the text/plain content type as Flat File documents.
Adding Flat File document
Complete the following steps for IBM webMethods B2B to start recognizing Flat File documents:
- Add a Flat File document
- (Optional) Add Identifiers to a Flat File document
- (Optional) Add attributes to a Flat File document
- (Optional) Configure Flat File document options
- (Optional) Use the Custom properties in the Advanced tab of Inbound Channels
User Roles and Privileges
IBM webMethods B2B instance with administrator privileges.
Before You Begin
Add key-value identifiers for a flat file and associate them with an inbound channel so that IBM webMethods B2B recognizes the Flat Files based on these identifiers. For detailed steps, see Using Custom Properties to Recognize Flat Files.
Adding a Flat File Document
- In IBM webMethods B2B, go to Documents > Add Document > Flat File.
In the Add flat file dialog box, specify the following details:
Field Description Name Type a name for the Flat File document. Description (Optional) Provide a brief description for the Flat File document. Refer to Select the product to refer to.
- No reference. Does not have an external reference.
- IBM webMethods Integration. Refers to a Flat File connector through a project on IBM webMethods Integration.
Click Create to view the Flat File Summary page.
Adding Identifiers to a Flat File Document
On the Identifiers page, click
> and specify the following details:
Field Description Key A valid key to identify the Flat File document type. For example, a filename. Value The corresponding value for the Key that was defined. For example, sample.txt. Add to Channel (Optional) select the required channel as follows: - Click Select channel.
- Select the channel from the list.
- Click Add to channel.
- Click Add.
Alternatively, add these identifiers to the inbound channel and configure the advanced properties. For more information, see Supported Channel Types and Details.
NoteOnly AS2, SFTP-IN, and HTTP-IN channels can recognize Flat Files.Click Create.
Add multiple identifiers from documents to an inbound channel as follows:
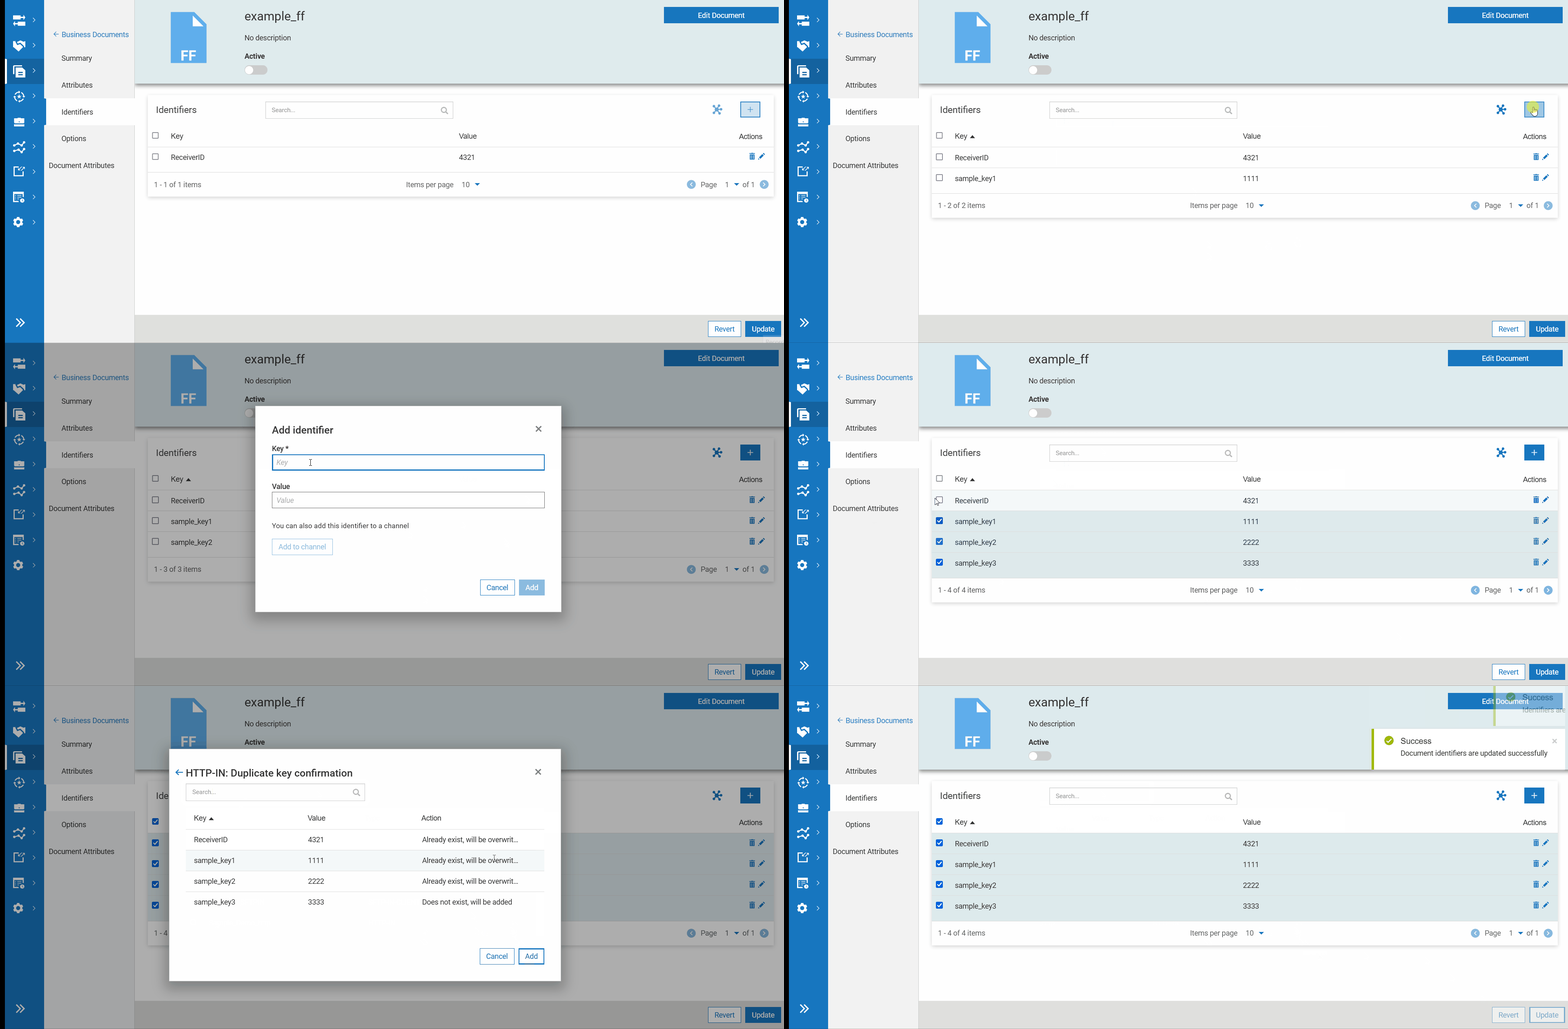
Click Update.
Adding attributes to a Flat File Document
- On the Attributes page, click
.
In the Add attribute dialog box, specify the following details:
Field Description Attribute The required document attribute values to extract from documents that match this document type. Select the required attribute in one of the following ways:
Select an attribute from the list. If the attribute is not available in the list:- Click Add attribute.
- In the Add document attribute dialog box, provide the required details.
- Click Save.
- In the Add extracted attribute dialog box, click Add.
Avoid using characters other than: A-Z, a-z,0-9, _ (underscore), - (hyphen) in the attribute names.
Type The type of the selected attribute. Description The description of the selected attribute. Required By default, when IBM webMethods B2B cannot extract an attribute, it continues to process, and if the processing is successfull, IBM webMethods B2B sets the processing status to DONE. It does not log an error to the activity log. If IBM webMethods B2B has to log an error to the activity log when it cannot extract an attribute, then designate that attribute as required for extraction. If processing is successfull, IBM webMethods B2B sets the processing status to DONE W/ERRORS. Transformation IBM webMethods B2B can transform extracted attributes before storing them in the IBM webMethods B2B database. - If you extract an attribute with the data type DATETIME or DATETIME LIST, specify the date format. Choose a built-in common date and time format or type the format you need, using a pattern string based on the
Time Format Syntaxdescribed for thejava.text.SimpleDateFormatclass.
IBM webMethods B2B extracts the value of the date and uses the pattern you specify to decode the value and converts it to the format that IBM webMethods B2B requires to store the date in the BizDocEnvelope.
If you do not provide a date and time format, the default built-in transformation format dd-MM-yyyy HH:mm:Ss is used. - If you extract an attribute that has the data type STRING or STRINGLIST, then transform the string value using one of the built-in transformations below:
- Uppercase: Transforms the extracted string attribute value to all uppercase.
- Lowercase: Transforms the extracted string attribute to all lowercase.
- String Substitution: Substitutes extracted values with a pattern you specify. IBM webMethods B2B uses the
java.text.MessageFormatclass to perform this transformation.
Items Ordered: Cellular phone, Belt clip, Rapid mobile charger
If you place more arguments in the pattern than there are extracted values, the string stored in the database for the attribute contains the extra arguments. If you specify fewer arguments than there are extracted values, the string contains only the values for the number of arguments.
- If you extract an attribute that has the data type NUMBER and contains an array of numbers, transform the array into a single value using one of the built-in transformations as follows:
- Average: Calculates the average value of all the numbers in the array.
- Minimum: Calculates the smallest number in the array.
- Maximum: Calculates the largest number in the array.
- Sum: Calculates the sum of all the numbers in the array.
- No format: Stores the first value of the array as the value of the attribute.
When IBM webMethods B2B extracts a NUMBER or NUMBER LIST from a document, it uses the number parsing behavior ofjava.lang.Number.
For example, if the NUMBER or NUMBER LIST contains the value 100zzz, IBM webMethods B2B interprets the value as 100, instead of displaying an error as it would if the value were zzz100.
Select Channel (Optional) select a channel to add an attribute to it: - Click Select channel.
- Select the channel from the list.
- Click Add to channel.
- Click Add.
Click
> to add more attributes and on the Add attribute page, click Add.
Click Update.
Configuring Flat File Document Options
On the Options page, specify the following details:
Field Description Enable Processing Rule Routing Enables processing of documents using pre-processing and processing actions defined in a processing rule. If you want to process documents using only pre-processing actions defined in the document type, disable processing rule routing. Validate document structure Validates the structure of the inbound document against the IBM webMethods Integration Flat File connector associated with this document. Optionally override the delimiters set in the Flat File connector using the Override delimiter button.
The Override delimiter button uses the values you set, instead of those set in the corresponding flat file connector on IBM webMethods Integration for the following fields:- Records. The character that separates records in a Flat File document.
- Field or composite. The character that separates field or a composite in a Flat File.
- Subfield. The character that separates subfields in a Flat File document.
- Release character. The character used to enable a delimiter to be used for its intended, original meaning. The character following the release character is not be treated as a delimiter. For example, the field delimiter is + and the release character is \. When using + within a field as text, you must prefix it with the release character.
- Skip whitespace. Enable to skip whitespaces at the beginning of the record.
Note- If you do not set specific delimiters for the inbounds documents meant for IBM webMethods B2B, the product displays the delimiters set in the IBM webMethods Integration Flat File connector. But, if you set new value for this option on the Override delimiters dialog box in IBM webMethods B2B, the inbound documents will be parsed based on these newly set delimiters.
- IBM webMethods B2B does not support validation for documents categorized as large documents in the Large Document Threshold property of the Runtime options. IBM webMethods B2B processes large documents with a warning.
Save Saves the documents to the database. Save a document to the database when you want to: - Deliver the document using reliable delivery with immediate or scheduled delivery for details. See Configuring Reliable Delivery Settings in a Partner Profile.
- Pass a document to a business process.
- Send a document back to the beginning as a new document (for example, because the document did not match any defined document type). This is called resubmitting the document. For details about resubmitting the document, see Editing and Resubmitting a Business Document.
- Send a document back through processing rules (for example, because the document was processed by the wrong rule). This is called reprocessing the document. For details about reprocessing the document, see Reprocessing a Business Document.
Choose to save All documents or Only unique documents.
Select to persist just the Content, Attributes, Activity log or all of them in the saved document.Click Update.
Next Steps
Modify or update the Flat File:
- In IBM webMethods B2B, go to Documents.
- Select a Flat File document from the Business Documents page.
- Click Edit Document to modify the document name and its description.
- Click Update.
Using Custom Properties to Recognize Flat Files
Recognize and process inbound Flat File documents and send them to business partners.
Understanding Custom Properties
The Custom properties you define in the Advanced properties of an inbound channel can be used to recognize and identify the incoming payload of a Flat File document. To use the custom properties for flat files, add them as identifiers or attributes in the corresponding Flat Files.
For more information about these properties, see Supported Channel Types and Details.
User Roles and Privileges
- IBM webMethods B2B instance with administrator privileges.
Before You Begin
Create at least one inbound channel to receive inbound Flat File documents from a trading partner.
Using the Custom Properties that are Defined in the Advanced Properties of an Inbound Channel
- On the Channels page of an inbound channel, go to the Advanced tab.
- In the Custom Properties section, click
to add a new property.
IBM webMethods B2B uses these properties to recognize the incoming document. Use them either as identifiers or attributes, to extract to perform transformations.
In the Flat File document, go to the Identifiers page, add an identifier to recognize the incoming Flat File document.
This identifier must also exist in the user-defined properties of the inbound channel.
ImportantThe key-value pairs are case-sensitive and must be a unique set.In the Flat File document, go to the Attributes page, add an attribute to extract from the incoming Flat File document.
This attribute must also exist in the custom properties of the inbound channel.
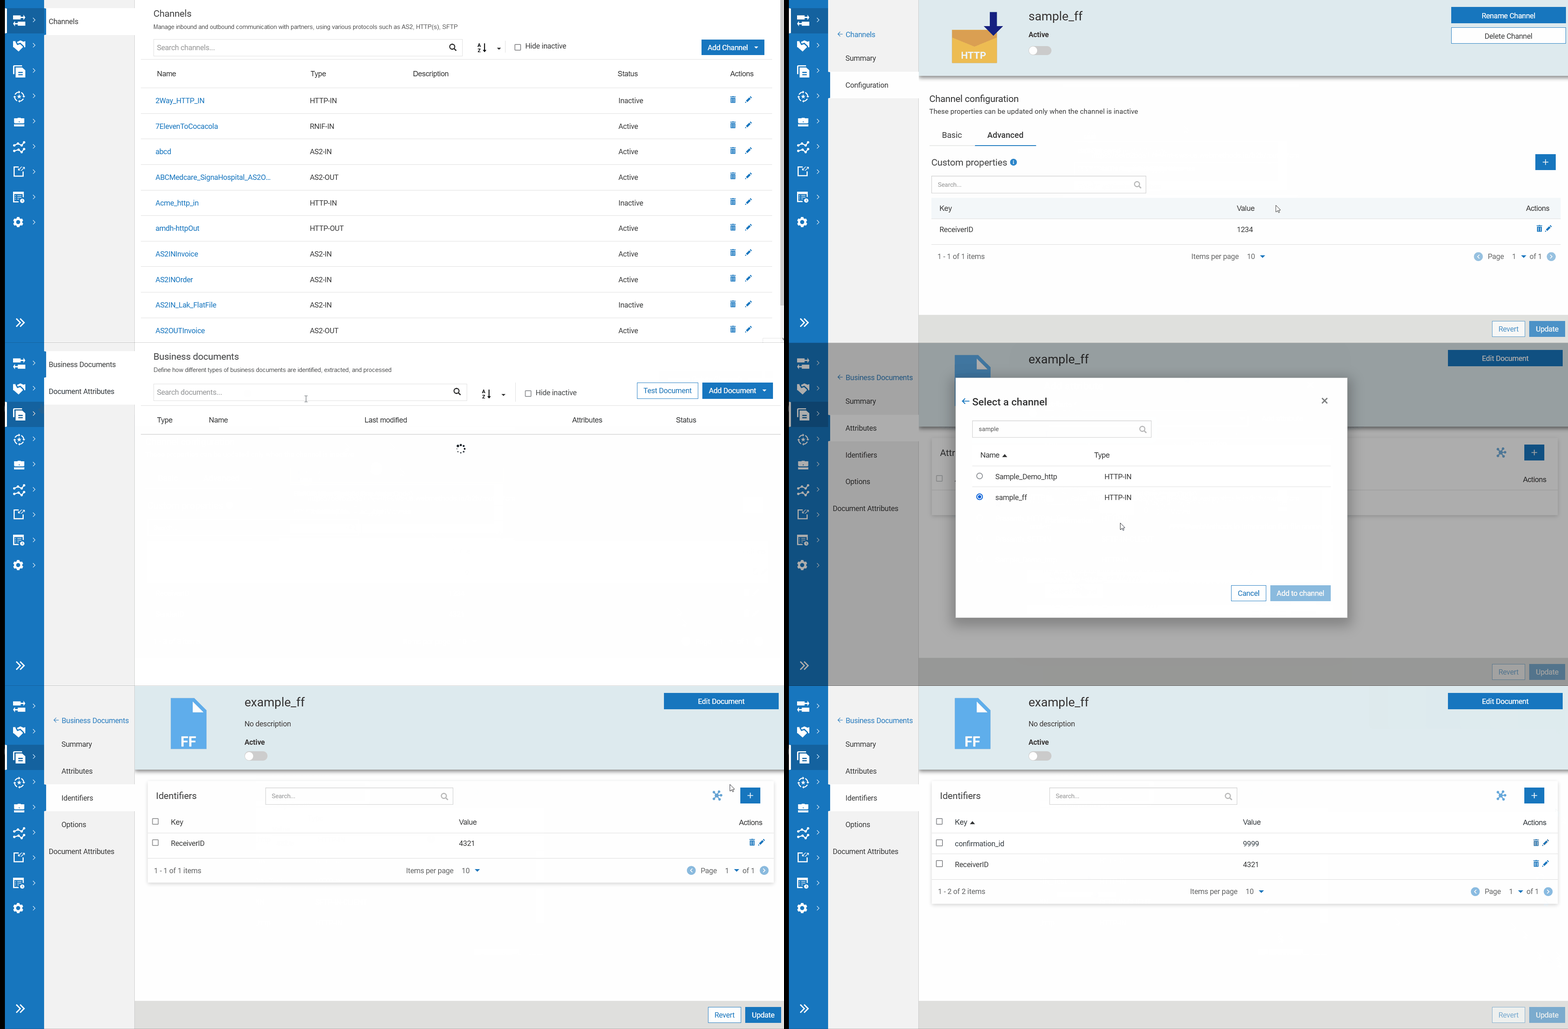
Visual Model
The below visual illustrates the flow:
Resubmitting Flat Files
For details on the behavior of flat file resubmission, see Editing and Resubmitting a Business Document.
XML Documents
Defining an XML Document that Refers to an Existing Document in IBM webMethods IntegrationBefore you beginNext stepsDefining an XML Document from a Sample XML DocumentBefore you beginNext stepsAlternate flowDefining an XML Document by Using an XML SchemaBefore you beginNext stepsAlternate FlowDefining an XML Document with a DTDBefore you beginNext stepsAlternate flowUpdating an XML DocumentNext stepsTesting an XML DocumentBefore you beginAdding RosettaNet PIP DocumentDownloading the PIPAdding a PIP in DTD formatXML Document PropertiesIdentifiersAttributesNamespacesOptionsAccessing XPath nodesDocument AttributesSystem AttributesCustom AttributesCreating Custom Document AttributesRNIF Attribute BehaviorsUsing Extracted Attributes as Extended Criteria in an Existing Processing RuleSummaryBefore you beginBasic flowEDI Attribute BehaviorsNext stepsIn IBM webMethods B2B, create and define XML documents by referring to an existing document type in IBM webMethods Integration.
The Business documents page displays a list of documents that are available in IBM webMethods B2B. You can:
- View the details of the documents, such as the name and type, the last modified date and time stamp, the status, and the number of attributes associated with the document.
- Sort documents alphabetically in the ascending or descending order and view the documents in the active state by selecting Hide inactive option.
- Search a document from the list by typing characters in the search box. The list displays all documents starting with the characters you type in the search box.
In IBM webMethods B2B, define various document properties and use them when you create an XML document.
Document recognition criteria: Content that an inbound XML document must have for it to be a match for the XML document. Specify one or more criteria listed below:
The Root tag the document should have.
The system or public identifier the document should have.
Identifiers and optionally, the values the document should have. Define the XML Query Language (XQL) queries that IBM webMethods B2B executes to find the nodes and values.
Pipeline variables (that is, variables inserted into the pipeline by the service that sends the document to IBM webMethods B2B) and optionally, the values the variables should have.
Attribute extraction: System and custom attribute to extract from the document. Define the XQL queries that IBM webMethods B2B executes to extract the attributes. In addition, specify transformations for extracted attribute; for example, you might want to transform an extracted string value into all uppercase characters.
Pre-processing actions: A document can specify one or more of the following actions:
Verify Digital Signature, ensures the signed body of the document arrived unchanged, and the sender is who it claims to be. IBM webMethods B2B checks the sender by matching the certificate from the digital signature to the certificate in the partner’s profile.
Check for Duplicate Document, checks whether IBM webMethods B2B has already received the document. IBM webMethods B2B saves the results of this check to the pipeline, for you to use the results in the Save Document to Database pre-processing action to save only the unique documents.
Save Document to Database, saves the document to the IBM webMethods B2B database. For example, save documents to the database when you want to make multiple attempts to deliver documents to partners.
Enable Processing Rule Routing uses a processing rule to process the document further. You might not want to use a processing rule:
- If you want to only persist the document to the IBM webMethods B2B database.
- If you want to process the document using a business process instead of a processing rule.
Defining an XML Document that Refers to an Existing Document in IBM webMethods Integration
This use case explains how to define an XML document in IBM webMethods B2B that refers to an existing document in a selected project from IBM webMethods Integration.
In this example, define an XML document purchase_order, which is project-aware of the project B2B_Test in IBM webMethods Integration and refers to an existing document docTypeRef_PurchaseOrderType.
Before you begin
Ensure that you have:
An existing project in IBM webMethods Integration.
A document that you want to refer to exists in the selected project.
To define an XML document that refers to an existing document
In IBM webMethods B2B go to Documents > Add Document > XML.
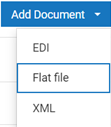
Provide the following details:
- Name. Type
purchase\_order, a name for the XML document. - Description. Optional. Provide a brief description for the XML document.
- Name. Type
Select the project B2B_Test.

Click Next.
Select the IBM webMethods Integration document type
docTypeRef\_PurchaseOrderType.Specify the root tag identifier,
Actions, the root tag name that the inbound document must have.
Optional. Specify the DTD to use.
Click Finish.
The XML document is created, and the document details page displays the following details:
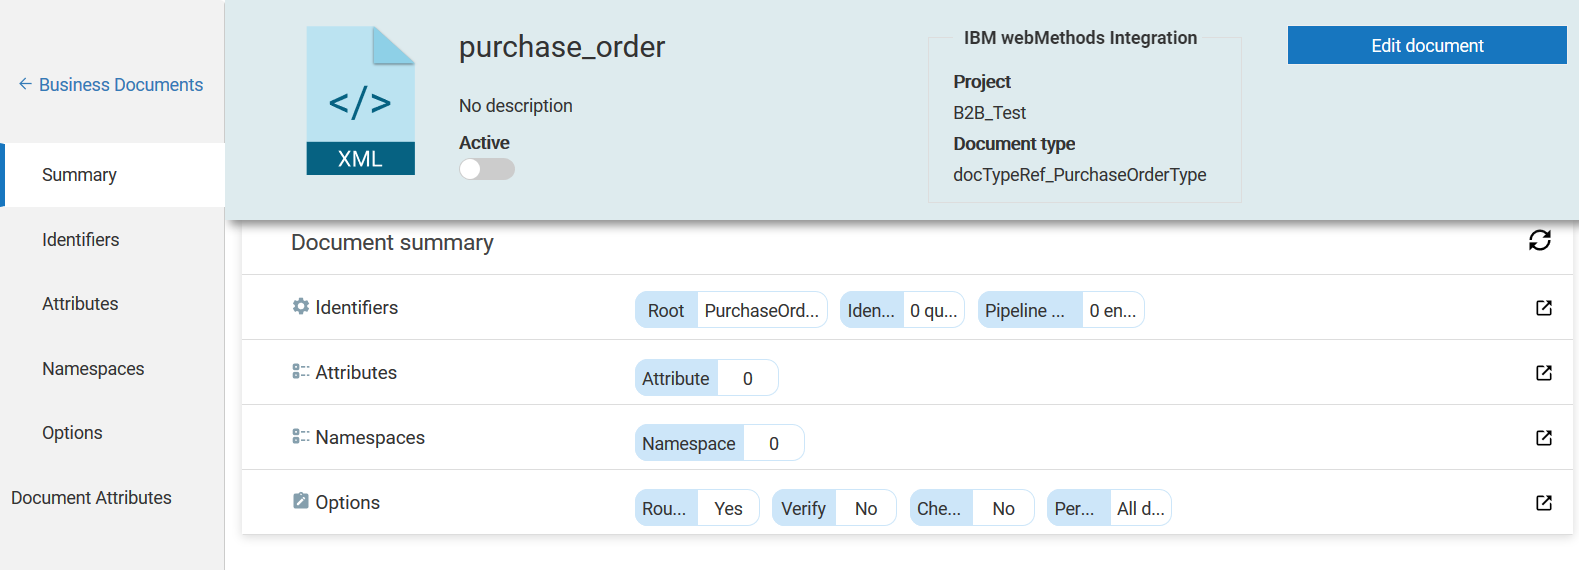
View this XML document in the list of available documents on the Business Documents page.
Next steps
Update the XML document, as required, using the Edit Document option.
Use the Edit Document option to update the name, description, project and document type.
Navigate to the respective pages to edit the Identifiers, Attributes, Namespaces, and Options.
Activate the XML document and test it.
Defining an XML Document from a Sample XML Document
This use case explains how to define an XML document from a sample XML document.
The use case starts with a sample XML document based on which you want to define an XML document and ends when you successfully create the XML document.
In this example, define an XML document PurchaseOrder, that is project-aware of the project B2B_Test in IBM webMethods Integration and uses a sample XML document PORequest.xml.
Before you begin
Ensure that you have:
- An existing project in IBM webMethods Integration.
- XML document structure (document type, schema, and so on) defined in the system.
To define an XML document from a sample XML document
In IBM webMethods B2B go to Documents > Add Document > XML.

Provide the following details:
- Name. Type
PurchaseOrder, a name for the XML document. - Description. Optional. Provide a brief description for the XML document.
- Name. Type
Select the project B2B_Test.

Click Next.
Select No to create an XML document without referring to an existing document type from the selected project.
Select Sample XML document.
Provide the sample XML document by dragging and dropping the required file in the space provided.
Alternatively, browse and select the required file to upload the file.
NoteThe sample XML file should have a file size, which is less than or equal to 1 MB.Click Finish.
The XML document is created, and the document details page appears displaying the following details:
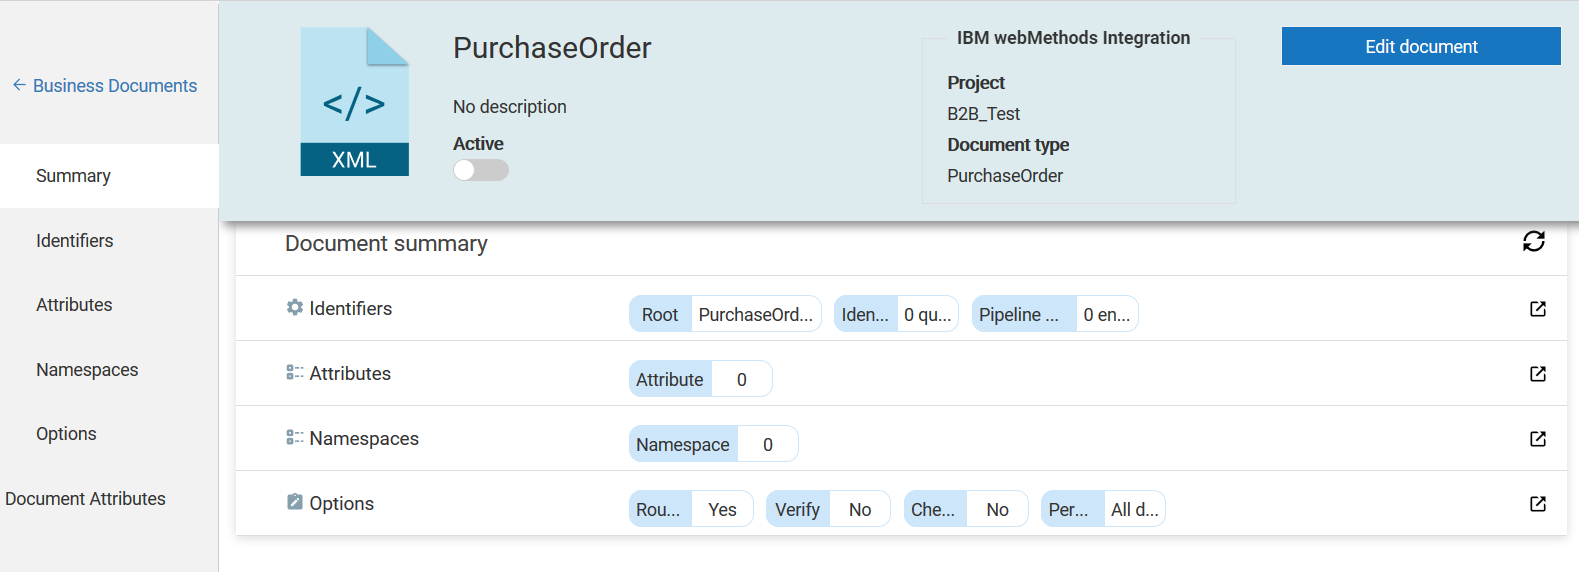
View this XML document in the list of available documents on the Business Documents page.
Next steps
- After adding the XML document, extract the senderID and receiverIDs for the documents manually, so that they can be recognized by IBM webMethods B2B.
processVersion attribute in the pipeline matching step under Identifiers for each of the documents, so that IBM webMethods B2B can recognize Rosettanet messages.- Activate the XML document and test it.
With this use case, the respective document type is also created on IBM webMethods Integration.
Alternate flow
- Update the XML document, as required, using the Edit Document option.
- Use the Edit Document option to update the name, description, project and document type.
- Navigate to the respective pages to edit the Identifiers, Attributes, Namespaces, and Options.
Defining an XML Document by Using an XML Schema
This use case explains how to define an XML document from XML schema.
The use case starts when you have an XML schema based on which you want to define an XML document and ends when you successfully create the XML document.
In this example, define an XML document purchaseorder1, that is project-aware of the project B2B_Test in IBM webMethods Integration and uses an XML schema POAccept.xsd.
Before you begin
Ensure that you have:
An existing project in IBM webMethods Integration.
XML document structure (document type, schema, and so on) defined in the system.
To define an XML document from an XML schema
In IBM webMethods B2B go to Documents > Add Document > XML.

Specify the following details:
- Name. Type
purchaseorder, a name for the XML document. - Description. Optional. Provide a brief description for the XML document.
- Name. Type
Select the project B2B_Test.

Click Next.
Select No to create an XML document without referring to an existing document type from the selected project.
Select XML schema.
Select File as the XML schema source. Provide a URL on which an XML schema source is hosted.
Provide the XML schema file by dragging and dropping the required file in the provided space. Alternatively, either browse for the required file to upload it, or provide the XML schema URL. Ensure that you also have the user credentials to access the URL-hosted schema.
NoteThe XML schema file should have a file size, which is less than or equal to 1 MB.
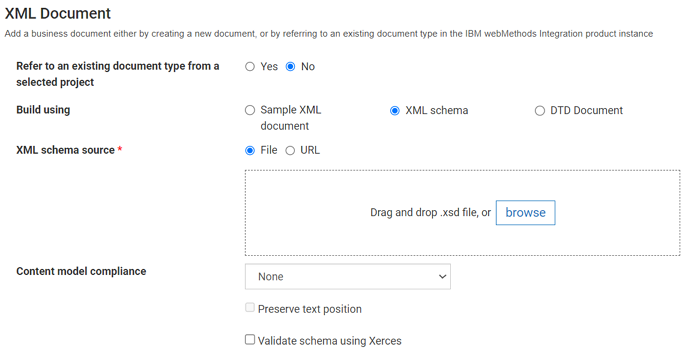
Select the Content model compliance. The content model provides a formal description of the structure and allows the content to be of a complex type. Specify whether IBM webMethods B2B enforces the following model compliance when generating the document type:
- Strict. Generates the document type only if IBM webMethods B2B can represent the content models defined in the XML Schema definition correctly. Document type generation fails if IBM webMethods B2B cannot accurately represent the content models in the source XML Schema definition.
- Lax. Generates the document type even if the content models in the XML schema definition cannot be represented correctly.
- None. Generates the document type that does not necessarily represent or maintain the content models in the source XML Schema definition.
Select Preserve text position. Specifies that the document type generated for a complex type that allows mixed content to preserve the location of text in instance documents. The resulting document type contains a body field after each field and includes a leading body field.
Select Validate schema using Xcerces. IBM webMethods B2B uses the Xerces Java parser to validate the XML Schema definition.
Click Next.
In the Select root node section, select the element PurchaseOrderAcceptance that you want to use as the root element for the document type.
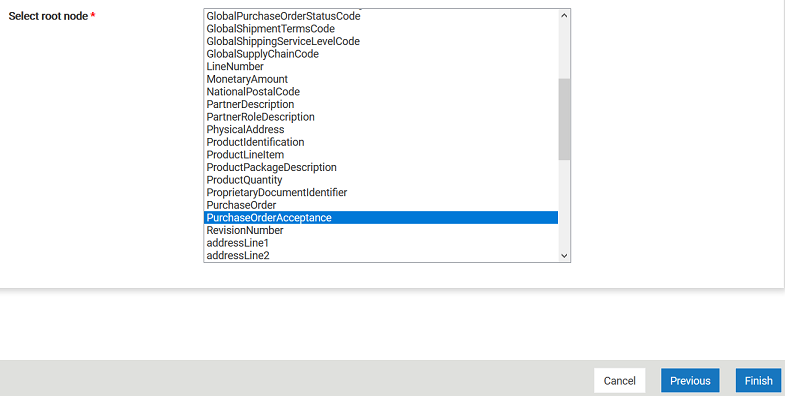 Select multiple elements by pressing the CTRL key.
If IBM webMethods B2B determines that the XML Schema definition is invalid, the Select root node panel displays an error message to that effect. Click Cancel to abandon the attempt to create a document type.
Select multiple elements by pressing the CTRL key.
If IBM webMethods B2B determines that the XML Schema definition is invalid, the Select root node panel displays an error message to that effect. Click Cancel to abandon the attempt to create a document type.Click Finish. The XML document is created, and the document details page appears displaying the following details:
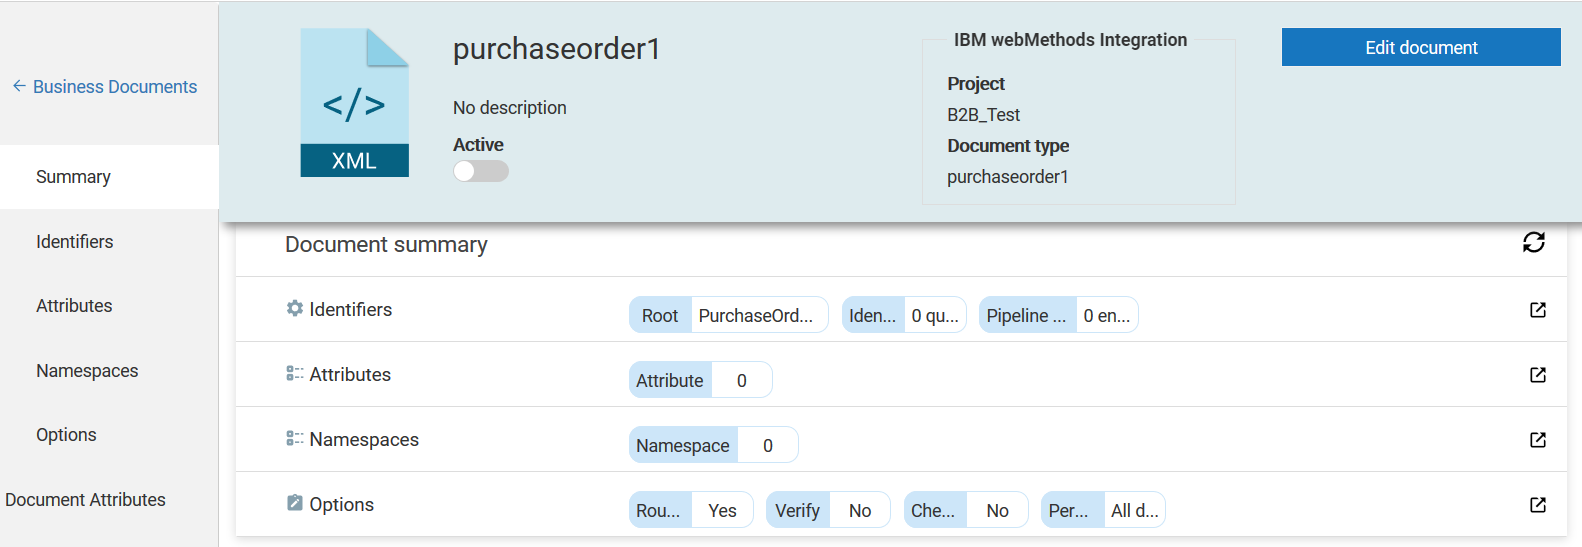 View this XML document in the list of available documents on the Business Documents page.
Next steps
- After adding the XML document, you must manually extract the senderID and receiverIDs for the documents, so they can be recognized by IBM webMethods B2B.
processVersion attribute in the pipeline matching step under Identifiers for each of the documents, so that IBM webMethods B2B can recognize Rosettanet messages.- Activate the XML document and test it.
With this use case, the respective document type is also created on IBM webMethods Integration.
Alternate Flow
Update the XML document, as required, using the Edit Document option.
Use the Edit Document option to update the name, description, project, and doctype.
Navigate to the respective pages to edit the Identifiers, Attributes, Namespaces, and Options.
Defining an XML Document with a DTD
This use case explains how to define an XML document with a DTD.
The use case starts when you have either a plain DTD document or a DTD document in a compressed zip, or a URL on which a DTD is hosted based on which you want to define an XML document. The use case ends when you create the XML document.
In this example, define an XML document based on a DTD purchaseorder1, that is project-aware of the project B2B_Test in IBM webMethods Integration and uses a DTD POAccept.DTD.
Before you begin
Ensure that you have an existing project in IBM webMethods Integration.
To define an XML document with a DTD
In IBM webMethods B2B go to Documents > Add Document > XML.
Provide the following details:
- Name. Type purchaseorder1, a name for the XML document.
- Description. Optional. Provide a brief description for the XML document.
Select the project B2B_Test.

Click Next.
Select No to create an XML document without referring to an existing document type from the selected project.
Select DTD Document to build the XML document.
Select the method to upload the DTD document. Either use a plain DTD document that is available locally, or a DTD in a compressed format or a URL that hosts the DTD document.
If you upload a compressed DTD document, ensure that you provide the DTD document path along with the file name within the compressed file. For example, if the DTD document is within a several levels of sub folders, specify the exact file path and the filename of the DTD document.
NoteThe DTD document or Compressed zip containing DTD document should be less than or equal to 5 MB in size.
Click Next.
Select a root DTD with which you want to create the XML file.
Click Finish.
Next steps
- After adding the XML document, you must manually extract the senderID and receiverIDs for the documents, so they can be recognized by IBM webMethods B2B.
processVersion attribute in the pipeline matching step under Identifiers for each of the documents, so that IBM webMethods B2B can recognize Rosettanet messages.- Activate the XML document and test it.
With this use case, the respective document type is also created on IBM webMethods Integration.
Alternate flow
Update the XML document, as required, using the Edit Document option.
Use the Edit Document option to update the name, description, project, and doctype.
Navigate to the respective pages to edit the Identifiers, Attributes, Namespaces, and Options.
Updating an XML Document
Modify or update the following aspects of an XML document:
Status
Description
Options
Properties of documents that have a structure associated with it.
These properties impact the behavior of each node in an inbound document. Any inbound document that deviates from the properties you set for each of the nodes, generates appropriate validation errors in the Course of transaction.
To update an XML document
In IBM webMethods B2B, go to Documents.
Select an XML document from the Business Documents page.
Click Edit Document to modify the document name, description, project name, and document type, as required.
Click Update.
Modify the following fields by navigating to respective pages in the document summary section:
Identifiers: Modify the information for the following identifiers:
Root tag to match the document type
Doctype identifier that inbound documents must have to match the document type
Identifying queries
Pipeline variables that must be present in inbound documents to match the document type
Attributes: Document attribute values to extract from documents that match this document type.
Namespaces: Namespace mappings for IBM webMethods B2B to locate the nodes identified by the XQL queries.
Options: Settings for rule processing, duplicate check, and document persistence.
- Enable or Disable Processing Rule Routing
- Enable or disable digital signature verification
- Check for duplicate document
- Persist document option
Click Update.
For details on the fields and their description, see XML Document Properties
The XML document is updated to include the modifications.
Next steps
Activate the document and test it.
Testing an XML Document
If you have samples of XML documents IBM webMethods B2B processes, test them to determine whether each document:
Matches exactly one XML document. The XML document types are set up correctly for the document.
Does not match any XML document. IBM webMethods B2B considers such a document an unknown document type. Create a document type using the sample document or update an existing document type to identify the document.
Matches more than one XML document. IBM webMethods B2B considers the document as an unknown document type if it cannot determine which document type to use. Update the XML document types so that the document matches exactly one XML document type.
IBM webMethods B2B does not test documents against disabled document types.
IBM webMethods B2B does not actually process the document you are testing. That is, IBM webMethods B2B does not perform any pre-processing or processing actions on the document.
Before you begin
Ensure that the XML document is in active state.
To test an XML document
In IBM webMethods B2B, go to Documents.
On the Business Documents page, click Test Document.
Drag and drop the required .xml file
Alternatively, browse and select the required .xml file.
- Click Test XML.
IBM webMethods B2B displays all document types that match the sample document.
Adding RosettaNet PIP Document
The RosettaNet organization creates and maintains Partner Interface Processes (PIPs) to provide common business-process definitions for all RosettaNet message exchanges.
Downloading the PIP
Visit the RosettaNet website.
Locate the corresponding PIP under the PIP directory that you want to create. For example, to request a purchase order change, use 3A8_RequestPurchaseOrderChange_V01_00_00.zip.
Download the PIP zip folder and extract the files.
NoteExtract the contents of the PIP zip folder when the DTD document does not have dependencies.
The folder contains the PIP and the specification file. The specification file in the PIP folder explains the PIP parameters. For more information about the PIP parameters, see Configuring an RNIF params.
Adding a PIP in DTD format
To add a PIP in DTD format in IBM webMethods B2B, see Defining an XML Document by Using a DTD File.
XML Document Properties
The following sections describe various document properties against which IBM webMethods B2B validates any inbound document. Modify any of these properties, as required.
Identifiers
Define XML document types to be general or specific. For example, define an XML document type that recognizes OAG documents, OAG PROCESS_PO_004 documents, or OAG PROCESS_PO_004 documents from a specific sender.
IBM webMethods B2B displays a tree view of the referred IBM webMethods Integration document in the left panel.
Specify at least one criterion for a document to match a document type. In case of multiple criteria, it must match all the identification criteria you specify. If you specify the Root tag and Doctype criteria, IBM webMethods B2B matches inbound XML documents to those criteria first. If these match, IBM webMethods B2B also checks the identifying XQL queries and values, and the pipeline matching. Matching criteria for XQL queries and its values is case-sensitive.
| Field | Description |
|---|---|
| Root tag | Specifies the root element for the document type. It is the value that inbound documents must have in the root tag to match the document type. |
| Doctype identifier | Specifies the system or public identifier from the DOCTYPE declaration that inbound documents must have to match the document type. For example, to identify a document that has the DOCTYPE declaration <!DOCTYPE cXML SYSTEM “cXML.dtd”>, you would type cXML.dtd. |
| Identifying queries | Specify that certain nodes must be present for inbound documents to match the document type. You can also specify the values those nodes must have. To do so, define identifying XQL queries. For example: The identifying query below specifies that the OrderRequest tag must be present: /cXML[0]/Request[0]/OrderRequest[0] The identifying query below specifies that the Identity tag, within the Sender tag > Credential tag, must be present and must evaluate to XYZ Steel Company: /cXML[0]/Header[0]/Sender[0]/Credential[0]/XYZ Steel Company Add a new identifier or replace an existing one. To add a new identifier, select a node for which you want to add an identifying query and click Add Identifier. Provide the XPath expression and the value for the expression. Ensure that the length of the XPath is limited to 2,000 characters. Click Add. Click Update to save the modifications. To replace an identifier, for a particular node select an existing identifier and click Replace Identifier. Choose to modify the value and click Replace. The XPath expression of the selected identifier is replaced with that of the selected node. Click Update to save the modifications. |
| Pipeline matching | Specify pipeline variables that must be present in the inbound documents to match the document type. Criteria for matching inbound documents to the document type are name/value pairs, where values are optional. The pipeline is a IBM webMethods B2B data structure in which input and output values from services of IBM webMethods B2B application are maintained. The pipeline starts with the input to a service and collects inputs and outputs from subsequent services. When a service executes, it has access to all data in the pipeline. If you do not specify a value, the document matches the document type if the pipeline has a variable that matches the specified name, regardless of the variable’s value. If you specify a value, the variable must have the specified value. The variables are inserted into the pipeline by the service from IBM webMethods B2B application that sends the document to IBM webMethods B2B. To add a pipeline variable, click Add Pipeline in the Pipeline matching section on the right. In the Create pipeline match dialog box, type the variable name and optionally, the value. |
Attributes
In the document type, specify the system and custom document attribute values to extract from documents that match this document type. If you want to transform extracted attributes, use built-in or custom transformations. Add a new attribute or replace an existing one.
On the document details page, click Attributes on the left navigation panel.
To add an attribute, select a node in the left panel for which you want to define an XPath query. Click Add To Attributes and provide the following information in the Add extracted attribute dialog box:
| Field | Description |
|---|---|
| XPath expression | IBM webMethods B2B fills in the XQL query for the node. Ensure that the length of the XPath attribute is limited to 2,000 characters. |
| Attribute | Specifies the required document attribute values to extract from documents that match this document type. Select the required attribute in one of the following ways:
Avoid using characters other than: A-Z, a-z,0-9, _ (underscore), - (hyphen) in the attribute names. |
| Type | Specifies the type of the attribute selected. |
| Description | Specifies the description included for the selected attribute. |
| Required | By default, when IBM webMethods B2B cannot extract an attribute, it continues processing, and, if processing completes successfully, sets the processing status to DONE. It does not log an error to the activity log. If you want IBM webMethods B2B to log an error to the activity log when it cannot extract an attribute, you can designate that attribute as required for extraction. If processing completes successfully, IBM webMethods B2B sets the processing status to DONE W/ERRORS. |
| Transformation | IBM webMethods B2B can transform extracted attributes before storing them in the IBM webMethods B2B database.
When IBM webMethods B2B extracts a NUMBER or NUMBER LIST from a document, it uses the number parsing behavior of java.lang.Number. For example, if the NUMBER or NUMBER LIST contains the value 100zzz, IBM webMethods B2B interprets the value as 100, instead of displaying an error as it would if the value were zzz100. |
To replace an existing attribute, select a node for which you want to replace an attribute. Select an existing attribute from the list and click Replace Attribute. Modify the attribute name and click Replace. The XPath expression of the selected attribute is replaced with that of the selected node. Click Update to save the modifications.
Namespaces
If an XML document uses namespaces, the elements in that document might be prefixed with a string. When you create XQL queries to identify elements within the document, the XQL queries must include the prefix. If XML documents use equivalent namespaces but have different prefixes, you must define namespace mappings for IBM webMethods B2B to locate the nodes identified by the XQL queries. Namespace mappings identify all prefixes that identify the same namespace (that is, point to the same URI).
Include a namespace mapping for each prefix and URI combination that you expect to receive in XML documents from the partners. If IBM webMethods B2B receives a document that uses a prefix that is not defined in the namespace mappings table, it performs a literal match of the XQL queries against the document.
Options
On the Options page, define the options and actions, as required:
| Field | Description |
|---|---|
| Enable Processing Rule Routing | Enables processing of documents using pre-processing and processing actions defined in a processing rule.
If you want to process documents using only pre-processing actions defined in the document type, disable processing rule routing. |
| Validate document structure | Validates the structure of the inbound document against the available schema.
|
| Verify digital signature | Executes a verification service to verify the digital signatures of documents.
To use this action, the document type must specify extraction of the SignedBody and Signature system attributes, and the signature must be a PKCS#7 detached signature of the signed body. In addition, the profile for each partner whose digital signature you want to verify must specify a certificate. IBM webMethods B2B ensures that the signed body has not changed by verifying the digital signature. To verify that the sender is who it claims to be, IBM webMethods B2B matches the certificate from the digital signature to the certificate in its database for the sender. Note
To verify the digital signature of cXML documents, you must enable the Validate the signed messages option on the Channels > Configuration page.
|
| Check for Duplicate Document | Checks for a document with the same Document ID; the same Document ID and sender; the same document ID, sender, and receiver; or the same document ID, sender, and document type. In the extraction specifications, you must specify extracting the necessary attributes for the option you select. If you want to use a custom service that performs the check based on other attributes, click Select and search or browse for the service. |
| Save | Saves documents to the database.
You must save a document to the database when you want to:
Choose to save All documents or Only unique documents. Select whether you want to persist just the Content, Attributes, Activity log or all of them in the saved document. |
See the [Tutorial on Processing XML Document Type With an AS2 Channel](https://tech.forums.softwareag.com/t/processing-xml-document-types-on-webmethods-io-b2b/237469) for examples.
See the [Tutorial on Processing XML Document Type With an HTTP Inbound Channel](https://tech.forums.softwareag.com/t/process-xml-documents-over-http-inbound-channel-with-workflows/237472) for examples.
Accessing XPath nodes
All the XPath operators and XPath axes can be used to access the nodes. For the complete list of operators and axes on XPath, see the XML Path Language (XPath) 3.0 standards.
The following is an XML document sample used in the examples:
<PurchaseOrderRequest>
  <PurchaseOrder>
    <deliverTo>
      <PhysicalAddress>
        <cityName>
          <FreeFormText>Reston VA</FreeFormText>
        </cityName>
        <addressLine1>
          <FreeFormText>IBM</FreeFormText>
        </addressLine1>
        <addressLine2>
          <FreeFormText>11700 Plaza America Drive</FreeFormText>
        </addressLine2>
        <addressLine3>
          <FreeFormText>Reston VA</FreeFormText>
        </addressLine3>
        <NationalPostalCode>20190</NationalPostalCode>
      </PhysicalAddress>
    </deliverTo>
    <comment>
      <FreeFormText>Comments go here</FreeFormText>
    </comment>
    <packListRequirements>
      <FreeFormText>Packing List Requirements</FreeFormText>
    </packListRequirements>
    <totalCost free="noMonetaryValue">6510</totalCost>
    <!-- This is the items array series -->
    <!-- Item 1 -->
    <ProductLineItem>
      <shipFrom>
        <GlobalLocationIdentifier>Warehouse 1</GlobalLocationIdentifier>
      </shipFrom>
      <ProductQuantity>150</ProductQuantity>
      <LineNumber>1</LineNumber>
      <productUnit>
        <ProductPackageDescription>
          <ProductIdentification>
            <GlobalProductIdentifier>Anvil</GlobalProductIdentifier>
            <PartnerProductIdentification>
              <GlobalPartnerClassificationCode>5644</GlobalPartnerClassificationCode>
              <ProprietaryProductIdentifier>CS-1100</ProprietaryProductIdentifier>
            </PartnerProductIdentification>
          </ProductIdentification>
        </ProductPackageDescription>
      </productUnit>
    </ProductLineItem>
    <!-- Item 2 -->
    <ProductLineItem>
      <shipFrom>
        <GlobalLocationIdentifier>Computer Warehouse 1</GlobalLocationIdentifier>
      </shipFrom>
      <ProductQuantity>120</ProductQuantity>
      <LineNumber>2</LineNumber>
      <productUnit>
        <ProductPackageDescription>
          <ProductIdentification>
            <GlobalProductIdentifier>Hammer</GlobalProductIdentifier>
            <PartnerProductIdentification>
              <GlobalPartnerClassificationCode>5672</GlobalPartnerClassificationCode>
              <ProprietaryProductIdentifier>CS-1150</ProprietaryProductIdentifier>
            </PartnerProductIdentification>
          </ProductIdentification>
        </ProductPackageDescription>
      </productUnit>
    </ProductLineItem>
  </PurchaseOrder>
</PurchaseOrderRequest>
The following table lists some path expressions and the result of the expressions based on the sample XML document:
| Example String | XPath Results |
|---|---|
| PurchaseOrder | Selects all nodes with the name PurchaseOrder. |
| /PurchaseOrder | Selects the root element PurchaseOrder. |
| PurchaseOrder/deliverTo | Selects the deliverTo element. |
| //deliverTo | Selects all deliverTo elements in the document. |
| PurchaseOrder//deliverTo | Selects all book elements that are
descendant of the *PurchaseOrder* element.
|
| //@free | Selects all attributes that are named free.
noMonetaryValue
|
| //ProductLineItem[ProductQuantity>120]/ProductQuantity | Selects the
productLineItem only if the
productQuantity is greater than 120.
|
| //PurchaseOrder/totalCost | //ProductLineItem[ProductQuantity>120]/ProductQuantity | Selects all the
totalCost AND
ProductQuantity, if the
ProductQuantity is more than 120.
|
| //PurchaseOrder/ProductLineItem[last()] | Selects the last *ProductLineItem* element
that is the child of the *PurchaseOrder* element.
|
| * | (Wildcard) Matches any element node. |
| @* | (Wildcard) Matches any attribute node. |
| node() | (Wildcard) Matches any node of any kind. |
| /PurchaseOrder/* | Selects all the child element nodes of the PurchaseOrder element. |
| //* | Selects all elements in the document. |
| //totalCost[@*] | Selects all title elements which have at
least one attribute of any kind.
|
Document Attributes
Document attributes identify specific content in the documents when they pass through the network. This specific content in the document may be of your interest in the document. For example, a purchase order number or the account number of a purchaser. You can write specific logic to process a document with a certain purchase order after you extract the attributes of your interest in the document.
The following are a few reasons to extract document attributes:
To use extracted attributes as a criterion for using a particular processing rule. For example, if you want to use one processing rule if the sender is Partner A and another processing rule if the sender is Partner B, you would extract the system attribute SenderID. Or if you want to use a particular processing rule when the receiver is Partner C and the total order amount is greater than $10,000, you will extract the system attribute ReceiverID and the custom attribute Total_Order_Amount.
To perform certain processing actions that require extracted attributes. For example, if you want to deliver a document to the receiver partner, you would extract the system attribute ReceiverID. If you want to verify the digital signature of an XML document, you would extract the system attributes SignedBody and Signature.
If you want to pass extracted attributes for specific type of analysis. For example, if you want to generate a report on the purchase order quantity for a particular sender from a particular receiver, and classify them as platinum, gold, and silver partners, you would extract the custom attribute PO_Quantity and the system attributes SenderID and ReceiverID and write a business logic to further categorize them.
System Attributes
System attributes are the document attributes that IBM webMethods B2B owns. The system attributes are:
| System Attribute | Description |
|---|---|
| Sender ID | Identification of the sender of a document. |
| Receiver ID | Identification of the receiver of a document. |
| Document ID | Identification of the document. |
| User Status | The status that you or a partner associates with the document. |
| Conversation ID | Identification within a document that associates this document with other documents in the same business process (or conversation of documents). |
| Signed Body | Portion of a document that contains data that is digitally signed. |
| Signature | Portion of a document that contains the digital signature of the document. |
Custom Attributes
Custom Attributes are attributes that you define to identify any other content that you are interested in extracting from the documents. For example, to extract the purchase order number from documents, you might define a document attribute named PO_Number. To extract the total amount of a purchase order, you might define a document attribute named Total_Order_Amount.
Creating Custom Document Attributes
Create custom attributes for all the types of documents you expect to receive; attributes are not associated with a specific document type. Later, when you define the document types or add an extended criteria for a rule, you would specify the attributes to extract and to use as criteria.
To create a custom document attribute
In IBM webMethods B2B, navigate to Business Documents > Document Attributes and click Add Document Attribute.
Provide a unique name for the document attribute and optionally, a description. There are certain words you must avoid while creating custom attributes because they might be a part of system attributes, database columns, to name a few. Few words that you must avoid include DocID, DocTimestamp, TypeName, SenderID, SenderCorp, SenderUnit, ReceiverID, ReceiverCorp, ReceiverUnit, RoutingStatus, UserStatus, NativeID, GroupID, ConversationID, Comments, SenderProfileGroup, ReceiverProfileGroup, DocTypeID, and NS Name.
Specify the attributes’ Data type. Select one of the following Data types:
- Datetime.
- Datetime List
- Number
- Number List
- String
- String List
Set the status to enabled if you want the attribute to be in Active state. The attribute is by default set to be in the active status. Set the status as inactive and change the status to active at a later point of time by using the Edit (
 ) option for the respective document attribute.
Enable the Save option to save the attribute to the database. Save is enabled by default.
Click Add. The custom attribute is created and listed in the Document attributes list.
Avoid using characters other than: A-Z, a-z,0-9, _ (underscore), - (hyphen) in attribute the names.
These document attributes are used later when you define document types as a criterion to extract the documents. Modify the Document attribute details or change the status of a document attribute by using the Edit ( ) option for the respective attribute.
See the [Custom Attribute Tutorial](https://tech.forums.softwareag.com/t/webmethods-io-b2b-manage-custom-attributes/237470) for examples.
RNIF Attribute Behaviors
When you receive an HTTP header with the prefix x-RN- for an inbound RNIF message, IBM webMethods B2B creates a document attribute. You can view this RNIF-specific attribute in the attribute tab of the Transactions page. The RNIF-specific custom attribute is case sensitive.
Using Extracted Attributes as Extended Criteria in an Existing Processing Rule
Summary
You can use the extracted attributes as extended criteria in processing rules to apply specific logic to specific attributes in a business document using specific processing rules. The use case begins when you have an attribute in a document that requires special routing using processing rules. The use case ends when you have routed the document successfully using the intended processing rule.
Before you begin
- Ensure that you have added the document from which you want to extract the attribute.
- Ensure that you have a processing rule that takes necessary processing action.
Basic flow
To extract attributes from a document:
- In IBM webMethods B2B, go to Documents and click on the document for which you want to extract attributes.
- Go to Attributes.
In the left-side document tree view, select the attribute you want to extract and click Add to Attribute on the right-side panel.

In the Add extracted attribute dialog box, specify the following details:
Fields Values XPath expression The complete XPath expression. Attribute Select an attribute either from the list or add one by clicking Add attribute. To add an attribute, specify the following details: - Name. Name of the attribute.
- Data type. Data type of the attribute.
- Description. A short description of the attribute.
- Status. Status of the attribute. The possible values are active or inactive.
- Save. Save the attribute to the instance.
Required Specify if the attribute value must be mandatorily present in the inbound business document. Transformation Specify if a transformation function must be applied to the attribute. The transformations you can apply depend on the data type of the attribute. Click Add.
In the Attributes page, click Update.
To use the extracted attribute as extended criteria in a processing rule:
- In IBM webMethods B2B, go to Rules and select the rule to which you want to add the extended criteria.
- In the Extended criteria page, click Add Extended Criteria.
In the Add extracted attribute dialog box, specify the following details:
Fields Values Attribute Select the attribute that you want the processing rule to match with the inbound document. Data type Select the data type of the value associated with the attribute. Operator Select the match criteria. The operator you can use depends on the data type of the attribute. Value Specify the value to which the attribute must be a match. Click Add.
In the Extended criteria page, click Update.
EDI Attribute Behaviors
- If there is code in the XPath of an EDI attribute, for example, /ST/RIC/RIC01/code, then the code list validator is applied.
- For a record or a composite, if the value of the Max Repeat property is greater than 1, then the XPath contains an array representation - [0]. For example, /ST/TRN[0]/TRN01, TRN[0] represents an array.
- If you extract an attribute which has a code in the XPath, then changing the validator property results in a scenario where the attribute is extracted. Similarly, if you change the validator property to code list validator, the attribute is not extracted.
Next steps
See the Course of transaction to check if the inbound document was processed by the correct processing rule after matching the extended criteria.
See the Extended Criteria Tutorial for examples.
Peppol for AS4
How Peppol network worksBefore you beginBasic flowNext stepsIBM webMethods B2B facilitates cross-border eProcurement through the Peppol network, which enables trading partners to exchange electronic documents using a set of artifacts and specifications through the AS4 channel.
How Peppol network works
Peppol Access Points connects users to the Peppol network and enable the exchange of electronic documents according to the Peppol specifications. The sender and receiver selects their preferred access point provider to connect with all existing Peppol participants on the network.
To transmit electronic documents successfully from a sender to the intended recipient, it is necessary for all Peppol access points to know each other. This is facilitated by a centralized service, called the Service Metadata Locator (SML), which is maintained by Peppol. The Peppol SML determines the appropriate Service Metadata Publisher (SMP) to utilize to get the necessary delivery details for any Peppol participant.
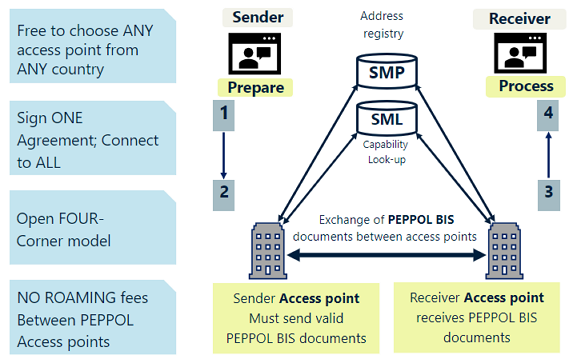
For more information, see Peppol with IBM webMethods B2B
Before you begin
Ensure you set up the following assets in IBM webMethods B2B for the related Flow services to work in IBM webMethods Integration:
Enterprise profile:
Create the access point profile to send the electronic documents.
To create the access point profile for production, create a partner profile and add the identity type as urn:fdc:peppol.eu:2017:identifiers:ap, and give the identity value as CNAME. CName is the subject common name (CN) in the Peppol Access Point public certificate issued to the access point by the Peppol organization. It is located in the Details tab of the certificate in the Subject > CN field.Add the Sign - Verify and Encrypt - Decrypt complete public certificate chain of access point along with the private key provided by the Peppol Organisation in the access point profile for sending the documents through AS4 channel.
Configure the ID type value (CNAME for ID type urn:fdc:peppol.eu:2017:identifiers:ap) and access point certificate chain for the test and production environment. To set the access point certificate, go to Runtime options in IBM webMethods B2B > AS4 > Peppol. Set the Test Access Point Profile ID and Production Access Point Profile ID as the peppol identity type value (CNAME) of the test and production access point profile.
For more information about access point certificate, see AS4 runtime options.NoteYou must update the CA certificates chain in the Runtime options, whenever there is any change in the certificates by Peppol organization. By default IBM webMethods B2B uses the default peppol CA certificates chain.IBM webMethods B2B has a set of default TPA values as per the peppol specification. You cannot delete or modify the peppol-specific TPA. But, you can select a specific sender and receiver to make it partner-specific.
For more information, see Working with Peppol TPA Parameters.
End-user profile:
- Create the end-user partner profile with the identity type as urn:fdc:peppol.eu:2017:identifiers:ap and give the identity value in the format CNAME(participantID) and participantID. Both values must be added to the end-user partner profile. For example:POP000143(0151:79000024733) and 0151:79000024733.
End-user specific sign/encrypt certificates can be configured as part of the end-user partner profile. When the certificates are not configured, by default, the access point profile certificates are used for all the transactions between the peppol participants.
To receive Peppol documents
- Create an AS4-in channel and associate it with the access point profile. You must disable Validate user when configuring the AS4-in channel.
Basic flow
The transactions appears on the Transactions page of IBM webMethods B2B when the Flow services in IBM webMethods Integration is run.
Next steps
See the Course of transaction to check if the transactions are recorded in the Transactions page of IBM webMethods B2B as per the partner-specific TPA.
