How do I Secure External Elasticsearch Communication using HTTPS with ReadonlyREST Plugin?
You can use the ReadonlyREST plugin to secure external Elasticsearch, one of the components in an API Management setup, to communicate securely over HTTPS.
Before you begin
Ensure that you have:

Downloaded the ReadonlyREST plugin. You can download the ReadonlyREST plugin compatible with external Elasticsearch 8.2.3 from
https://readonlyrest.com/download and store it in your file system.
Installed an updated version of Java in your system and the path of the environment variable is set.
To secure external Elasticsearch communication using HTTPS
1. Install and initialize the ReadonlyREST plugin.
a. Shutdown API Gateway.
b. Open the command prompt from the location SAG_Install_Dir/bin
c. Run the following command:
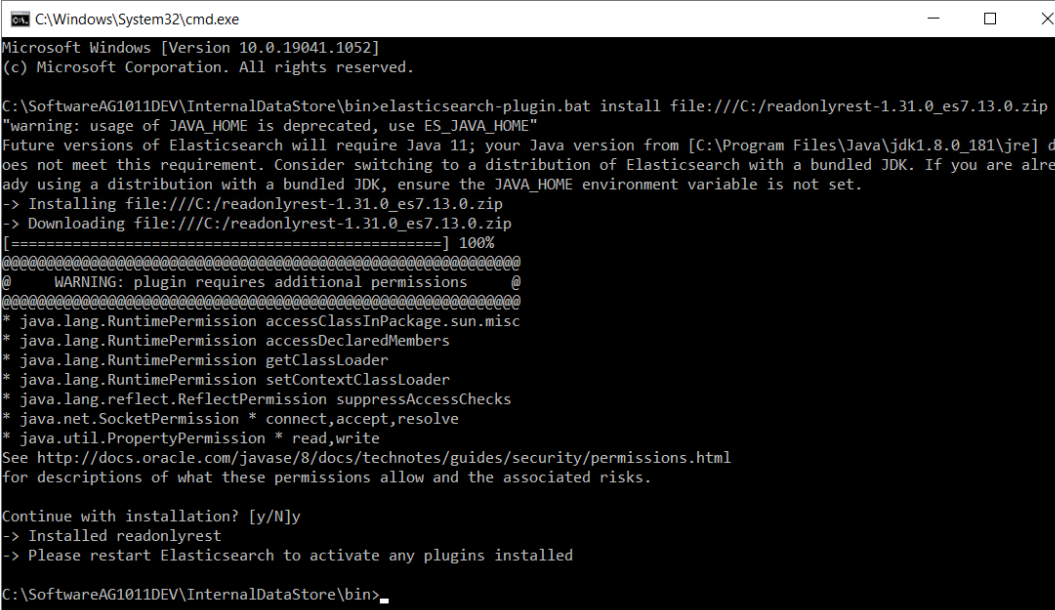
elasticsearch-plugin.bat install file:///ReadonlyREST_plugin_zip_file_location_in_the_file_system
d. Type y when the installation procedure prompts for additional required permissions.
Installed readonlyrest message appears on successful installation.
e. Navigate to the SAG_Install_Dir\config folder and create an empty file with the name, readonlyrest.yml (in the same folder where elasticsearch.yml is available).
f. Copy the folder sagconfig from SAG_Install_Dir\IntegrationServer\instances\Instance_name\packages\WmAPIGateway\config\resources\elasticsearch to SAG_Install_Dir.
g. Copy the certificates node-0-keystore.jks and truststore.jks from SAG_Install_Dir\sagconfig folder to SAG_Install_Dir\config folder. Because, the keystore should be stored in the same directory where elasticsearch.yml and readonlyrest.yml is available.
h. Run the following command to patch the ReadonlyREST plugin:
java -jar <SAG_Root>/plugins/readonlyrest/ror-tools.jar patch --es-path <SAG_Root>
i. Run the following command to verify whether the patching is successful:
**java -jar <SAG_Root>/plugins/readonlyrest/ror-tools.jar verify --es-path <SAG_Root>
The message - "External Elasticsearch is patched! ReadonlyREST can be used" appears if the patching is successful.
Note:
An elastic user has all the permissions necessary to perform the operations required by the API Gateway. To configure the API Gateway analytics cluster as a non-elastic user, you must have the necessary permissions. Run the following command to create a role with the required permissons:
CURL -XPOST https://<ES_URL>/_security/role/APIGW-super-user-role { "cluster": [ "create_snapshot","manage","manage_ilm", "manage_index_templates", "manage_ingest_pipelines","manage_pipeline"], "indices": [ { "names": [ "gateway*"], "privileges": [ "all","view_index_metadata","manage","write","read","monitor" ] } ]}
By providing * in "names": [ "gateway*"], you grant permission to access all indexes similar to the elastic user.
Provide the following CURL command to associate this role to the user configured in API Gateway:
CURL -XPOST https://<ES_URL>/_security/user/APIGW-super-user
{
"password" : "<Random_Gen_Password_1>",
"roles" : [ "APIGW-super-user-role" ],
"full_name" : "Super User for Dev Portal",
"metadata" : {
"intelligence" : 7
}
}
You can edit the privileges in the CURL command based on your requirements.
2. Protect external Elasticsearch with two-way SSL and basic authorization.
The ReadonlyREST plugin supports plain-text credentials and hashed credentials for basic authorization. You can choose to add plain-text credentials or hashed credentials in the readonlyrest.yml file.
Plain-text credentials
Perform the following steps to include plain-text credentials for basic authorization in the readonlyrest.yml file.
a. Open the readonlyrest.yml file from the SAG_Install_Dir\config folder and add the following text:
readonlyrest:
access_control_rules:
- name: "Require HTTP Basic Auth"
type: allow
auth_key: <plain_text_credentials>
(#For example: auth_key:Administrator:manage)
ssl:
enable: true
keystore_file: "node-0-keystore.jks"
keystore_pass: a362fbcce236eb098973
key_pass: a362fbcce236eb098973
client_authentication: true
where access control rule name: Require HTTP Basic Auth is basic auth authentication, auth_key is the credentials (username and password) in the plain text.
Note:
Ensure that the content is indented properly as shown above, so that the YAML parser can parse them correctly.
Hashed credentials
The ReadonlyREST plugin supports obfuscating the credentials by hashing the credentials using SHA256 algorithm. Use hashed credentials to keep the application secure.
Perform the following steps to include hashed credentials for basic authorization in the readonlyrest.yml file.
To generate the hash code for your password:
b. Replace the auth_key property in the readonlyrest.yml file with auth_key_sha256 property.
c. Add the hashed credentials to the property auth_key_sha256 in readonlyrest.yml file located at SAG_Install_Dir\config.
readonlyrest:
access_control_rules:
- name: "Require HTTP Basic Auth"
type: allow
auth_key_sha256: 927d5619ff87227be6ca8a2cc9ee68c11dd7a08d64d1e20bdc8d86254850b418
ssl:
enable: true
keystore_file: "node-0-keystore.jks"
keystore_pass: a362fbcce236eb098973
key_pass: a362fbcce236eb098973
client_authentication: true
where access control rule name: Require HTTP Basic Auth is basic auth authentication, auth_key_sha256 is the credentials (username and password) in the hashed format and client_authentication is the two way SSL authentication. By default, this property is disabled. You can remove this property or set the value to false if you do not want the server or API Gateway Data Store to validate the client authentication.
d. Save the configuration file readonlyrest.yml.
Note:
The keystore file and its passwords keystore_pass & key_pass are shipped out with
API Gateway product by default. This may not be safe for production environment. For production setup, you can generate your own certificates (keystore and trustore) and configure in the
readonlyrest.yml file. To generate your own certificates, see
ReadonlyREST.
b. After adding plain-text credentials or hashed credentials in readonlyrest.yml file, open the elasticsearch.yml file from the SAG_Install_Dir\config folder and add the following configuration to the existing content and save the file.
http.type: ssl_netty4
xpack.security.enabled: false
This enables HTTPS connection for external Elasticsearch.
3. Secure the inter-node communication.
In a clustered setup, to establish a secure communication between the API Gateway Data Store instances, perform the following steps:
a. Open the readonlyrest.yml file from the SAG_Install_Dir\config folder and add the following configurations towards the end of the existing content and save the file. This configuration must be added to all the nodes which requires encrypted communication within cluster.
ssl_internode:
keystore_file: "node-0-keystore.jks"
keystore_pass: a362fbcce236eb098973
key_pass: a362fbcce236eb098973
The consolidated content of the readonlyrest.yml is as follows:
readonlyrest:
access_control_rules:
- name: "Require HTTP Basic Auth"
type: allow
auth_key_sha256: 927d5619ff87227be6ca8a2cc9ee68c11dd7a08d64d1e20bdc8d86254850b418
ssl:
enable: true
keystore_file: "node-0-keystore.jks"
keystore_pass: a362fbcce236eb098973
key_pass: a362fbcce236eb098973
ssl_internode:
keystore_file: "node-0-keystore.jks"
keystore_pass: a362fbcce236eb098973
key_pass: a362fbcce236eb098973
client_authentication: true
b. Open the elasticsearch.yml file from the SAG_Install_Dir\config folder and add the following configuration to the existing content and save the file.
transport.type: ror_ssl_internode
This configuration must be added to all the nodes which requires encrypted communication within cluster.
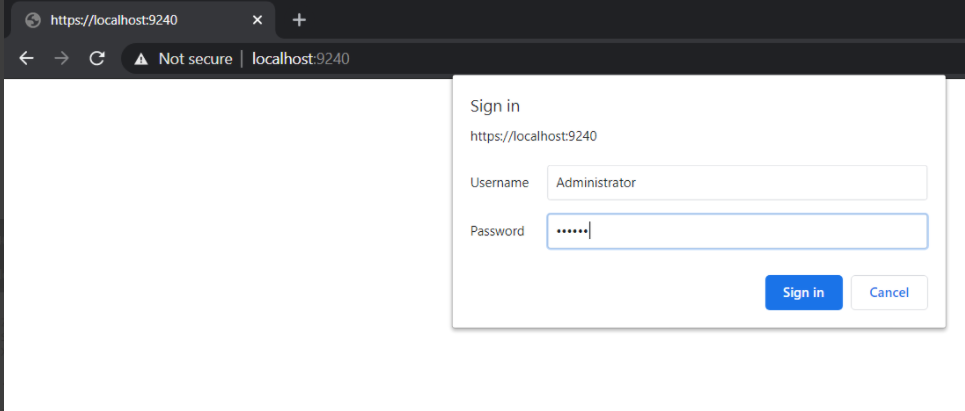
c. Shutdown and restart the external Elasticsearch node and verify if it is protected by accessing the node in HTTPS URL with the given username and password.
https://<host>:<port>
External Elasticsearch now runs on a secure channel on the HTTPS port and requests the basic authentication details.
4. Change the external Kibana configuration to connect to external Elasticsearch.
a. Open the kibana.yml file from the SAG_Install_Dir\profiles\IS_instance_name\apigateway\dashboard\config folder.
b. Remove the # symbol from the following properties and provide the corresponding values for the properties and save the file.
elasticsearch.customHeaders.Authorization:
"Basic QWRtaW5pc3RyYXRvcjptYW5hZ2U="elasticsearch.ssl.verificationMode:
certificateelasticsearch.ssl.certificateAuthorities:
<file path of your root-ca.pem certificate>elasticsearch.hosts: [https://<
host>:
<port>]
Sample kibana.yml file is as follows:
server.port: 9405
server.host: "0.0.0.0"
server.basePath: "/apigatewayui/dashboardproxy"
elasticsearch.hosts: ["http://localhost:9240"]
elasticsearch.customHeaders.Authorization: "Basic QWRtaW5pcRyYXRvcjptYW5hZ2U="
elasticsearch.ssl.verificationMode: certificate
elasticsearch.ssl.verificationAuthorities: <SAG_Root>/sagconfig/root-ca.pem
pid.file: "kibana.pid"
console.ui.enabled: false
c. Open the uiconfiguration.properties file from the SAG_Install_Dir\profiles\IS_instance_name\apigateway\config folder.
d. Set the value of the property apigw.es.url to https://localhost:9240.
5. Change the API Gateway configurations to connect to external Elasticsearch.
a. Open the config.properties file from the SAG_Install_Dir\IntegrationServer\instances\instance_name\packages\WmAPIGateway\config\resources\elasticsearch folder.
b. Remove the # symbol from the following properties and provide the corresponding values for the properties and save the file.
pg.gateway.elasticsearch.http.username=
Administratorpg.gateway.elasticsearch.http.password=
managepg.gateway.elasticsearch.https.truststore.filepath=
SAG_Install_Dir/sagconfig/truststore.jkspg.gateway.elasticsearch.https.truststore.password=
2c0820e69e7dd5356576pg.gateway.elasticsearch.https.enabled=
truec. Start external Elasticsearch.
d. When external Elasticsearch is up and running, start the external Kibana server by running the kibana.bat file located at SAG_Install_Dir\profiles\IS_default\apigateway\dashboard\bin.
e. Start API Gateway.
You can now log on, create APIs, and access the Analytics page without any challenge window for user credentials.
Troubleshooting tips while securing external Elasticsearch communication using HTTPS
If the loading bar does not disappear, you can navigate to the following location and set the value of the property xpack.fleet.enabled to false-
SAG_Install_Dir/wm10.11/profiles/IS_apigateway/apigateway/dashboard/config/kibana.yml
Note:
The following error message returned on starting external Elasticsearch can be ignored:
Failed to gather field mappings for index [metrics-endpoint.metadata_current_default] org.elasticsearch.action.NoShardAvailableActionException: No shard available for [org.elasticsearch.action.fieldcaps.FieldCapabilitiesIndexRequest/unset]
Configuring ReadonlyREST plugin with Self-generated certificates
As an API Provider, if you want to generate your own certificates to use with the ReadonlyREST plugin instead of the default certificates that are shipped with API Gateway, you can configure ReadonlyREST with user generated certificates. You have to perform this procedure if your organization does not have policies and procedures in place regarding the generation and use of digital certificates and certificate chains, including the use of certificates signed by a CA and you want to generate a self-signed certificate and import them into the keystore and truststore. Use Java Keytool to generate the required certificates for running ReadonlyREST in a production environment.
1. Shut down API Gateway, external Elasticsearch, and external Kibana.
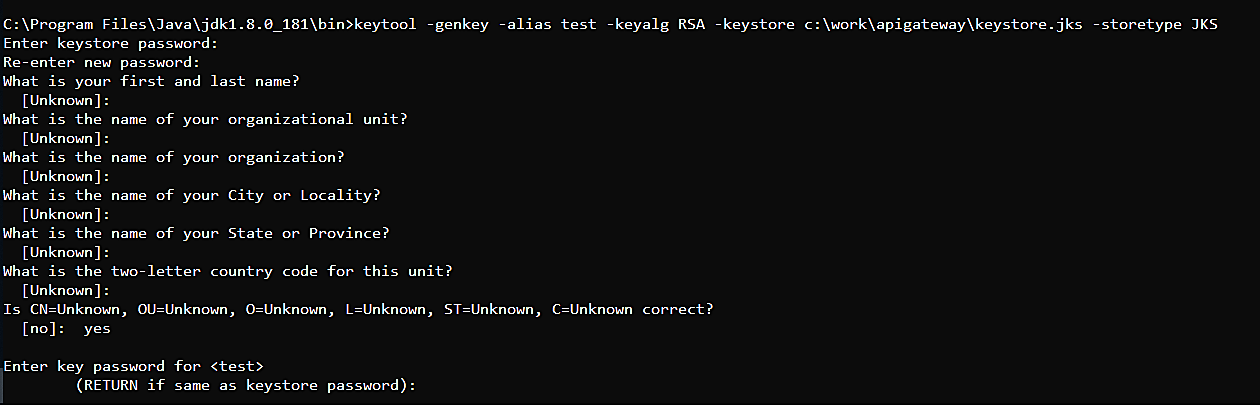
2. Generate keystore.jks file.
a. Run the following command from Java_Install_Directory/bin to generate keystore certificate in the corresponding file location using Java Keytool:
keytool -genkey -alias alias_name -keyalg RSA -keystore file_location\keystore.jks -storetype JKS
The keystore certificate is generated in the file location that you specify.
Example:
b. Replace the generated keystore.jks file in the SAG_Install_Dir\config folder.
c. Update the properties keystore_file, keystore_pass and key_pass in the readonlyrest.yml file located at SAG_Install_Dir\config.
Sample readonlyrest.yml file is as follows:
readonlyrest:
access_control_rules:
- name: "Require HTTP Basic Auth"
type: allow
auth_key: Administrator:manage
ssl:
enable: true
keystore_file: "keystore.jks"
keystore_pass: <Keystore pass>
key_pass: <Key pass>
client_authentication: true
3. Export certificate from the keystore to configure in Kibana.yml file:
a. Run the following command to export the certificate from the keystore and place it in the required location. :
keytool -export -alias alias_name -keystore keystore_file_location -rfc -file <filename>.cert
The exported certificate is saved in the specified location.
b. After exporting, update the exported certificate name and the file location of the exported certificate in elasticsearch.ssl.certificateAuthorities property in kibana.yml file located at SAG_Install_Dir\profiles\IS_default\apigateway\dashboard\config.
Example:
elasticsearch.ssl.certificateAuthorities: C:\work\apigateway\test.cert
4. Generate truststore and import the generated certificate.
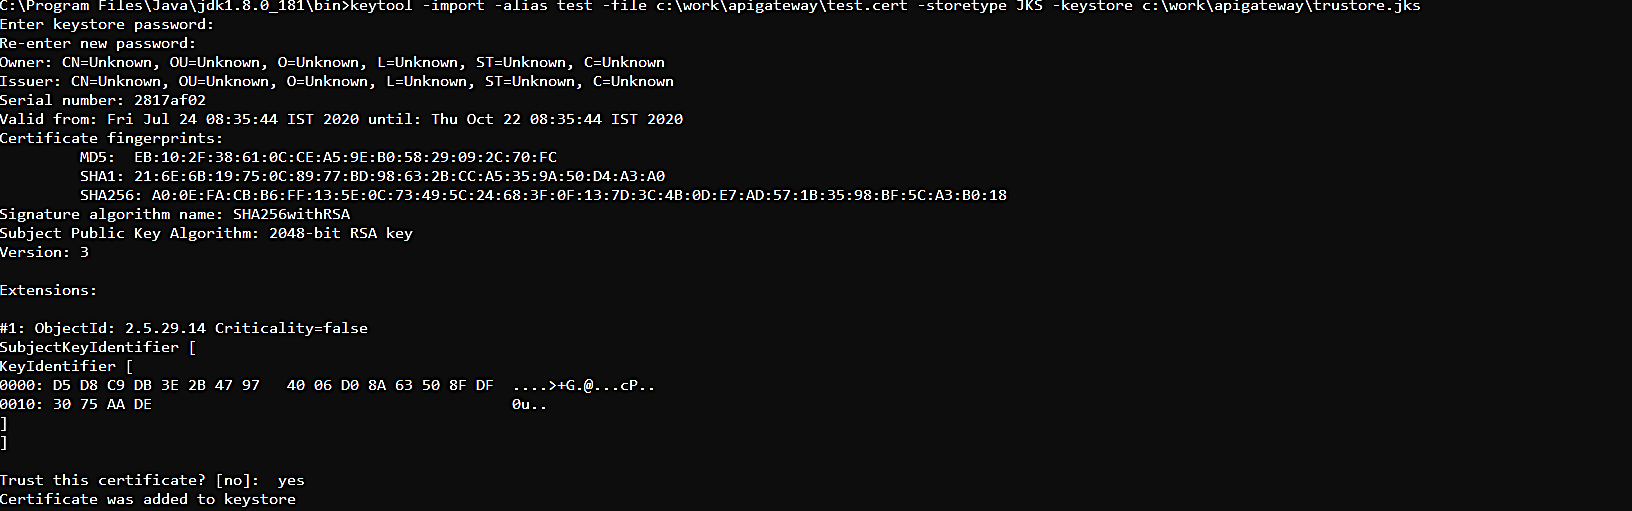
a. Run the following command to generate the truststore file and import the generated certificate into the truststore file.
keytool -import -alias alias_name -file Certificate_file_location
-storetype JKS -keystore file_location_and_file name_for_trustore.jks
The trust store certificate is stored in the specified location. For example: C:\work\apigateway\trustore.jks.
b. Update the details of the generated truststore file in the following properties
pg.gateway.elasticsearch.https.truststore.filepath pg.gateway.elasticsearch.https.truststore.password in the
config.properties file located at
SAG_Install_Dir\IntegrationServer\instances\default\packages\WmAPIGateway\config\resources\elasticsearch.
Example:
pg.gateway.elasticsearch.https.truststore.filepath=C:/work/apigateway/trustore.jks
pg.gateway.elasticsearch.https.truststore.password=your_trustore_password
c. Start external Elasticsearch.
d. When external Elasticsearch is up and running, start the external Kibana server by running the kibana.bat file located at SAG_Install_Dir\profiles\IS_default\apigateway\dashboard\bin.
e. Start API Gateway.
You can now log on, create APIs, and access the Analytics page without any challenge window for user credentials.