Why Publish APIs?
No subtopics in thissection
After you build your APIs, you have to publish them to make the APIs available for consumption by developers and consumers. Publishing an API enables developers and consumers to consume the functionalities exposed through your API. They can then integrate the functionalities, the APIs provide,into applications easily. Creating and developing an API in API Gateway does not make it accessible to your users. You must first activate the API before publishing it to a portal so that the gateway endpoint is available for the developers and consumers to invoke the API.
API Gateway allows you to publish APIs to Developer Portal from where they are available for consumption by developers and consumers.
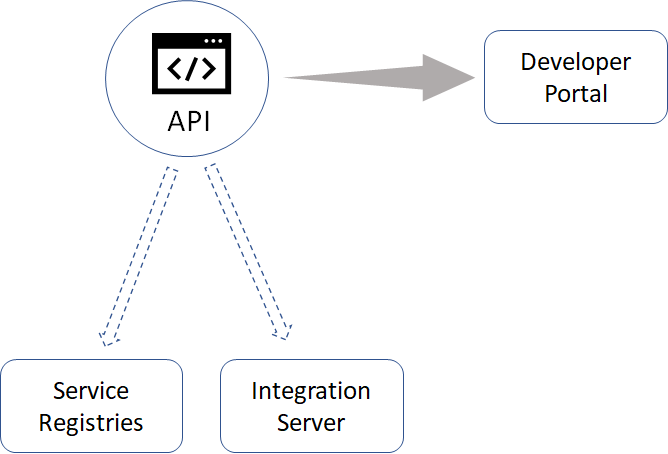
Optionally, API Gateway also allows you to publish the APIs to the following destinations:
Service registries. This enables applications to dynamically locate an API Gateway instance that can process that API.
Integration Server. This is used in API first implementation approach.
In addition to publishing, API Gateway provides you with capabilities to customize your APIs before publishing them. You can customize APIs depending on how you want to restrict exposure of specific information the APIs handle as follows:
- Restrict the exposure of specific resources, methods, and operations of an API to other applications.
- Define a custom gateway endpoint by customizing the URL of the gateway endpoint that your users will use to access the API.
The following sections describe how you can activate an API, customize the gateway endpoint, and publish APIs to different destinations.
Activating an API
No subtopics in thissection
You must first activate the API before publishing it to a portal so that the gateway endpoint is available for developers and consumers to invoke the API.
You must have the Activate/Deactivate APIs functional privilege assigned to perform this task. You can activate an API in the Manage APIs page. Alternatively you can also activate the API from the API Details page.
To activate an API
Click APIs in the title navigation bar.
A list of available APIs appears.Do one of the following:
- Click the toggle button, in the corresponding column of the API to be activated, to change the status to
 to activate the API.
 - Select the API to open the API details page. Click Activate.
- Click the toggle button, in the corresponding column of the API to be activated, to change the status to
Click Yes in the confirmation dialog box.
The API is now activated. The Gateway endpoint is now available, which can be used by the consumers of this API. You can now publish the API to the required destination and expose the API for consumption by the consumers.
You can modify API details or update the API, except the name and version of the API, when the API is in the active state. Active APIs are replaced during deployment with zero downtime and do not break ongoing requests. The updated APIs do not become effective for ongoing requests.
Note- If there is an error while saving after updating an active API, the API becomes inactive but the changes are saved.
- Once the API is activated, you can define the custom gateway endpoints. For more information about gateway endpoints, see Gateway Endpoints.
- Once the API is activated, you can enable the tracer. For more information about how to enable the tracer and view the tracing details, see Trace API.
Deactivating an API
No subtopics in thissection
You can deactivate an API in the Manage APIs page. Alternatively you can also deactivate the API from the API Details page.
You must have the Activate/Deactivate APIs functional privilege assigned to perform this task.
To deactivate an API
Click APIs in the title navigation bar.
A list of available APIs appears.Click the toggle button, in the corresponding column of the API to be deactivated, to change the status to
 to deactivate the API.
Click Yes in the confirmation dialog box.
The API is now deactivated. The API is no more available to be consumed by consumers.
Exposing a REST API to Applications
No subtopics in thissection
The API Provider can restrict the exposure of specific resources and methods of a REST API to other applications.
Consider you have a native REST API created in API Gateway with resources - Resource A, Resource B, and Resource C. You might want to expose Resource A and Resource C, and restrict the visibility of Resource B to other applications. You can use the Expose to consumers button to switch on the visibility of Resource A and Resource C and switch off the visibility of Resource B as required. Similarly, you can restrict the visibility of one or more methods within each individual resource.
If an application attempts to invoke the Resource C in the above REST API, API Gateway returns a HTTP response code 404.
By default, the Expose to consumers button is switched on for all resources and methods of the REST API. Once the API is activated, all of its resources and methods are exposed to registered applications. If you do not want a particular set of resources and methods, or a set of methods in a particular resource to be hidden for registered applications, switch off the Expose to consumers button in the REST API definition.
Note
Be aware that API Gateway does not allow you to activate a REST API if none of the methods in the API are selected for exposing to other applications. You must select at least one method of the REST API to enforce runtime invocations.
To expose a set of resources and methods of the REST API
Click APIs in the title navigation bar.
A list of APIs available in API Gateway appears.Click the name of the required API.
This opens the API details page.Click Edit.
If the API is active, API Gateway displays a warning message to let you know that the API is active.Click Resources and methods.
This displays a list of resources and methods available in the API.a. To select a resource, switch on the Expose to consumers button next to the resource URI. You can select one or more resources to expose to other applications.
b. To select a method within the resource, click on the resource path. In the expanded list of methods, switch on the Expose to consumers button next to the method name. You can select one or more methods to expose to other applications.
Click Save to save the updated API.
Activate the API, if it is not active, to put it into effect.
Exposing a SOAP API and GraphQL API to Applications
No subtopics in thissection
The API Provider can restrict the exposure of specific operations of a SOAP API and GraphQL API to other applications.
Consider you have a native SOAP API or GraphQL API created in API Gateway with operations - Operation A, Operation B, and Operation C. You might want to expose the Operation A and Operation C, and restrict the visibility of Operation B to other applications. You can use the Expose to consumers button to switch on the visibility of Operation A and Operation C and switch off the visibility of Operation B, as required.
If an application attempts to invoke the Operation B in the SOAP API or GraphQL API, API Gateway returns a HTTP response code 404 for SOAP API and response code 400 for GraphQL API.
By default, the Expose to consumers action is switched on for all operations of the SOAP API and GraphQL API. Once the API is activated, exposed operations are available for use in the registered applications. If you do not want a particular set of operations to be hidden for registered applications, switch off Expose to consumers in the SOAP API or GraphQL API definition.
Note
Be aware that API Gateway will not allow you to activate a SOAP API or GraphQL API if none of the operations in the API are selected for exposing to other applications. You must select at least one operation of the SOAP API or GraphQL API to enforce runtime invocations.
To expose a set of operations of the SOAP API or GraphQL API
Click APIs in the title navigation bar.
This displays a list of APIs available in API Gateway.
Click the name of the required API.
This opens the API details page.
Click Edit.
If the API is active, API Gateway displays a warning message to let you know that the API is active.
Click Operations.
This displays a list of operations available in the API.
a. To select an operation, switch on the Expose to consumers button next to the operation URI.
You can select one or more operations to expose to other applications.
Click Save to save the updated API.
Activate the API, if it is not active, to put it into effect.
Gateway Endpoints
How do I Define API-specific Gateway Endpoints?How do I Define Global Gateway Endpoint?How do I Edit Global Gateway Endpoint?How do I Delete Global Gateway Endpoint?Other Gateway Endpoint UsecasesGateway endpoint is the URL that is used to access an API through API Gateway. By default, API Gateway provides a default gateway endpoint for all active APIs. The default gateway endpoint is in the <protocol>://<hostname>/{defaultPrefix}/{apiName}/{apiVersion}/{resourcePath} format.
When there is a need to access the API using a different endpoint, you can define a custom gateway endpoint. In custom gateway endpoints, you can customize the portion of the URL between <hostname> and <resourcePath>.
Custom gateway endpoints can be specific to an API or a global template can be defined through global gateway endpoint.
How do I Define API-specific Gateway Endpoints?
This use case explains how to define custom gateway endpoints specific to an API. You can define more than one custom gateway endpoint to an API. Custom gateway endpoints can be added for all types of APIs such as REST, SOAP, OData, and WebSocket.
The use case starts when you want to define API specific gateway endpoint and ends when you have created the API specific gateway endpoint.
Here are some points that you need to consider, when you define API specific gateway endpoint:
Custom gateway endpoints cannot be created for the APIs, which has blank space or special characters in API name or API version.
Gateway endpoint is case-sensitive.
Gateway endpoint cannot start with pre-defined prefixes such as rest or invoke.
URL path of one custom gateway endpoint cannot start with the URL path of the another custom gateway endpoint or default gateway endpoint. For example, if any of the API has a custom endpoint with URL path abc/custom, you cannot have another custom gateway endpoint with URL path abc/customendpoint. Similarly, if any of the API has a default gateway endpoint gateway/myAPI/v1, you cannot have custom endpoint with URL path gateway/myAPI. However, it is possible to have two valid custom gateway endpoints with URL paths abc/custom1 and abc/custom2, because here one of the URL path is not the extension of another URL path.
In order to use the gateway endpoints feature, the watt.server.url.alias.partialMatching property needs to be true. By default this property is set to true.
API Gateway internally creates the URL aliases, when you create a custom gateway endpoint. These internal URL aliases are hidden from the API Gateway users, and are displayed only in the Integration Server. Software AG recommends that you do not modify any URL alias through Integration Server.
A gateway endpoint can use following variables, which are resolved dynamically:
${defaultPrefix} - resolves based on API type. For REST and OData the defaultPrefix is gateway, SOAP the defaultPrefix is ws, and Websockets the defaultPrefix is websocket.
${apiName} - replaces with the API name value.
${apiVersion} - replaces with the API version value.
For example, when a gateway endpoint uses ${apiName} variable, and if you change the API name, it automatically gets reflected in the gateway endpoint.
NoteIf you want to use a gateway endpoint across all versions of an API, Software AG recommends you to use the ${apiVersion} variable so that the gateway endpoint becomes unique across different versions.
Important
At any given point, API Gateway does not allow you to provide the same gateway endpoint for different APIs nor different versions of same API. Hence, make sure that you provide an unique gateway endpoint, so that it does not match with any of the existing APIs’ default or custom gateway endpoints.
Before you begin
Ensure that you have:
To define API-specific gateway endpoints
Click APIs in the title navigation bar.
A list of all registered APIs appears.NoteYou can manage the gateway endpoints of an API, directly from the view mode of the API details screen.Click the corresponding API for, which you want to customize the gateway endpoint.
The API details page appears.Click Technical information.
Click +Add custom gateway endpoint and provide the following information.
Field Description Name Specifies the name for the custom gateway endpoint. A gateway endpoint name must be unique within an API. URL Specifies the custom gateway endpoint.
The gateway endpoint name cannot include a space, nor can it include the following special characters: # % ? ‘ “ < \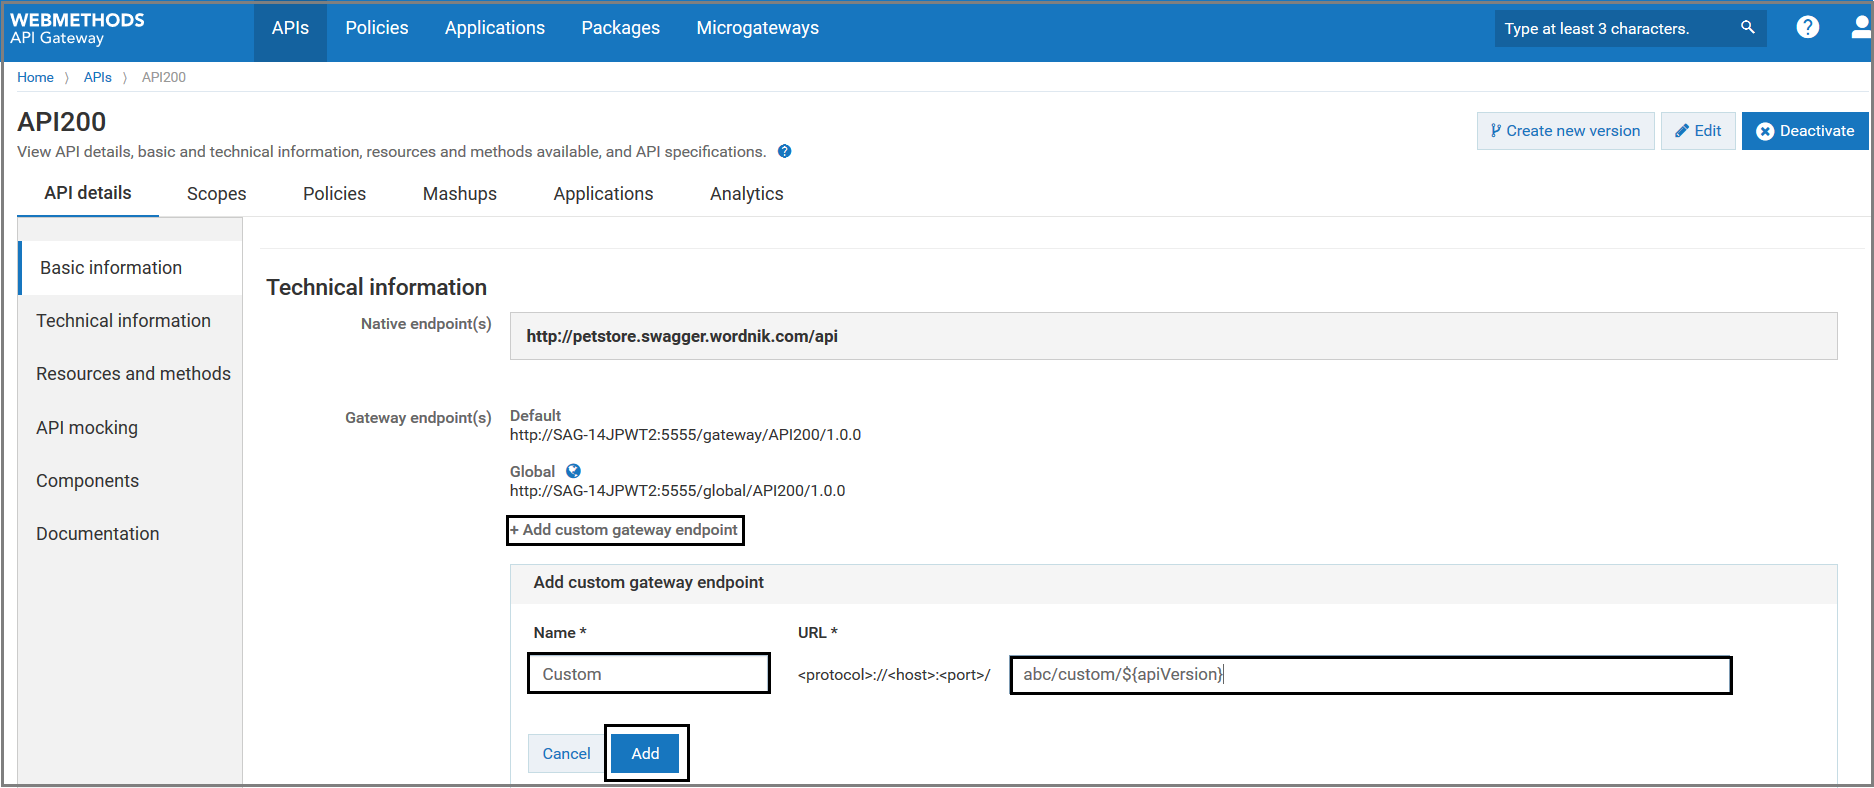
Click Save.
The added custom gateway endpoint appears in the Gateway endpoint(s) field of the API details page. In addition to the default gateway endpoint, you can access the API using this custom gateway endpoint.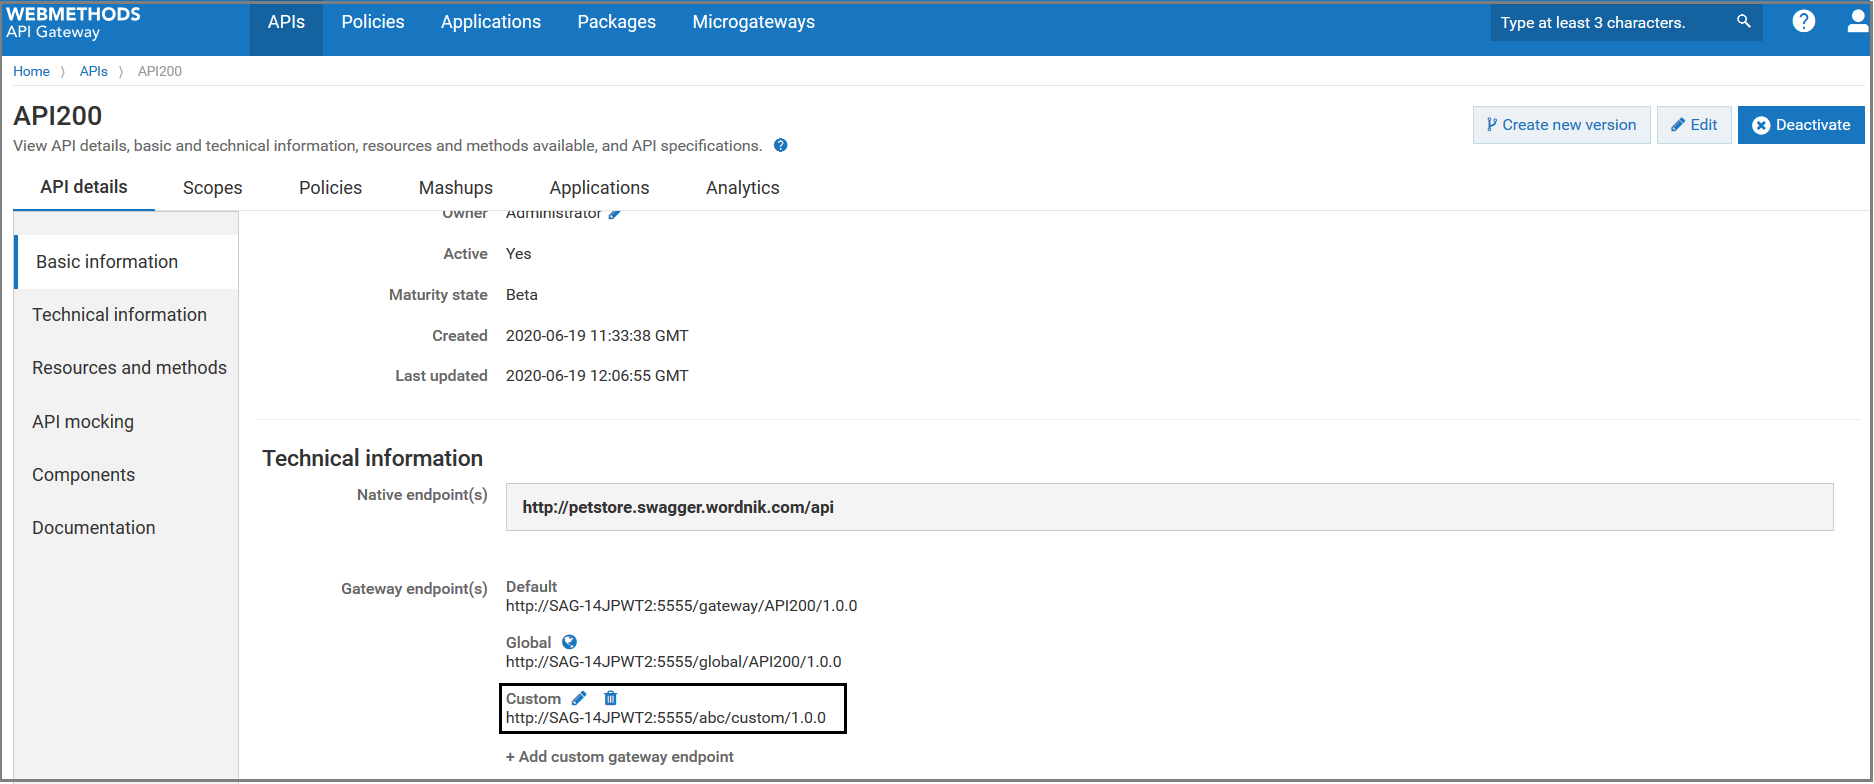 NoteYou can edit or delete the gateway endpoint from API details page either by clicking the
 or
or  icon corresponding to the gateway endpoint that you want to edit or delete.
How do I Define Global Gateway Endpoint?
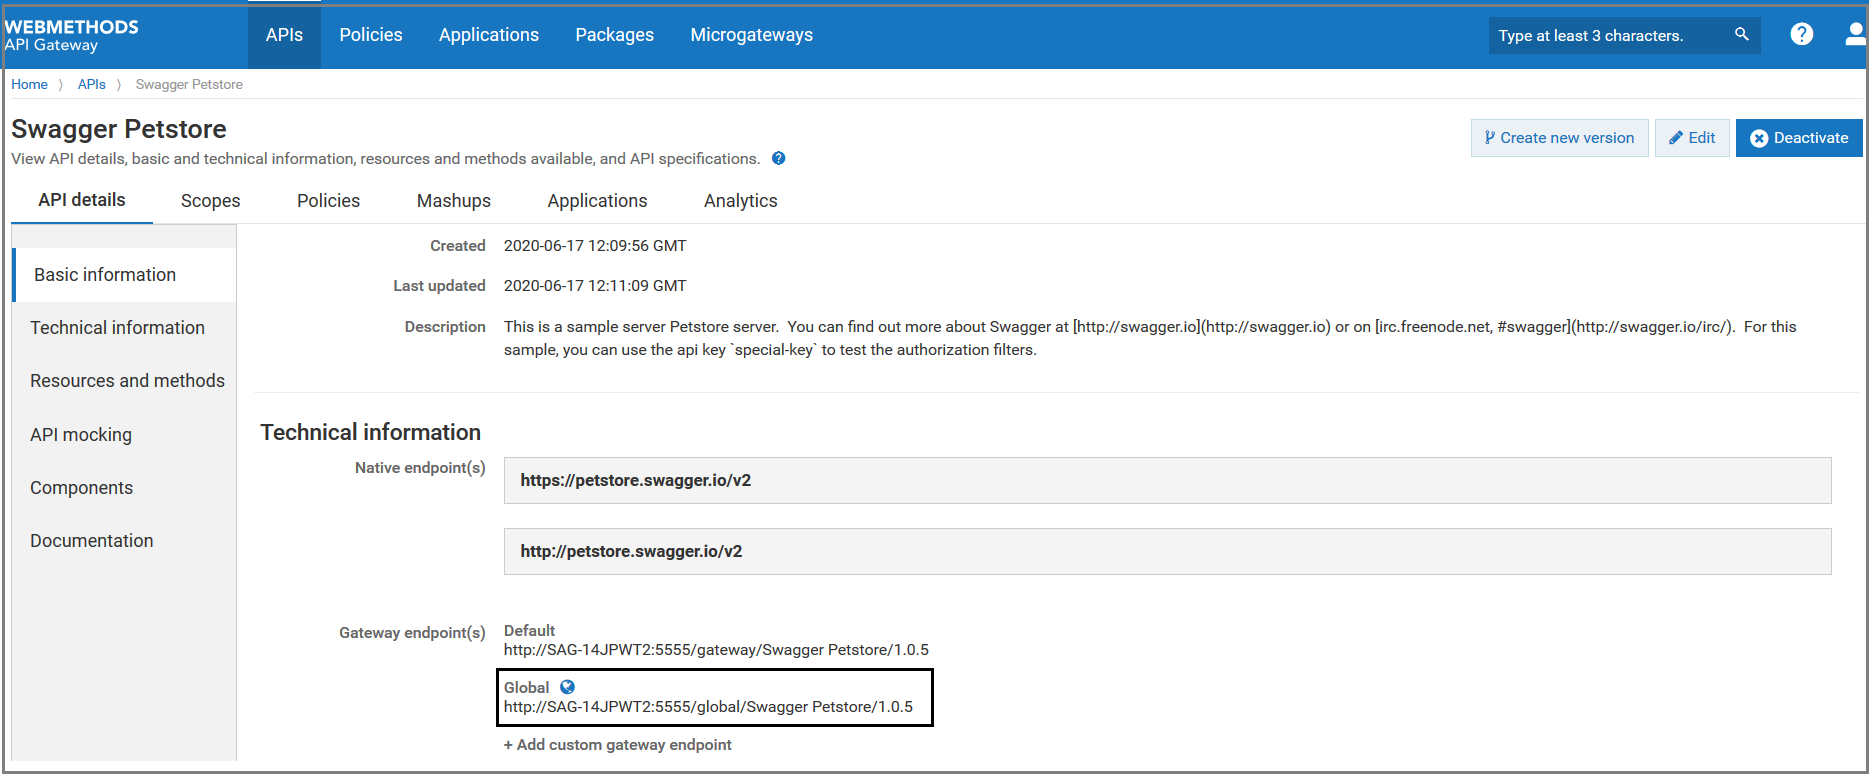
This use case explains how to define global gateway endpoint. The global gateway endpoint creates gateway endpoint template for all APIs. Each API will inherit this global endpoint in addition to the default and custom endpoints of an API.
The use case starts when you want to define global gateway endpoint and ends when you have created the global gateway endpoint.
In order to generate a unique gateway endpoint for each API version, the global gateway endpoint template must use the following variables :
- ${apiName}
- ${apiVersion}
Expand the menu options icon
 , in the title bar, and select Administration.
Select General > URL aliases.
In the Global gateway endpoint section, provide the global gateway endpoint that you want to define across the APIs.
Click Save.

The added global gateway endpoint appears in the Gateway endpoint(s) field of the API details page of all APIs. In addition to the default and API-specific gateway endpoints, you can access your APIs using this global gateway endpoint.
Expand the menu options icon
, in the title bar, and select Administration.Select General > URL aliases.
In the Global gateway endpoint section, update the value specified in the Global gateway endpoint field.
Click Save. The updated global gateway endpoint appears in the Gateway endpoint(s) field of the API details page. All the APIs can be accessed using the updated global gateway endpoint.
NoteYou cannot access the APIs using the older global gateway endpoint.Expand the menu options icon
, in the title bar, and select Administration.Select General > URL aliases.
In the Global gateway endpoint section, delete the value specified in the Global gateway endpoint field.
Click Save. The global gateway endpoint is removed from the Gateway endpoint(s) field of the API details page and you cannot access any of your APIs using global gateway endpoint.
Before you begin
Ensure that you have Manage APIs functional privilege.
To define global gateway endpoint
How do I Edit Global Gateway Endpoint?
This use case explains you how to edit the global gateway endpoint. You can edit the global gateway endpoint, when you want to change or update the existing global gateway endpoint template for all the APIs.
The use case starts when you want to edit global gateway endpoint and ends when you have updated the global gateway endpoint.
To edit global gateway endpoint
How do I Delete Global Gateway Endpoint?
This use case explains you how to delete the global gateway endpoint. You can delete the global gateway endpoint, when you do not want to access any of your APIs using the existing global gateway endpoint template.
The use case starts when you want to delete global gateway endpoint and ends when you have deleted the global gateway endpoint.
To delete global gateway endpoint
Other Gateway Endpoint Usecases
This section lists the impact of Gateway Endpoint on other API Gateway features.
Publishing APIs to Developer Portal
Just like publishing the default gateway endpoints, you can also publish the custom gateway endpoints to the Developer Portal. Published custom gateway endpoints can be accessed through the Developer Portal interface.
Supporting Custom Prefix in CentraSite deployed APIs
When you virtualize a service in CentraSite, you can replace the default prefix of an invocation alias with custom prefix. When you publish such services to API Gateway, the custom prefix that was specified in CentraSite will be supported in API Gateway by automatically adding the custom gateway endpoint to the respective API.
Publishing APIs to Developer Portal
Publishing a Single API to Developer PortalPublishing Multiple APIs to Developer Portal in a Single OperationPublishing an API to Developer Portal sends the SOAP and REST APIs to Developer Portal on which they are exposed for testing and user consumption.
Note
API Gateway does not support publishing GraphQL API to Developer Portal.
The process of publishing an API to Developer Portal is initiated from API Gateway and is carried out on the Developer Portal server.
Doing this involves the following high-level steps:
Step 1: You initiate the publish process by selecting the API to be published, specify the API endpoints to be visible to the consumers, and the Developer Portal communities in which the API is to be published.
Step 2: API Gateway publishes the API to each of the specified Developer Portal communities.
Step 3: During bulk publishing of APIs, the process continues even if API Gateway encounters a failure with Developer Portal.
When publishing an API to the Developer Portal destination, keep the following points in mind:
The Developer Portal destination must be configured in API Gateway.
You must have the Publish to Developer Portal functional privilege.
You cannot publish an API if it is in inactive state. You have to activate the API before publishing it.
Publishing a Single API to Developer Portal
Pre-requisites:
You must have the Publish to Developer Portal functional privilege assigned to perform this task.
To publish an API to Developer Portal
Click APIs in the title navigation bar.
A list of all APIs appears.Click the Publish icon for the API that you want to publish.
Select the API endpoints that need to be visible to the consumers.
At least one endpoint should be selected before publishing the API.Select the API type if you want to publish a REST-enabled SOAP API.
When the REST transformation is enabled for a SOAP API in API Gateway, you can publish the REST-enabled SOAP API to Developer Portal in one of the following ways:Publish as REST: Default. The API is published as a REST API to Developer Portal. The REST resources and methods which correspond to the transformed SOAP operations are also published to Developer Portal.
Publish as SOAP: The API is published as a SOAP API with the SOAP operations to Developer Portal.
Publish as REST and SOAP: When both the options are selected, the API is published as a REST API as well as a SOAP API in Developer Portal and marked as a HYBRID API.
NoteThe Publish as option is available only if the REST transformation is enabled for the SOAP API.Select the communities to which the API needs to be published.
By default, an API is published to the Public Community of Developer Portal.NoteIf an API is already a part of the package published to a community then you cannot remove it from that community.Click Publish.
The API along with the selected endpoints is published to Developer Portal and available for the consumers to consume it.A REST-enabled SOAP API is published to Developer Portal based on the selected API type:
REST API. The API Details view displays the published API as a REST API with the defined REST resources and methods.
SOAP API. The API Details view displays the published API as a SOAP API with the defined SOAP operations.
HYBRID API. The API Details view, by default, displays the published API as a REST API with the REST resources and methods. There is an option SOAP that can be selected to display the published API as a SOAP API with the SOAP operations.
Once an API is published, the Publish icon changes to Republish icon.
You can unpublish an API once it is published by clicking the Unpublish icon.
Publishing Multiple APIs to Developer Portal in a Single Operation
Pre-requisites:
You must have the Publish to Developer Portal functional privilege assigned to perform this task.
You can bulk publish APIs to Developer Portal.
To publish multiple APIs to Developer Portal in a single operation
Click APIs in the title navigation bar.
A list of all APIs appears.Select the APIs that you want to publish.
By default, all the respective API endpoints are internally selected to be visible to the consumers.In the Menu
 icon, click Publish.
Select the communities to which the APIs have to be published.
By default, the APIs are published to the Public Community of Developer Portal.Click Publish.
The APIs along with their associated endpoints are published to Developer Portal and available for the consumers to consume.
If you have selected several APIs where one or more of them are REST-enabled SOAP APIs in API Gateway, then these SOAP APIs are published as REST APIs along with their specific REST endpoints in Developer Portal.Examine the Publish APIs report window and check for any errors that occurred during the publishing process.
The Publish APIs report window displays the following information:Parameter Description Name The name of the published API. Version The version of the published API. Status The status of the publishing process.
The available values are:- Success
- Failure
Description A descriptive information if the API publishing process fails or if a warning occurs. API Gateway writes these results to the Audit logs dashboard, so you can view them later.
Click Download the detailed report here to download the detailed report as an HTML file.
Unpublishing APIs from Developer Portal
Unpublishing a Single API from Developer PortalUnpublishing Multiple APIs from Developer Portal in a Single OperationAfter you publish an API to Developer Portal, the API remains published and available on Developer Portal for consumption until you manually unpublish the API.
You can unpublish a SOAP or REST API from Developer Portal to suspend its interaction, testing, and user consumption in Developer Portal.
Unpublishing a Single API from Developer Portal
Pre-requisites:
You must have the Publish to Developer Portal functional privilege assigned to perform this task.
To unpublish an API from Developer Portal
Click APIs in the title navigation bar.
A list of all APIs appears.Click the Unpublish icon for the API that you want to unpublish.
The Unpublish API dialog box is displayed.Select Developer Portal in Destination.
Click Unpublish.
Select Force unpublish to force the unpublish operation without a confirmation dialog popping up.Click Yes in the confirmation dialog.
The API is unpublished from the Developer Portal destination. The API is no longer available on Developer Portal for testing and user consumption.
Once an API is unpublished, the Republish icon changes to Publish icon.
You can publish an API once it is unpublished by clicking the Publish icon.
Unpublishing Multiple APIs from Developer Portal in a Single Operation
Pre-requisites:
You must have the Publish to Developer Portal functional privilege assigned to perform this task.
You can bulk unpublish APIs from Developer Portal.
To unpublish multiple APIs from Developer Portal in a single operation
Click APIs in the title navigation bar.
A list of all APIs appears.Select the APIs that you want to unpublish.
In the Menu
icon, click Unpublish.Click Unpublish.
Select Force unpublish to force the unpublish operation without a confirmation dialog popping up.Click Yes in the confirmation dialog.
The selected APIs are unpublished from Developer Portal.Examine the Unpublish APIs report window and check for any errors that occurred during the unpublishing process.
The Unpublish APIs report window displays the following information:Parameter Description Name The name of the unpublished API. Status The status of the unpublishing process. The available values are: - Success
- Failure
Description A descriptive information if the API unpublishing process fails or if a warning occurs. API Gateway writes these results to the Audit logs dashboard, so you can view them later.
Click Download the detailed report here to download the detailed report as an HTML file.
Publishing APIs to Service Registries
Publishing a Single API to Service RegistriesPublishing Multiple APIs to Service Registries in a Single OperationPublishing an API to a service registry enables applications to dynamically locate an API Gateway instance that can process that API.
When publishing an API to a service registry, keep the following points in mind:
Before you publish an API to a service registry destination, you must add the service registry to the API Gateway instance from where you want to publish.
You must have the Publish API to service registry functional privilege to publish APIs to a service registry.
You can publish only active APIs. You cannot publish APIs that are in the inactivate state.
An API that is published to a service registry:
Is automatically de-registered from the service registry if the API is deactivated in API Gateway. When the API is activated again, it is automatically registered on the same service registry.
Is automatically de-registered from the service registry if the API Gateway instance from where it was registered goes down. When the API Gateway instance comes up again, the API is registered on the same service registry.
In a cluster of API Gateway nodes, only the API Gateway instance from where you publish an API is added to the service registry. You have to separately publish the API from each API Gateway instance that the service registry can use for an API.
NoteSimilarly, you have to separately unpublish the API from each API Gateway instance from where you want to unpublish the API.If a load balancer has been configured for the API Gateway cluster, APIs from all instances are registered using the load balancer URL.
Publishing a Single API to Service Registries
Pre-requisites:
You must have the Publish API to service registry functional privilege assigned to perform this task.
To publish an API to service registries
Click APIs in the title navigation bar.
The list of APIs defined in API Gateway appears.Click the Publish icon for the API that you want to publish.
Select Service Registries.
The list of service registries that have been added to API Gateway is displayed.Select the service registry to which you want to publish the API.
The list of endpoints in the selected API are displayed.Select the endpoints that you want to publish to the selected service registry.
Repeat the previous two steps to publish the API to additional service registries.
Click Publish.
Once an API is published, the Publish icon changes to Republish icon.
You can unpublish a published API by clicking the Unpublish icon.
Publishing Multiple APIs to Service Registries in a Single Operation
Pre-requisites:
You must have the Publish API to service registry functional privilege assigned to perform this task.
Note
When you publish multiple APIs to one or more service registries in a single operation, all endpoints in the APIs are published. To selectively publish endpoints within an API, you must publish the API separately as a single API.
To publish multiple APIs to service registries in a single operation
Click APIs in the title navigation bar.
The list of APIs defined in API Gateway appears.Select the APIs that you want to publish.
On the
menu, click Publish.Select Service Registries.
The list of service registries that have been added to API Gateway is displayed.Select the service registry to which you want to publish the API and click Publish.
Once an API is published, the Publish icon changes to Republish icon.
You can unpublish a published API by clicking the Unpublish icon.
Unpublishing APIs from a Service Registry
Unpublishing a Single API from Service RegistriesUnpublishing Multiple APIs from Service Registries in a Single OperationYou can manually unpublish APIs that you had previously published on service registries.
You must consider the following points before unpublishing an API from a service registry:
You must have the Publish API to service registry functional privilege to unpublish APIs from a service registry.
There is no option to unpublish individual endpoints. When you manually unpublish an API, all the endpoints in that API are unpublished from the selected service registries.
As both—API publishing to service registries and API unpublishing to service registries—are specific to the current API Gateway instance, APIs are unpublished only for the API Gateway instance from where you unpublish. Therefore, if the same API was published from other instances of API Gateway, it continues to be available on the service registries from those API Gateway instances.
APIs may also get unpublished automatically from service registries, as described below.
Automatic Unpublishing of APIs
API Gateway automatically, but temporarily unpublishes an API in the following situations:
When you deactivate an API after publishing it to a service registry.
NoteWhen you reactivate the API, the temporarily unpublished endpoints are published again to the original service registries.When you disable or delete an API Gateway port that has endpoints that have been published to a service registry.
NoteWhen you enable or add back the port again, the temporarily unpublished endpoints are published again to the original service registries.
Unpublishing a Single API from Service Registries
Pre-requisites:
You must have the Publish API to service registry functional privilege assigned to perform this task.
To unpublish an API from Service Registries
Click APIs in the title navigation bar.
A list of all APIs appears.Click the Unpublish icon for the API that you want to unpublish.
The Unpublish API dialog box is displayed.Select Service registries in Destination.
The list of service registries to which the API was published is displayed.Select the service registries from which you want to unpublish the API.
Select Force unpublish to mark the API as unpublished in API Gateway even if the unpublish fails on the selected service registries.
The API is unpublished from the selected service registries. The API is no longer available on selected service registries for testing and user consumption.
Once an API is unpublished, the Republish icon changes to Publish icon.
Unpublishing Multiple APIs from Service Registries in a Single Operation
Pre-requisites:
You must have the Publish API to service registry functional privilege assigned to perform this task.
You can bulk unpublish APIs from one or more service registries.
To unpublish multiple APIs from service registries in a single operation
Click APIs in the title navigation bar.
A list of all APIs appears.Select the APIs that you want to unpublish.
In the Menu
icon, click Unpublish.Select Service registries in Destination.
The list of service registries to which the APIs were published is displayed.Select the service registries from which you want to unpublish the selected APIs.
Select Force unpublish to mark the APIs as unpublished in API Gateway even if the unpublish fails on the destination service registries.
Examine the Unpublish APIs report window and check for any errors that occurred during the unpublishing process.
The Unpublish APIs report window displays the following information:Parameter Description Name The name of the unpublished API. Status The status of the unpublishing process. The available values are: - Success
- Failure
Description A descriptive information if the API unpublishing process fails or if a warning occurs. API Gateway writes these results to the Audit logs dashboard, so you can view them later.
Click Download the detailed report here to download the detailed report as an HTML file.
The APIs are unpublished from the selected service registries for the current API Gateway instance. Once an API is unpublished, the Republish icon changes to Publish icon.