API Monetization
No subtopics in thissection
Once you create and configure your APIs in API Gateway, you can create a monetization strategy for your APIs.
API Gateway allows you to create packages and plans. As an API provider or API product manager, you can configure the packages and plans as per your organization requirements to monetize your APIs.
The general flow to monetize APIs is as follows:
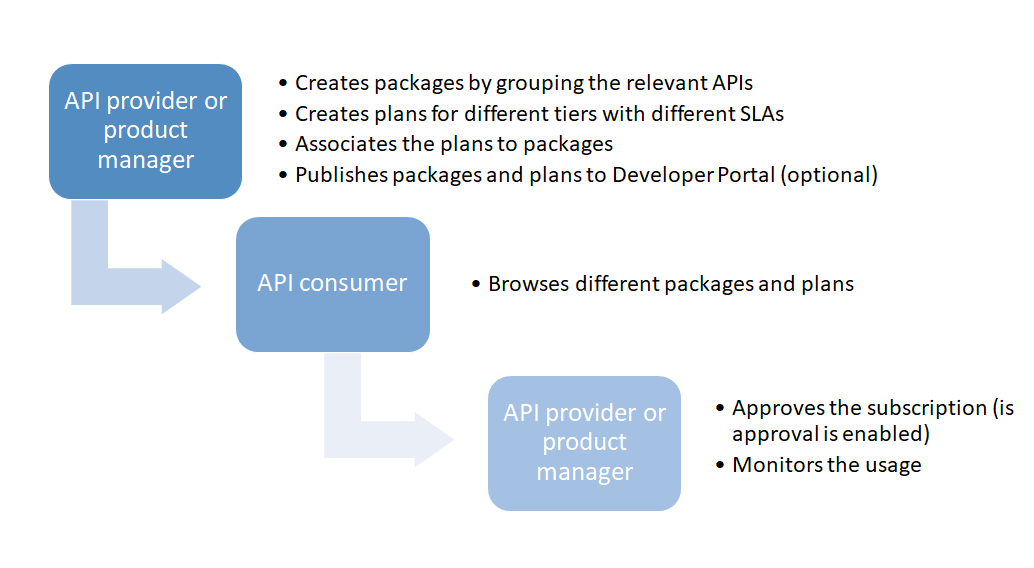
When you add an API to a package for monetization, the API key authentication mechanism is automatically added to the IAM policy at API level. If the API already contains an IAM policy that has two authentication mechanisms with the AND condition, then the condition is switched to OR. This ensures that the monetization is supported when certain consumer applications access the API by just using the API key.
In a typical API Monetization solution, you have the following components:
API Gateway- You can create APIs, packages and plans and host them in API Gateway. In addition you can enforce quota and rate limits and monitor the API usage.
NoteIf you are configuring API consumption rate limits for any purpose other than monitoring, apply the Traffic optimization policy, instead of packaging. For information about the policy, see Traffic Optimization.Billing solution - You can translate the APIs, Packages, and Plans into billable products. You can perform customer information and billing related activities here, based on the usage quota.
Developer Portal - Here consumers find and subscribe to the API packages and plans.
Note
With API Gateway 10.11, you can create a subscription by using the Subscription REST API. For more details about this API, see Subscription Management.
API Gateway does not support billing solution. However, it provides the following extensions, which you can use to integrate with a billing system.
APIs to create, read, update, delete the APIs, packages, plans, and subscriptions.
Extensible model that enables extending meta data for packages, plans, and subscriptions to store additional (billing or consumer related) data.
Provides support to track the changes to assets. You can use the Search API to retrieve the audit data or you can configure the audit data to be pushed to different destinations as and when there is a change. For more details about Search API, see API Gateway Search. For more details about custom destination, see Custom Destination.
API Gateway monitors the usage and transactions. APIs are available to retrieve the monitoring and transactions data or you can configure API Gateway to push this data to different destinations. Alerts can be configured to be sent to different destinations for different metrics. To learn more, see Transaction Data.
API Gateway provides APIs to retrieve the usage information per API or a subscription. You can use this data to determine the quota usage and for billing purposes.
NoteTo view usage metrics, you must either add log invocation policy to each API or use global policy to generate transaction events.
On the API Gateway to Developer Portal integration, API Gateway provides support for publishing APIs, packages and plans to Developer Portal and also provides support for creating subscriptions from the Developer Portal. Additionally, API Gateway pushes API transactions to Developer Portal.
Packages and Plans
No subtopics in thissection
An API Package refers to a logical grouping of multiple APIs from a single API provider. A package can contain one or more APIs and an API can belong to more than one package. You must have the API Gateway ’s manage packages and plans functional privilege assigned to manage API packages and plans.
An API Plan is the contract proposal presented to consumers who are about to subscribe to APIs. Plans are offered as tiered offerings with varying availability guarantees, SLAs or cost structures associated with them. An API package can be associated with multiple plans at a time. This helps the API providers in providing tiered access to their APIs to allow different service levels and pricing plans. Though you can edit or delete a plan that has subscribers, Software AG recommends you not to do so.
Note
Package and plan subscriptions can be done only through Developer Portal.
You can create packages and plans, associate a plan with a package, associate APIs with a package, view the list of packages, package details, and APIs and plans associated with the package in the API Gateway user interface
Creating a Package
No subtopics in thissection
You must have the API Gateway’s Manage packages and plans functional privilege assigned to perform this task.
An API Package refers to a logical grouping of multiple APIs from a single API provider. A package can contain one or more APIs and an API can belong to more than one package. You can subscribe to a package from the Developer Portal or using the Subscription APIs. To learn more about Subscription APIs, see Subscription Management.
You can create an API Package from the Manage packages and plans page.
To create an API Package
Click Packages in the title navigation bar.
Click Create in the Manage packages and plans section.
Select Package.
Click Create.
Provide the following information in the Basic information section:
Field Description Name Name of the API package. Version Version assigned for the API package. Team Team to which the application must be assigned to. You can select more than one team. To remove a team, click the  icon next to the team.
Description A brief description for the API package. Icon An icon that is displayed for the API package.
Click Browse and select the required image to be displayed as the icon for the API package. The icon size should not be more than 100 KB.You can save the API package at this point and add the plans at a later time. The above fields are basic fields, provided by API Gateway.
Click Additional information to create custom fields for your package.
You can use these fields to extend meta data for Packages to store additional (billing/consumer related) data. For example, you can create an additional field called Category, which determines the category of a package. You can add drop-down values like gold, silver, and bronze. So you can now categorize packages as gold package, silver package, and so on.

Click Add field to create a new custom field.
(Optional) Click Add to add multiple custom fields.
Provide the following information:
Field Description Name Name of the custom field. Field Value Value for the custom field. Description A brief description for the custom field. Click Save.
Click Plans in the left navigation pane.
Select the plans that are to be associated with the API package.
You can save the API package at this point and add APIs at a later time.
Click Continue to add APIs.
Alternatively, click APIs in the left navigation pane.
Type characters in the search box and click the search icon to search for the required APIs.
A list of APIs that contain the characters specified in the search box appears.
Select the required APIs to be associated with the Package and click + to add them.
You can delete the APIs from the package by clicking the Delete icon adjacent to the API in the API list.
Click Save.
Creating a Plan
No subtopics in thissection
You must have the API Gateway’s manage packages and plans functional privilege assigned to perform this task.
An API Plan is the contract proposal presented to consumers who are about to subscribe to APIs. Plans are offered as tiered offerings with varying availability guarantees, SLAs or cost structures associated with them. An API package can be associated with multiple plans at a time. This helps the API providers in providing tiered access to their APIs to allow different service levels and pricing plans. Though you can edit or delete a plan that has subscribers, Software AG recommends you not to do so.
You can create packages and plans, associate a plan with a package, associate APIs with a package, view the list of packages, package details, and APIs and plans associated with the package in the API Gateway user interface.
You can create a plan from the Manage packages and plans page.
To create a plan
Click Packages in the title navigation bar.
Click Create in the Manage packages and plans section.
Select Plan.
Click Create.
Provide the following information in the Basic information section:
Field Description Name Name of the plan. Version Version assigned for the plan. Team Team to which the application must be assigned to. You can select more than one team. To remove a team, click the icon next to the team.Description A brief description for the plan. Icon An icon that is displayed for the plan.
Click Browse and select the required image to be displayed as the icon for the plan. The icon size should not be more than 100 KB.You can save the API package at this point and add the plans at a later time. The above fields are basic fields, provided by API Gateway. You can add additional information in the Additional information section.
Click Additional information to create custom fields for your plan.
You can use these fields to extend meta data for Packages to store additional (billing/consumer related) data. For example, you can have a field called plan type. This field can have drop-down values called prepaid and postpaid. You can categorize all the plans as either prepaid or postpaid plans.

Click Add field to create a new custom field.
(Optional) Click Add to add multiple custom fields.
Provide the following information:
Field Description Name Name of the custom field. Field Value Value for the custom field. Description A brief description for the custom field. Click Save.
Click Pricing in the left navigation pane.
Provide the following information in the Pricing section:
Field Description Cost Specifies the cost for the plan. Terms Specifies the terms of conditions for the pricing. License Specifies the license information. You can save the plan at this point and provide traffic optimization configurations at a later time.
Click Continue to Quality of Service.
Alternatively, click Rate limits in the left navigation pane.
Click + Add Rule.
Provide the following information in the Create rule section:
Field Description Maximum request count Specifies the maximum number of requests handled.
Value provided should be an integer.Interval Specifies the value for the interval for which the maximum request count is handled.
Value provided should be an integer.Interval unit Specifies the unit of measurement of the time interval.
For example:- Minutes
- Hours
- Days
- Calendar Week.The plan starts on the first day of the week and ends on the last ay of the week. By default, the start day of the week is set to Monday.
For example:- If you subscribe to a package on a Wednesday and Interval is set to 1, the validity of the plan ends on Sunday, that is, 5 days.
- If you subscribe to a package on a Wednesday and Interval is set to 2, the validity of the plan still ends on Sunday, but the validity of the plan is two calendar weeks, that is 12 days.
You can change the start day of the week using the extended setting startDayOfTheWeek in the Administration> General > Extended settings section. This extended setting needs a restart of the API Gateway server for the changes to take effect. Please contact Software AG Support team to the restart the API Gateway server.- Calendar Month. Starts on the first day of the month and ends on the last day of the month.
For example:- If you subscribe to a package in the month of August and Interval is set to 1, the validity of the plan ends on the last day of August.
- If you subscribe to a package in the month of August and Interval is set to 2, the validity of the plan still ends on Sunday, but the validity of the plan ends in two calendar months, that is on the last day of September.
Alert frequency Specifies how frequently to send alerts to API Gateway destination when the Rate limits condition is violated.
Select one of the options:- Only Once. Triggers an alert only the first time one of the specified conditions is violated.
- Every Time. Triggers an alert every time one of the specified conditions is violated.
Violation message Specifies the text that displays when the rule is violated. Click Ok.
This creates the rule and displays it in the Configured rules table. Click + Add rule to add more rules. You can edit or delete the rules by clicking the Edit and the Delete icons respectively.
At a later time, when this plan is applied to an API through a package, the rules that you configured for this plan are enforced on the applied API.
Click Quota and provide the following information in the Quota settings section.
Field Description Maximum request quota Specifies the maximum number of requests handled.
Value provided should be an integer.Block on breach When selected it specifies that the access to the API is blocked when there is a rule violation.
By default, this option is not selected.Interval Specifies the value for the interval for which the maximum request quota is handled.
Value provided should be an integer.Interval unit Specifies the unit of measurement of the time interval.
For example:- Minutes
- Hours
- Days
- Calendar Week.The plan starts on the first day of the week and ends on the last ay of the week. By default, the start day of the week is set to Monday.
For example:- If you subscribe to a package on a Wednesday and Interval is set to 1, the validity of the plan ends on Sunday, that is, 5 days.
- If you subscribe to a package on a Wednesday and Interval is set to 2, the validity of the plan still ends on Sunday, but the validity of the plan is two calendar weeks, that is 12 days.
You can change the start day of the week using the extended setting startDayOfTheWeek in the Administration> General > Extended settings section. This extended setting needs a restart of the API Gateway server for the changes to take effect. Please contact Software AG Support team to the restart the API Gateway server.- Calendar Month. Starts on the first day of the month and ends on the last day of the month.
For example:- If you subscribe to a package in the month of August and Interval is set to 1, the validity of the plan ends on the last day of August.
- If you subscribe to a package in the month of August and Interval is set to 2, the validity of the plan still ends on Sunday, but the validity of the plan ends in two calendar months, that is on the last day of September.
Alert frequency Specifies how frequently to send alerts to API Gateway destination when the Quota condition is violated.
Select one of the options:- Only Once. Triggers an alert only the first time one of the specified conditions is violated.
- Every Time. Triggers an alert every time one of the specified conditions is violated.
Violation message Specifies the text that displays when the policy is violated. Notification settings Specifies whether notifications are to be sent on rule violations.
Enable the toggle button to enable the notifications and provide the following information:- Notify after (in %): Provide a value which is a number. A notification is sent to the configured email IDs once the total request count reaches the % value as provided in the maximum quota value.
- Violation message: Provide the content of the mail that is sent to the configured email Ids once the quota request count reaches the limit specified.
- Email Ids: Provide email Id of the recipient to which notifications have to be sent of notification once the quota request count reaches the limit specified. Click
 . You can add multiple recipients. Note: The SMTP settings under Administrator settings > Destinations has to be provided for email to be sent.
 - Send Digital Events
- Custom destination. Select custom destinations to which the notification must be sent. You can select multiple custom destinations. The custom destinations displayed in this field are populated from the custom destinations, configured in the Administration > Destinations > Custom destinations page.
Important: Incase of a server crash or restart, the quota status is determined by the value set in the pgmen.quotaSurvival.addLostIntervals property and works as follows:
- If the property is set to false, remaining time in quota is retained even after a restart or crash. For example, If quota is of 60 minutes and 7 minutes was used before the server crash or restart, then quota remaining time of 53 minutes is retained after server crash or restart, if the property is set to false.
- If the property is set to true, and if the sum of time between server shutdown and restart and quota elapsed time does not exceed the interval of the subscription, the quota usage value is retained. In this case the remaining quota time is calculated as {current interval cycle - (elapsed time + (start time - shutdown time))}. For example, if the current subscription duration is 1 month and if the server starts on the 10th day of the cycle and restarts on the 12th day of the cycle, the remaining quota time is calculated as {30 - (10 + (12-10))} = 18 days.
- If the property is set to true, and if the sum of time between server shutdown and restart and quota elapsed time exceeds the interval of the subscription, a new interval is created. Quota usage value is not retained in this case.
Click Save.
The plan is created and listed in the list of plans.
Activating a Package
No subtopics in thissection
You must have the API Gateway’s Activate/deactivate packages functional privilege assigned to perform this task.
You can activate a package so that a consumer can try out APIs in the package with the package level token. When the consumer requests a token from Developer Portal, the request is processed in API Gateway and a token is sent back to Developer Portal. This token is visible to the consumer on the Access Token page. The consumer can test the APIs in the package with this token on the API Try out page.
To activate a package
Click Packages in the title navigation bar.
A list of all packages appears with their status as Inactive or Active.Click the activation toggle button for the package.
The package is now activated.
Alternatively you can click Activate on the packages details page to activate the package.
Publishing a Package
No subtopics in thissection
You must have the API Gateway’s Publish to Developer Portal functional privilege assigned to perform this task.
You can publish a package to the configured destination, for example Developer Portal. Once the package is published, the APIs associated with the package are available to consumers. The package level token is applicable to all APIs associated with the package. The consumers do not have to request an access token for individual APIs to consume them.
Ensure the following before publishing a package:
A destination is configured.
The package is active.
The package has at least one plan and API associated with it.
The APIs associated with the package is published to the destination.
To publish a package
Click Packages in the title navigation bar.
A list of all packages appears.Click the Publish icon for the package that has to be published.
Select the communities to which the package needs to be published.
By default, a package is published to the Public Community of Developer Portal.NoteThe list of communities displayed are those that are common to which the APIs associated with this package are already published to.Click Publish.
A success message is displayed when the package is successfully published. The package is now published to the destination, for example Developer Portal, that is configured and is available on Developer Portal to consumers.
You can unpublish a package once it is published by clicking the Unpublish icon for the required package.
Viewing List of Packages and Package Details
No subtopics in thissection
You can view the list of packages in the Packages section of the Manage packages and plans page from where you can create, delete, and select a package to view its details.
To view the package list and package details
Click Packages in the title navigation bar.
A list of all packages appears. You can perform various operations like activating a package, publishing or unpublishing a package, and deleting a package.Select a package.
The basic information, and the associated plans and APIs for the selected package appears in the package details page.
Viewing List of Plans and Plan Details
No subtopics in thissection
You can view the list of plans in the Plans section of the Manage packages and plans page from where you can create, delete, and select a plan to view its details.
To view the plan list and plan details
Click Packages in the title navigation bar.
Click Plans.
A list of all plans appears. You can delete a plan by clicking the Delete icon for the respective plan.Select a plan.
The basic information, the pricing, and quality of service associated with the selected plan appears in the plan details page.
Viewing a List of Subscriptions
No subtopics in thissection
In the Manage packages and plans page, the Subscriptions tab lists the applications and the associated package name, plan, used quota, start time, end time, and the remaining period of the
subscription. The Subscriptions tab lists only the packages and plans that are subscribed from Developer Portal.
You can associate multiple packages and plans with a single subscription.
In the Subscription tab, you can also search for the subscriptions by name, package name, and plan name.
Modifying a Package
No subtopics in thissection
You must have the API Gateway’s Manage packages and plans functional privilege assigned to perform this task.
You can modify the basic information, and include or exclude plans and APIs of the package. You can modify a package only if it is in the inactive state.
To modify a package
Click Packages in the title navigation bar.
A list of all packages appears.Select a package.
The basic information, and the associated plans and APIs for the selected package appear on the package details page.Click Edit.
The package details appear.NoteThe Edit option is available only if the package is in the inactive state.You can modify the information related to the package, as required, in the Basic information section.
Click Plans in case you want to modify the plans associated with the package.
A list of plans associated with the package and list of available plans appears.You can do the following:
Add more plans to the package by selecting plans listed in the available plans list.
Delete the plans from the package by clearing the check box of the plan associated with the package.
Click APIs in case you want to modify the APIs associated with the package.
A list of APIs associated with the package and a search box to search for APIs that need to be added to the package appear.You can do one of the following:
Add more APIs to the package. You can search for APIs using the search box and click + adjacent to the API to add it.
Delete the APIs from the package by clicking the Delete icon adjacent to the API in the APIs list.
Click Save.
This saves the modified package.
Modifying a Plan
No subtopics in thissection
You must have the API Gateway’s Manage packages and plans functional privilege assigned to perform this task.
You can modify a plan to change the pricing details and Quality of service associated with the plan. You can modify a plan when the package associated with the plan is active or inactive. If you modify a plan when it is in the active state, the following points are applicable:
- The quota usage data is not reset for the existing customers. However, you can explicitly reset or modify the quota usage. If you modify the quota usage, a new cycle is initiated for all the subscribers.
- If you modify the Rate limits or pricing, it does not impact the quota usage.
Click Packages in the title navigation bar.
A list of all packages appears.Click Plans.
A list of all plans appears.Select a plan.
The plan details page displays the basic information, pricing details, and the quality of service associated with the plan.Click Edit.
The plan details appear with fields that you can edit.You can modify the information related to the plan, as required, in the Basic information section.
Click Pricing in case you want to modify the pricing model associated with the plan.
Modify the pricing plan as required.
Click Rate limits if you want to modify the rules associated with the plan.
A list of rules associated with the plan appears.You can do one of the following:
Add more rules to the plan.
Click Add rule to create and add rules to the plan.Modify the already configured rule.
Click the Edit icon for the rule listed in the Configured rules list and modify the details as required.Delete rules from the plan.
Click the Delete icon adjacent to the rule in the Configured rules list.
Click Quota settings if you want to modify the quota settings for the plan.
Modify the quota settings as required.
Click Save.
This saves the modified plan.
To modify a plan
Deleting a Package
No subtopics in thissection
You must have the API Gateway’s Manage packages and plans functional privilege assigned to perform this task.
You can delete a package from the Package list that appears on the Manage packages and plans page. You can not delete a package if it is in the active state. You have to deactivate it before deleting it.
To delete a package
Click Packages in the title navigation bar.
A list of all packages appears.Click the Delete icon for the package that has to be deleted.
Click Yes in the confirmation dialog.
Deleting a Plan
No subtopics in thissection
You must have the API Gateway’s Manage packages and plans functional privilege assigned to perform this task.
You can delete a plan from the Plans list that appears in the Plans section of the Manage packages and plans page. You can delete a plan only if it is not associated with a package. You have to disassociate the plan with the package before deleting it.
To delete a plan
Click Packages in the title navigation bar.
Click Plans.
A list of plans appears.
Click the Delete icon for the plan that has to be deleted.
Click Yes in the confirmation dialog.